This one-piece chunky chenille throw uses five broad color sections and a simple raised texture made from single crochet, half double crochet, and front-post half double crochet. The instructions below are an independently specified HookElla pattern; gauge, dimensions, and yarn use are planning estimates, not sample-tested results.
About this pattern
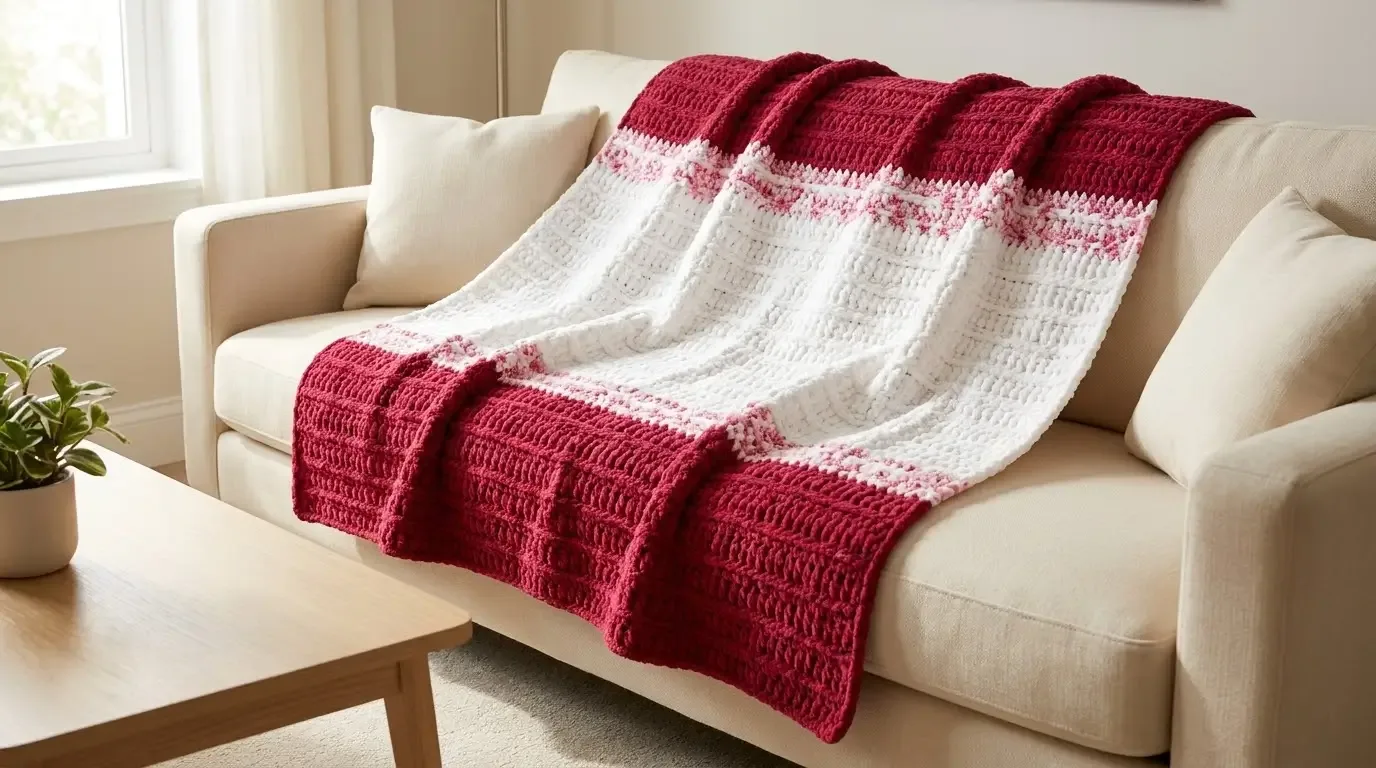
The Raspberry & Cream Chunky Crochet Blanket is a soft rectangular throw with deep raspberry ends, narrow strawberry-speckled transition bands, and a broad cream center. Its raised texture is worked across a single rectangle in turned rows, so the five color sections remain joined without sewing panels together.
This is a complete, independently specified HookElla pattern using standard crochet stitches. The pictured HookElla blanket guides the colors, proportion, and drape. The stitch instructions below are not copied or lightly rewritten from the research source. No HookElla sample has been crocheted or measured; treat the size, gauge, and yarn amounts as estimates until you make a swatch.
Materials
- Category 6 super-bulky chenille yarn: approximately 1,800–2,000 yd (1,646–1,829 m) total estimated. A starting shopping plan is about 800–900 yd raspberry, 350–450 yd strawberry-speckled white/pink, and 600–700 yd soft white. The referenced article suggests roughly 1,980 yd for its throw planning example; HookElla has not measured consumption for this different stitch sequence.
- 10 mm (N/P) crochet hook, or the size that produces a soft, stable swatch at the target gauge.
- Tapestry needle with an eye large enough for chenille, scissors, measuring tape, and a row counter or removable markers.
Choose a rounded chenille strand in the three pictured shades. The exact yarn brand and dye names are not specified for this HookElla version. Buy enough of each shade from the same dye lot when possible.
Finished size and gauge
One throw is planned at approximately 48.6 × 59.4 in (123 × 151 cm) before washing or blocking. Those dimensions are calculated from 85 stitches across, 104 rows long, and a provisional gauge of 7 stitches × 7 rows = 4 × 4 in (10 × 10 cm) in the established two-row texture. They are not physical measurements, and chenille can relax or compress differently by brand and tension.
Make a gauge swatch
With the 10 mm hook, ch 26 for 25 working stitches. Row 1: sc in the second chain and each chain across (25 sc). Ch 2, turn. Row 2: hdc across (25). Ch 1, turn. Row 3: work the Texture Row described below over the 25 stitches. Ch 2, turn. Row 4: hdc across. Continue alternating Texture Rows and hdc return rows until the swatch has at least 14 rows. Let it rest flat without stretching, then measure across the center and vertically through the two-row repeat.
Aim for 7 stitches and 7 rows over 4 in. If your swatch is wider or taller, change hook size and swatch again. This is a design target, not a verified HookElla gauge. The Yarnivo Gauge Calculator can convert measurements from your swatch into a projection; it cannot confirm drape or physical fit. The Blanket Starting-Chain Calculator may help explore width changes, but keep this pattern’s three-stitch repeat plus one edge stitch intact.
Abbreviations (US terms)
- ch — chain
- sc — single crochet
- hdc — half double crochet
- FPhdc — front-post half double crochet
- st(s) — stitch(es)
- RS / WS — right side / wrong side
- rep — repeat
- turning ch — chain at the row edge; it does not count as a stitch
Special stitches and construction notes
Hdc: Yarn over, insert the hook in the indicated stitch, yarn over and pull up a loop, yarn over and draw through all three loops.
FPhdc: Yarn over, insert the hook from front to back and back to front around the vertical post of the indicated stitch, yarn over and pull up a loop around the post, yarn over and draw through all three loops. This makes one raised stitch and counts as one stitch in the row. It replaces the top-loop stitch at that position; do not also work into the same stitch top.
Texture Row: The repeat uses three stitch positions: sc in the first stitch top, hdc in the next stitch top, then FPhdc around the post of the third stitch. Repeat the three-position group across the row, then finish with one sc in the final stitch. For 85 stitches, work the group 28 times (84 positions) plus the final sc (1 position), totaling 85 stitches. The front-post stitch is placed around an hdc post from the preceding hdc return row.
The blanket is worked flat. Turn after each row. The turning chain is for height only and never counts as a stitch. Work into the first actual stitch after turning; keep the first and last stitches visible and count all 85 positions. Do not add a border.
Pattern instructions
Foundation
With Raspberry, ch 86 loosely. The chain closest to the hook is not worked. This leaves 85 working stitches.
Row sequence and color schedule
- Row 1 (Raspberry): Sc in the second ch from the hook and in each remaining chain across. 85 sts. Ch 2, turn.
- Row 2 (Raspberry): Hdc in the first stitch and in each stitch across. Do not work into the turning chain. 85 sts. Ch 1, turn.
- Row 3 (Raspberry, Texture Row): Work the three-stitch Texture Row repeat 28 times, then sc in the final stitch. 85 sts. (29 sc, 28 hdc, 28 FPhdc.) Ch 2, turn.
- Row 4 (Raspberry): Hdc in each stitch across. 85 sts. Ch 1, turn.
- Row 5 (Texture Row) and every odd-numbered row through Row 103: Repeat Row 3’s Texture Row sequence. Work 28 three-stitch groups and sc in the last stitch. 85 sts. After each texture row, ch 2 and turn.
- Row 6 (hdc return) and every even-numbered row through Row 104: Hdc in each stitch across. 85 sts. After each return row, ch 1 and turn, except after Row 104. Row 104 is the final row; fasten off with a weaving tail.
The odd/even schedule is paired with the color table below. Rows 27, 35, 71, and 79 are Texture Rows in their new colors; each color boundary falls between complete two-row repeats.
Color changes and row-count check
The five sections are worked in this order and exact row count:
| Section | Rows | Color | Rows in section |
|---|---|---|---|
| 1 | 1–26 | Raspberry | 26 |
| 2 | 27–34 | Strawberry-speckled white/pink | 8 |
| 3 | 35–70 | Soft white | 36 |
| 4 | 71–78 | Strawberry-speckled white/pink | 8 |
| 5 | 79–104 | Raspberry | 26 |
At each change, finish the final stitch of the old color with the new color on its last pull-through, then turn and begin the next row in the new shade. For a final hdc, draw through all three loops with the incoming color. Leave a tail of at least 6 in (15 cm) in each shade and weave the ends along the wrong side of the matching color band. Do not carry a color across the full blanket width.
Counting check: 26 + 8 + 36 + 8 + 26 = 104 rows. All rows contain 85 stitches. Rows 3–104 form 51 complete two-row pairs: 51 Texture Rows and 51 hdc return rows; Rows 1–2 establish the fabric. Every Texture Row is 28 three-stitch groups plus one edge sc: 28 × 3 + 1 = 85 stitches.
Assembly instructions
This throw is one continuous rectangle, so no panels are joined and no border is added. After the final Raspberry return row, weave each yarn tail through several stitches on the wrong side, following the row direction and staying within the matching color area. Avoid pulling the chenille so tightly that the fabric puckers. Check both long edges for skipped or extra stitches and gently square the blanket by hand.
Finishing and care
Weave each tail through several stitches on the wrong side, following the row direction and staying within the corresponding color area. Avoid pulling the chenille so tightly that the fabric puckers. Trim tails only after they are secure. Check both long edges for skipped or extra stitches and gently square the blanket by hand.
Follow the yarn label for laundering and drying. If the label permits, wash gently and dry flat; do not apply direct heat or aggressively stretch plush chenille. No sewn seams, separate panels, fringe, or border are part of this pattern.
Fit adjustments and troubleshooting
- The blanket is narrower or wider than planned: Recheck stitch gauge over the center of the swatch. The 85-stitch width projects to 48.6 in at 7 stitches per 4 in. If changing width, use a stitch total of 3 × a whole number + 1 so the Texture Row ends with its single crochet edge. Recalculate the chain as one more than the desired stitch count.
- The blanket is shorter or longer than planned: At 7 rows per 4 in, 104 rows project to 59.4 in. If you need another length, add or remove complete two-row texture pairs, and adjust the section counts symmetrically so the two raspberry ends and two speckled bands stay balanced. The published size remains 104 rows.
- The sides look uneven: Count 85 stitches on every row and work the first actual stitch after the turning chain. Mark the first and last stitch if chenille hides the edge loops.
- The raised texture is difficult to see: Confirm each FPhdc wraps around the post of the third position in its three-stitch group, and work it only on the Texture Rows. The return row is ordinary hdc across.
- A hole appears beside a front-post stitch: The FPhdc replaces the top-loop stitch at that position. Do not work a second stitch into that same underlying position.
- The fabric feels stiff: Try a larger hook and make another swatch. A denser chenille fabric may also make the throw heavier and alter its drape.
- The color joins look bulky: Keep the join tails on the wrong side, weave them in the same color area, and avoid carrying inactive yarn across a row.
- The projected dimensions differ from your work: The 48.6 × 59.4 in figures are gauge calculations only. Measure your own swatch and the blanket as you go; chenille tension and care can change dimensions.
Frequently asked questions
Is this a continuous blanket or are sections joined?
It is one rectangle worked back and forth. Change shades at the row edges; do not cut and sew the five sections together.
Why does the texture row use a front-post stitch?
The FPhdc raises one selected stitch over the fabric surface. Alternating it with sc and hdc creates small relief points against the hdc return rows.
How do I keep the raspberry ends the same size?
Work 26 raspberry rows at both ends. The full color schedule is listed by row number above; the total is 104 rows.
Are the gauge and yarn amounts confirmed?
No. They are planning targets based on the dimensions and stitch count, not measured HookElla sample results. Check a swatch in the exact chenille yarn and hook you plan to use.
Is the construction infographic the full pattern?
No. It shows selected visual milestones only. Follow the complete written row sequence and counts above.
Inspiration and source credit
This independently written HookElla pattern was informed by the color-blocked plush-throw concept in the Raspberry & Cream Chunky Crochet Blanket article by Yarnimals Crochet. That article identifies Pamela Kuloba’s Rosy Chunky Blanket as an earlier inspiration. No source instructions, charts, or photographs are reproduced here. The HookElla photos on this page were supplied for this project.
Helpful questions
Is this the same written pattern as the Yarnimals Crochet blanket?
No. This HookElla version has its own stitch placement: groups of single crochet, half double crochet, and front-post half double crochet followed by a half-double-crochet return row. The Yarnimals article is credited as a research reference, and its instructions and photos are not republished.
Has the 48 × 60-inch size been physically tested?
No. The dimensions and yarn quantity are calculated planning estimates from the stated 7-stitch and 7-row gauge target. Make and measure a swatch in your own chenille before relying on the projection.
How many rows are in each color section?
The five sections contain 26 raspberry rows, 8 strawberry-speckled rows, 36 soft-white rows, 8 strawberry-speckled rows, and 26 raspberry rows, for 104 rows total.
Can I resize the blanket?
You can adjust the foundation width and row total after swatching, but keep the stitch-pattern width at three-stitch repeats plus one edge stitch. Change the row total in complete two-row texture pairs and preserve the five-section color proportions. The given 85-stitch, 104-row version is the only fully written size here.
Does the blanket need a border?
No added border is included. The pattern finishes with the last raspberry row, then the yarn ends are woven in and the fabric is gently squared.
Inspiration credit
This is an independently written HookElla pattern. The Yarnimals Crochet article is credited as a research and visual reference; that article identifies Pamela Kuloba's Rosy Chunky Blanket as an earlier inspiration. No instructions, charts, or photographs from either source are reproduced. Raspberry & Cream Chunky Crochet Blanket article by Yarnimals Crochet.