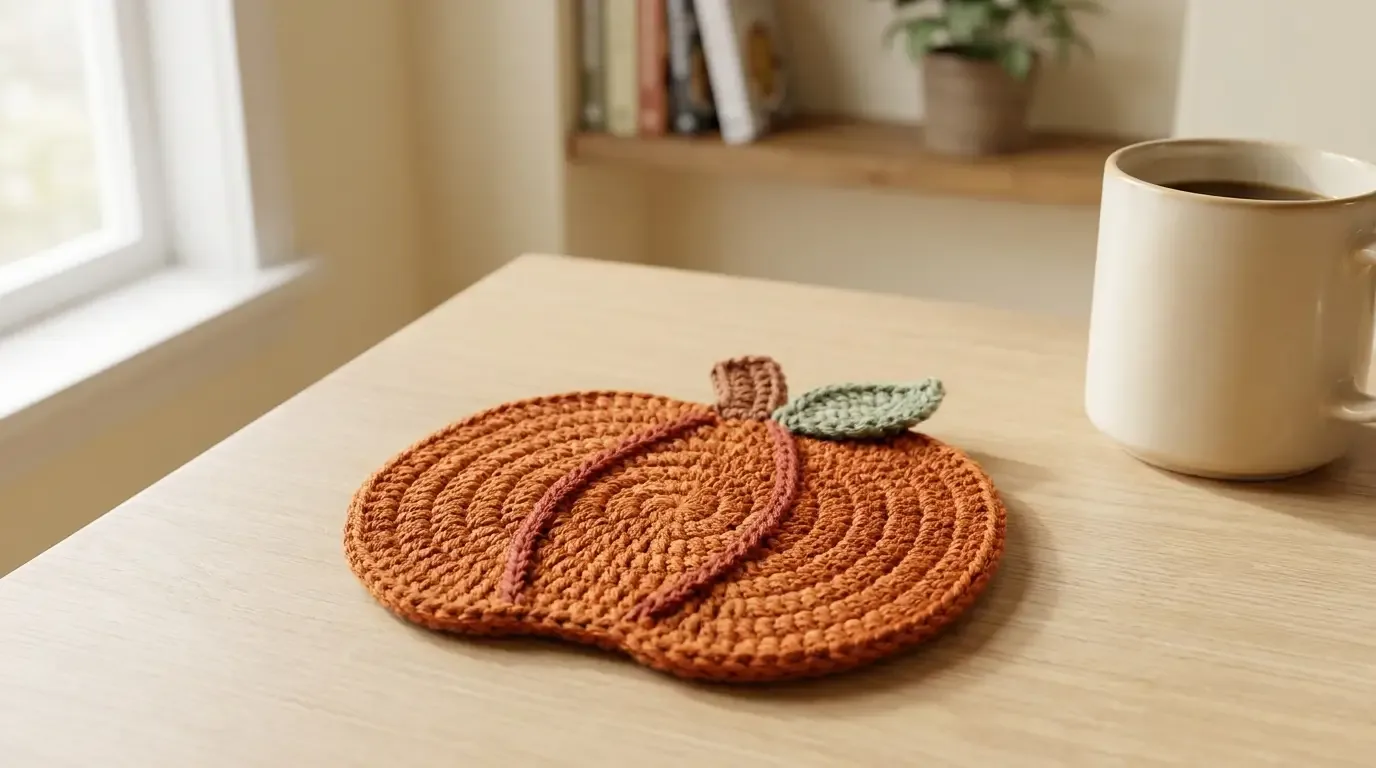
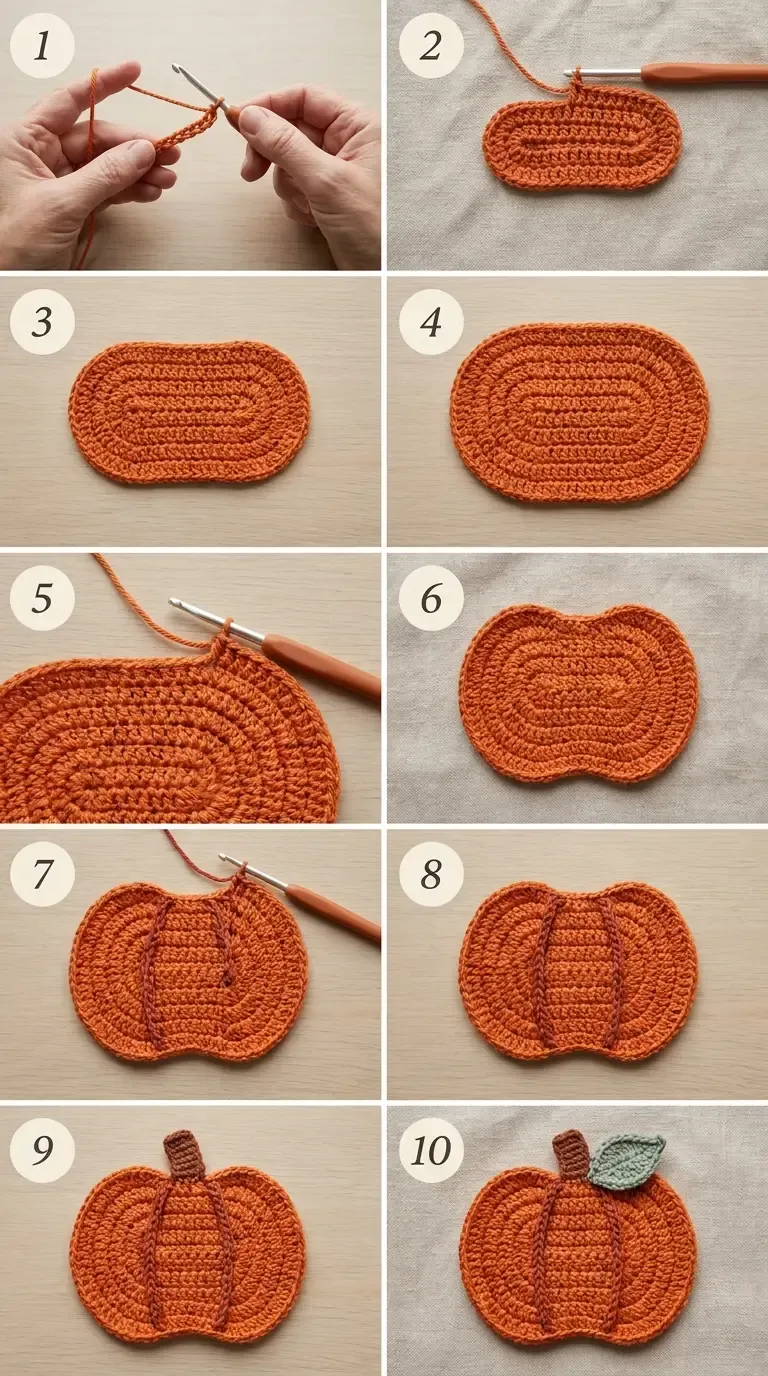
The Harvest Rib Pumpkin Coaster is a flat cotton coaster with a softly lobed pumpkin outline, two raised surface-crochet ribs, and a small stem and leaf. It is designed for mugs and seasonal display, not hot cookware.
About this original pumpkin coaster
This small seasonal make uses burnt-orange cotton for a flat oval center, with a five-lobed edge and two narrow deep-terracotta lines worked directly onto the front. A short cinnamon-brown stem and one sage-green leaf sit at the top. The coaster is not stuffed and has no face, extra leaves, or vines.
These instructions use US terms and a 4.5 mm hook. The pattern is independently engineered for HookElla and is not a rewritten version of another designer’s rows.
Materials
- #4 worsted-weight cotton yarn: approximately 35–45 yards total, estimated. Plan about 28–36 yd burnt orange, 2–4 yd deep terracotta, 1–2 yd cinnamon brown, and 2–3 yd sage green. These amounts are planning estimates, not measured usage.
- 4.5 mm hook.
- Tapestry needle, scissors, four stitch markers, and measuring tape.
Cotton gives the coaster a stable, absorbent surface. Keep the tension even but not stiff enough to curl the oval. If the foundation-chain edge is tight, use a larger hook for the chain only.
Finished size and gauge
Target size is approximately 5–5.5 inches wide by 4.5–5 inches tall, after the ribbing, edge shaping, and gentle blocking. These dimensions are estimates and have not been physically tested.
Use a 4.5 mm hook and aim for 18 hdc and 12 rounds = 4 inches (10 cm) in joined-round cotton fabric. This is an independently selected target gauge, not a measured sample. Swatch in the round and measure the fabric relaxed. The oval’s foundation chain sets its long axis; its six hdc rounds create the oval body, and the scalloped edging extends the outline slightly. The calculated 60-stitch outer oval circumference at target stitch gauge is about 13⅓ inches (60 ÷ 18 × 4); the actual shape will depend on how the fabric curves around the ends.
Abbreviations (US terms)
- ch — chain
- sl st — slip stitch
- sc — single crochet
- hdc — half double crochet
- dc — double crochet
- inc — work 2 hdc in the same stitch unless another stitch is named
- sc2tog — single-crochet decrease over the next 2 stitches
- BLO — back loop only
- st(s) — stitch(es)
- MR — adjustable/magic ring
The beginning chain does not count as a stitch. Join the oval rounds with a slip stitch to the first actual hdc; do not turn. In the oval rounds, a curved end is the set of stitches surrounding one end of the foundation chain. The two straight sides each remain seven hdc long.
Special stitches
Surface slip stitch: With the right side facing, insert the hook from front to back at the next point on the marked line. Catch the working yarn behind the fabric and draw a loop through the fabric and through the loop on the hook. Each pass makes a surface stitch and does not consume an underlying hdc.
Three-dc lobe peak: Work 3 dc into the same base stitch. This adds two stitches and makes the raised center of one scallop.
Pattern instructions
1. Make the oval center
With burnt-orange cotton, ch 11 loosely.
- Round 1: Hdc in the 3rd ch from hook and in each of the next 7 ch (8 hdc total). Work 3 hdc in the last ch. Rotate the chain to work along its underside: hdc in the next 7 unused chain loops, then work 2 hdc in the underside of the first worked ch. Join to the first hdc — 20 sts. The two rounded ends each contain 3 hdc; each straight side contains 7 hdc.
- Round 2: Ch 1. On the first 3-stitch end arc, work 2 hdc in the first st, 3 hdc in the next st, and 2 hdc in the last st (7 hdc). Hdc in each of the next 7 straight-side sts. Work the same 7-hdc increase sequence across the other 3-stitch end arc. Hdc in each of the final 7 straight-side sts. Join — 28 sts.
- Round 3: Ch 1. On the first 7-stitch end arc, repeat (2 hdc in next st, hdc in next st) 3 times, then 2 hdc in the last st (11 hdc). Hdc in each of the next 7 straight-side sts. Repeat the same 11-hdc increase sequence on the other 7-stitch end arc; hdc in each of the final 7 straight-side sts. Join — 36 sts.
- Round 4: Ch 1. On the first 11-stitch end arc, hdc in the first st, 2 hdc in the next st, hdc in each of the next 2 sts, 2 hdc in the next st, hdc in each of the next 2 sts, 2 hdc in the next st, hdc in each of the next 2 sts, and 2 hdc in the last st (15 hdc). Hdc in each of the next 7 straight-side sts. Repeat the 15-hdc end sequence on the other end arc; hdc in each of the final 7 straight-side sts. Join — 44 sts.
- Round 5: Ch 1. On the first 15-stitch end arc, work hdc in the first st, 2 hdc in the next st, hdc in each of the next 3 sts, 2 hdc in the next st, hdc in each of the next 3 sts, 2 hdc in the next st, hdc in each of the next 3 sts, 2 hdc in the next st, and hdc in the last st (19 hdc). Hdc in each of the next 7 straight-side sts. Repeat the 19-hdc end sequence on the other end arc; hdc in each of the final 7 straight-side sts. Join — 52 sts.
- Round 6: Ch 1. On the first 19-stitch end arc, hdc in each of the first 2 sts, 2 hdc in the next st, hdc in each of the next 4 sts, 2 hdc in the next st, hdc in each of the next 4 sts, 2 hdc in the next st, hdc in each of the next 4 sts, 2 hdc in the next st, and hdc in the last st (23 hdc). Hdc in each of the next 7 straight-side sts. Repeat the 23-hdc end sequence on the other end arc; hdc in each of the final 7 straight-side sts. Join — 60 sts.
The curved-end counts progress 3, 7, 11, 15, 19, 23 on each end; each straight side remains 7 stitches. The total is therefore 20, 28, 36, 44, 52, and 60. Lay the oval flat. If it cups or ripples, check tension and gauge before proceeding.
2. Shape the five-lobed edge
Keep burnt-orange yarn attached. Place a marker every 12 stitches around the 60-stitch oval. There will be five equal groups.
- Round 7: Ch 1. Repeat the following 12-stitch group 5 times: sl st in next st, sc in next st, hdc in next st, dc in next st, work 3 dc in next st, dc in next st, hdc in next st, sc in next 4 sts, sl st in next st. Each group uses 12 stitches and makes 14 edging stitches — 5 lobes; 70 edging sts total. Join to the first sl st and fasten off.
The three dc in each group form one lobe peak. The slip stitches mark the lower transitions between lobes. Keep this edge relaxed so the coaster lies flat.
3. Add the two raised ribs
With deep-terracotta yarn, work two separate surface-slip-stitch lines on the right side. Lay the coaster flat with one lobe at the top. Mark two starting points just to either side of the stem, where the central pumpkin section meets the side lobes. Curve the left line outward toward the lower-left edge and the right line outward toward the lower-right edge. The two lines frame the central ribbed panel shown in the finished photo; do not add a third center line.
For each line, attach the yarn at the starting point with a slip knot on the hook, then surface slip stitch through the fabric along the marked route. Space stitches evenly, about one fabric gap apart. Stop at the edge, fasten off, and weave both tails to the back. The two ridges should be narrow and raised; do not cinch them tightly enough to gather the coaster.
4. Crochet the short stem
With cinnamon-brown yarn, ch 4.
- Row 1: Sc in the 2nd ch from hook and each remaining ch — 3 sc.
- Rows 2–4: Ch 1, turn, sc BLO in each st — 3 sc per row.
Fasten off with a sewing tail. The small ribbed rectangle is the stem; do not stuff it. Sew its short lower edge to the top lobe, centered over the end of the middle rib.
5. Crochet one sage leaf
With sage-green yarn, ch 8.
- Round 1: Starting in the 2nd ch from hook, work sc in first ch, hdc in next ch, dc in each of next 2 ch, hdc in next ch, and sc in next ch. Work 3 sc in the final ch. Turn to the underside of the foundation chain: sc in next ch loop, hdc in next, dc in each of next 2, hdc in next, then work 2 sc in the first ch. Join to the first sc — 16 sts.
Fasten off with a long tail. Use the tail to sew a short center vein from the leaf base toward its tip. Position the leaf at the upper-right of the stem, angled outward, and sew its base securely to the coaster. Attach only one leaf.
Assembly and finishing
Check that the coaster lies flat. Secure each applique and surface-rib tail on the wrong side, weaving through several stitches before trimming. Shape the five edge lobes evenly by hand. If the cotton care label allows, damp-block flat and pin the lobes into a smooth pumpkin outline while drying. Avoid high heat and never use this cotton coaster as a heat pad or trivet.
For another small seasonal coaster project, see the Harvest Swirl Leaf Coasters.
Troubleshooting
- Oval waves: The base may have too many stitches or loose tension. Recheck the two curved-end increase sequences and the 7-stitch straight sides.
- Oval cups: The increase arcs may be too tight. Relax your tension or try a larger hook; do not add uncounted stitches.
- Lobes look uneven: Confirm that the 60 stitches were divided into five groups of 12 before the edging round.
- Surface ribs pucker: Remove and redo the line with looser surface stitches. These stitches decorate the face; they should not draw the base inward.
- Stem or leaf curls: Lightly damp-block those pieces before sewing them down.
- Coaster is smaller or larger than expected: Measure your HDC gauge and adjust the hook before restarting. Changing the number of oval rounds also changes the 60-stitch/five-lobe division, so the edging repeat must be recalculated rather than repeated blindly.
FAQ
Is this the same pattern as Ira Rott’s coaster?
No. This is a separately written HookElla coaster with an 11-chain oval, six HDC rounds, five equal 12-stitch lobes, surface-crocheted ribs, and separate stem and leaf. Ira Rott’s pattern is credited below; its instructions, diagrams, and photos are not reproduced here.
How much yarn does one coaster use?
Plan for about 35–45 yards total across the four colors. This is an estimate for this HookElla construction, not a measured sample or the source designer’s yardage.
Is the size guaranteed?
No. The 5–5.5 by 4.5–5-inch target is a gauge-based estimate. HookElla has not physically test-crocheted the pattern, so measure and adjust your swatch before making a set.
Inspiration credit
The seasonal pumpkin-coaster concept was inspired by Ira Rott’s Tea Time Pumpkin Coasters, published in 2013. Ravelry lists the original at approximately 5 × 6 inches, with worsted yarn and a 5.5 mm hook; its public gauge is separate from HookElla’s target gauge. This HookElla version uses a different oval foundation, increase schedule, five-group lobe repeat, surface-slip-stitch ribs, and applique shapes. The designer’s protected instructions, charts, and photographs are not reproduced. See Ira Rott’s original pattern page and Ravelry listing.
Helpful questions
How large is the coaster?
The target is about 5–5.5 inches wide and 4.5–5 inches tall. This is a gauge-based planning estimate, not a measured HookElla sample.
Can I use it as a trivet?
No. Cotton yarn can still scorch or transfer heat. Use this coaster for mugs, glasses, or light seasonal display, not hot pans or cookware.
Is the pattern physically tested?
No. The increase counts, five-lobe repeat, and assembly sequence have been checked mathematically, but HookElla has not test-crocheted a sample. Gauge and finished size remain estimates.
Can I wash the coaster?
Follow the cotton yarn's care label. Hand-wash or use a gentle cycle if permitted, reshape the lobes while damp, and dry flat. Keep the button-free coaster away from open flames and high heat.
Inspiration credit
The flat pumpkin coaster idea was inspired by Ira Rott's Tea Time Pumpkin Coasters. This HookElla version uses an independently developed HDC oval, five-lobed edging, surface-slip-stitch ribs, and separate stem and leaf; Ira Rott's written instructions, diagrams, and photographs are not reproduced. Ira Rott's Tea Time Pumpkin Coasters.