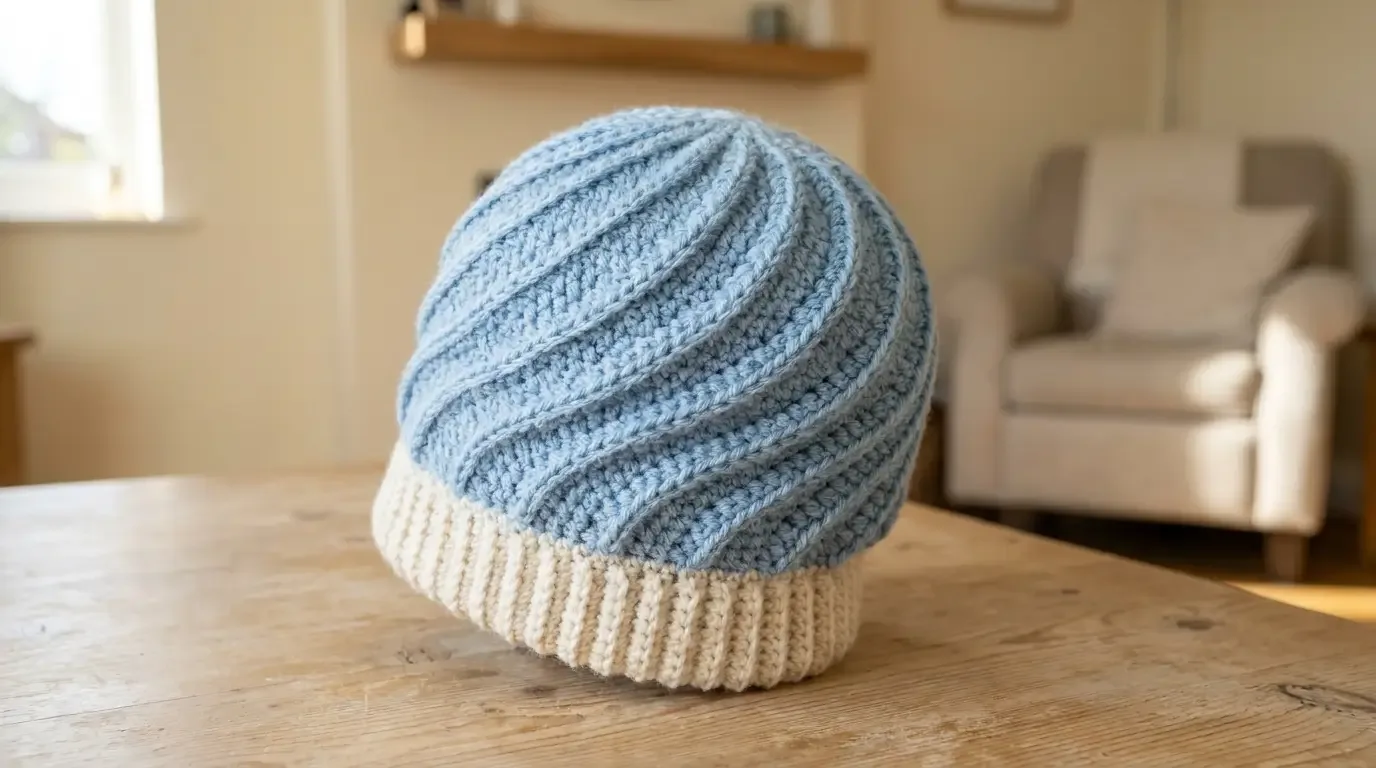
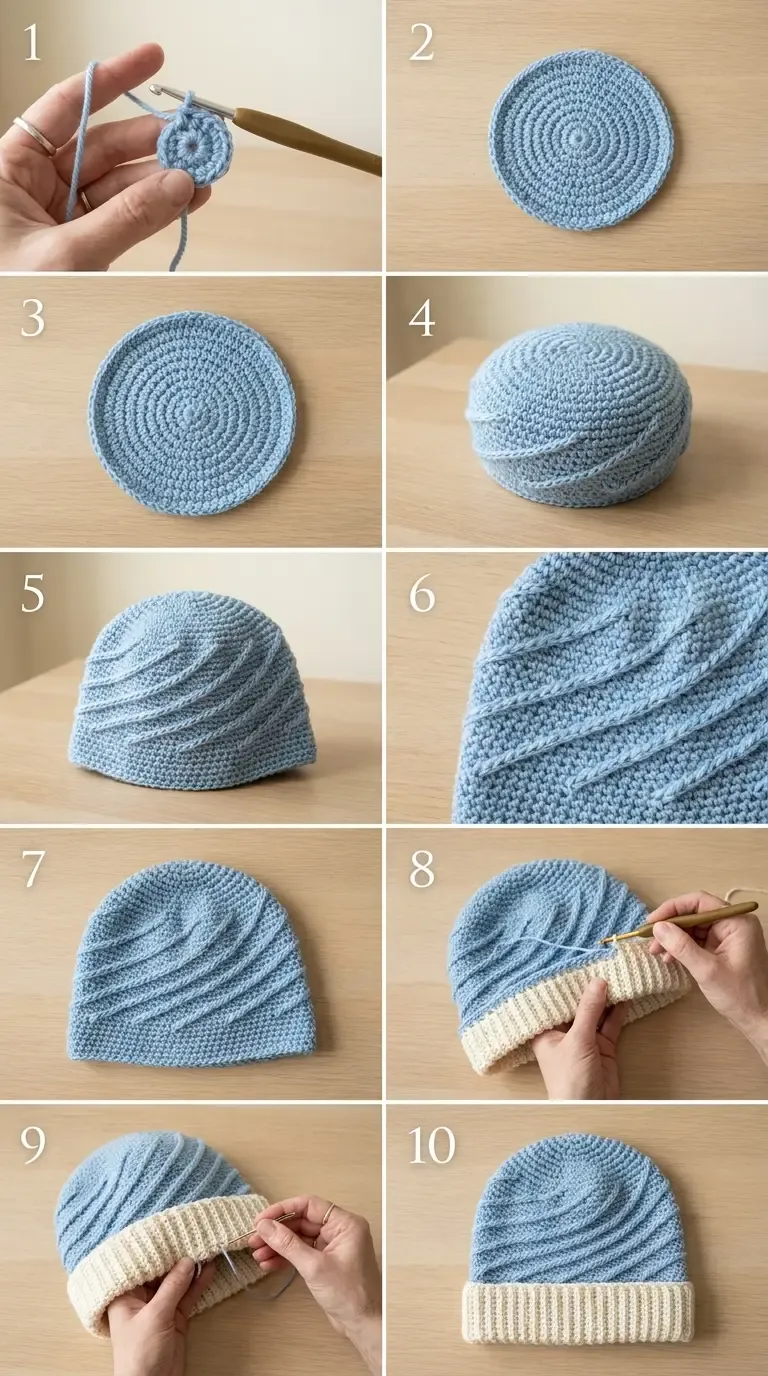
A winter-sky-blue crown grows into a close-fitting textured body, where staggered front-post stitches travel diagonally around the hat. A separately crocheted cream cuff adds a soft, vertical rib at the lower edge.
About this pattern
This independently written HookElla beanie combines a smooth rounded crown, diagonal raised blue ridges, and a cream ribbed cuff. It is crocheted top-down in joined rounds. The cuff is made as a separate strip and sewn to the hat opening; it is not folded or worked as a second color round. The pattern has not been physically sample-tested, so the fit, gauge, and yarn quantities below are planning estimates.
Find more cool-weather projects in the Crochet Hats / Beanies collection.
Materials
- #4 medium/worsted-weight yarn: about 150–200 yd (137–183 m) total, estimated. Plan approximately 115–155 yd blue and 35–45 yd cream; actual use depends on yarn and tension.
- 6 mm crochet hook for crown and body.
- 5 mm crochet hook for cuff.
- Stitch marker, tapestry needle, scissors, and flexible measuring tape.
Choose a smooth yarn with clear stitch definition. The listed yardage is not measured consumption.
Finished size and fit
One adult size is intended for a head circumference of approximately 21–22 in (53–56 cm), subject to the stretch of the chosen yarn. At the target body gauge, 84 stitch positions calculate to a relaxed circumference of 21 in (53.3 cm). The target crown diameter is about 6¾–7 in (17–18 cm). Expected total height is approximately 8½–9¼ in (21.5–23.5 cm), including the cuff. These are gauge-based estimates, not tested measurements.
Gauge and swatching
With the 6 mm hook, make a flat body swatch using the same mix of ordinary HDC and FPdc described below. Aim for 16 stitch positions and 9 rounds = 4 in (10 cm), measured relaxed and unstretched. The front-post stitches count as one stitch position each. Also make a crown swatch in double crochet: target 16 dc and 8 rounds = 4 in. With the 5 mm hook, make a cuff strip at least 24 rows long; target 18 row ends = 4 in when relaxed.
These are independently selected gauge targets, not measurements from a HookElla sample. Adjust hook size to approach the stitch gauge before making the hat. The crown gauge and body texture gauge may differ; use the actual crown diameter and body swatch to judge whether your fabric is plausible for the intended head size.
At 16 stitch positions per 4 in, the crown’s 84 stitches give a theoretical 21 in circumference. Seven crown rounds at 8 rounds per 4 in give about 3½ in of radial depth, or roughly a 7 in crown diameter. Nine body rounds at 9 rounds per 4 in add about 4 in of depth. An eight-stitch cuff at 18 row ends per 4 in is about 1¾ in deep. These calculations do not verify real-world fit.
Abbreviations (US terms)
- ch — chain
- dc — double crochet
- FPdc — front-post double crochet
- hdc — half double crochet
- inc — 2 dc in the same stitch during the crown
- MR — magic ring
- sc — single crochet
- sl st — slip stitch
- st(s) — stitch(es)
- BLO — back loop only
- RS — right side
Special stitches and construction notes
Front-post double crochet (FPdc): Yarn over, insert the hook from front to back and back to front around the vertical post of the indicated stitch, yarn over and pull up a loop, then finish as a double crochet. This wraps the post and raises it toward the front. The FPdc counts as one stitch in the round. Do not also work into the top loops of the stitch whose post you wrapped.
Hdc: Yarn over, insert the hook under both top loops of the indicated stitch, yarn over and pull up a loop, yarn over and draw through all three loops.
Sc BLO: Insert the hook under only the back loop of the indicated stitch, yarn over and pull up a loop, yarn over and draw through both loops.
The beginning ch 2 on crown rounds is a height chain and does not count as a stitch. Join each crown round with a slip stitch to the first actual stitch. The body rounds are joined the same way; do not turn. Mark the first actual stitch of each round. The cuff is worked flat in rows.
Pattern instructions
Crown
With blue and the 6 mm hook, make an MR. For each round, ch 2, work the stated stitches, then sl st to the first actual dc. The ch 2 never counts. Close the ring after Round 1.
- Round 1: Work 12 dc into MR; join. 12 sts.
- Round 2: Work 2 dc in each st around; join. 24 sts.
- Round 3: Repeat (dc in next st, 2 dc in next st) 12 times; join. 36 sts.
- Round 4: Repeat (dc in next 2 sts, 2 dc in next st) 12 times; join. 48 sts.
- Round 5: Repeat (dc in next 3 sts, 2 dc in next st) 12 times; join. 60 sts.
- Round 6: Repeat (dc in next 4 sts, 2 dc in next st) 12 times; join. 72 sts.
- Round 7: Repeat (dc in next 5 sts, 2 dc in next st) 12 times; join. 84 sts.
The crown count increases by 12 each round: 12, 24, 36, 48, 60, 72, 84. At target gauge, lay it flat; the diameter should be near 6¾–7 in. If it ripples or cups strongly, recheck gauge and tension before continuing.
Textured spiral-ridge body
Continue in blue with the 6 mm hook. Work 9 joined rounds, keeping 84 stitches each round. There are 14 FPdc and 70 hdc in every round. The offset moves one stitch forward on each round and repeats after six rounds.
For the round repeat below, let m be the offset number for that round. Begin at the marked first stitch:
- Hdc in the first m stitches (work none when m = 0).
- Repeat [FPdc around the post of the next stitch, hdc in the next 5 stitches] 13 times.
- FPdc around the post of the next stitch, then hdc in the next (5 − m) stitches (work none when m = 5).
- Join with sl st to the first actual stitch of the round. The beginning ch 2 is not counted.
Use these offsets in order:
- Round 8: m = 0. 84 sts: 14 FPdc + 70 hdc.
- Round 9: m = 1. 84 sts: 14 FPdc + 70 hdc.
- Round 10: m = 2. 84 sts: 14 FPdc + 70 hdc.
- Round 11: m = 3. 84 sts: 14 FPdc + 70 hdc.
- Round 12: m = 4. 84 sts: 14 FPdc + 70 hdc.
- Round 13: m = 5. 84 sts: 14 FPdc + 70 hdc.
- Round 14: m = 0. 84 sts: 14 FPdc + 70 hdc.
- Round 15: m = 1. 84 sts: 14 FPdc + 70 hdc.
- Round 16: m = 2. 84 sts: 14 FPdc + 70 hdc.
The position rule always consumes 84 previous-round stitch positions: m + (13 × 6) + 1 + (5 − m) = 84. Each FPdc replaces the stitch position around which it is made; it does not add an extra stitch. Check that the raised stitches advance by one position each round and form slanted ridges rather than stacking directly above one another. Keep the join at the back.
Separate cream ribbed cuff
With cream and the 5 mm hook, ch 9 loosely.
- Row 1: Sc in the second ch from hook and in each remaining ch across; turn. 8 sts.
- Rows 2–90: Ch 1, sc BLO in each st across; turn. 8 sts in every row; 90 rows total.
The cuff strip should measure about 20 in (51 cm) along its row-end edge when relaxed at the target cuff gauge. This is an estimate. Do not stretch it while measuring.
Assembly
- Bring the two short ends of the cuff together without twisting it. Join the foundation edge to the Row 90 edge with a flexible mattress stitch, forming a ring. Fasten off and weave in the tail.
- Place the hat with the wrong side facing out and the cuff ring beside the 84-stitch lower opening. Align the cuff seam with the back join of the hat. The cuff’s long edge attaches to the hat; the opposite long edge remains the lower edge.
- The cuff has 90 row ends and the hat opening has 84 stitches. Pin both pieces at six evenly spaced points. This divides the cuff into six groups of 15 row ends and the hat into six groups of 14 stitches.
- Sew each group together in order. For each group, pair 13 cuff row ends with 13 hat stitches one-to-one; at the center of that group, sew the remaining 2 adjacent cuff row ends to the corresponding 1 hat stitch. Repeat for all six groups. This eases exactly six extra cuff row ends across the opening. Keep the seam flexible and distribute the small gathers evenly.
- Turn the hat right side out and let the cuff hang down. It is an integrated-looking attached cuff, not folded over.
Finishing
Weave the magic-ring tail through several crown stitches and secure it. Weave in the body and cuff tails on the wrong side without pulling the fabric tight. Shape the crown and cuff gently by hand. Follow the yarn label for washing and blocking; avoid flattening the raised ridges. There is no pom-pom or additional decoration.
Fit adjustments and troubleshooting
- Check the stretch before assembly: The body opening calculates to 21 in only at the stated textured gauge. Compare the relaxed swatch and opening with the intended wearer’s head; do not treat the calculation as a fitting guarantee.
- Crown cups or ripples: Check the 16 dc/8-round crown target and adjust hook size or tension. Do not proceed with a distorted crown.
- Ridges look vertical: Confirm that the offset changes 0, 1, 2, 3, 4, 5, then repeats. Repeating the same offset would stack the ridges.
- A ridge seems to add stitches: Work the FPdc around a post but do not make a second stitch into that post’s top loops. Each FPdc occupies one position in the 84-stitch count.
- Cuff edge is too loose or tight: Check row-end gauge and relaxed strip length before sewing. The 90-to-84 easing is distributed as six pairs; do not bunch all six extras at the seam.
- Cuff has a twist: Lay the strip flat before seaming and check that its two long edges run parallel around the ring.
- Need a longer or shorter cuff circumference: Change the number of rows, then pin it evenly to the 84-stitch opening. Maintain the eight-stitch cuff depth for the same visual proportion.
Frequently asked questions
Is the beanie worked in the round?
Yes. The crown and blue body use joined rounds, and the separate cream cuff is made flat and sewn onto the lower opening.
How does the diagonal texture form?
Fourteen FPdc posts are spaced around each 84-stitch round. Advancing their starting position one stitch per round creates the diagonal path. This staggered layout is HookElla’s original stitch schedule for this pattern.
Can I use one hook for the whole hat?
The pattern uses 6 mm for the crown/body and 5 mm for a firmer cuff. If you substitute one hook, swatch both fabrics and check that the cuff still stretches comfortably and does not flare.
Is this a tested adult fit?
No. The stitch counts and target-gauge calculations are reviewed, but no sample has been crocheted or fitted. Treat the dimensions and yardage as estimates and verify your own swatch and recipient measurements.
Inspiration credit
The broad idea of a top-down, textured crochet beanie was inspired by Sarah Arnold’s Divine Hat listing on Ravelry. That listing describes an adult worsted-weight beanie with post-stitch texture. This HookElla pattern is independently constructed: its crown count, staggered diagonal ridge rule, round sequence, and separate sewn cuff were developed for this project. No source instructions or source photographs are reproduced.
The exact user-supplied finished photograph and construction infographic accompany this pattern. The finished photo is the featured image; the numbered infographic is a secondary visual guide. The full written directions above remain the pattern of record.
Helpful questions
What head size is this written for?
It is a one-size adult estimate for about 21–22 inches around. The 84-stitch body calculates to 21 inches only if the textured fabric measures 16 stitch positions per 4 inches; actual fit depends on the swatch and stretch.
Why do the raised ridges slant?
Each round moves the front-post stitch sequence forward by one stitch. That offset makes each ridge travel diagonally instead of stacking into a vertical column.
Is the pattern physically tested?
No. Counts and theoretical dimensions have been checked, but the sample, gauge, yarn use, and fit have not been physically tested.
Can I make the cuff longer?
Yes, add or remove cuff rows to adjust its relaxed circumference, then redistribute the joining ease evenly. Keep the cuff depth at eight single-crochet stitches unless you also want a wider cuff.
Is there a printable pattern?
Yes. Use the print or PDF control on this page for the complete instructions, including the crown, textured body, cuff, joining, and finishing.
Inspiration credit
Sarah Arnold's Divine Hat is credited as inspiration for the broader category of textured, top-down crochet beanies. This independently developed HookElla pattern uses its own crown counts, staggered post-stitch layout, and separately sewn cuff; the source instructions and photographs are not reproduced. Divine Hat by Sarah Arnold.