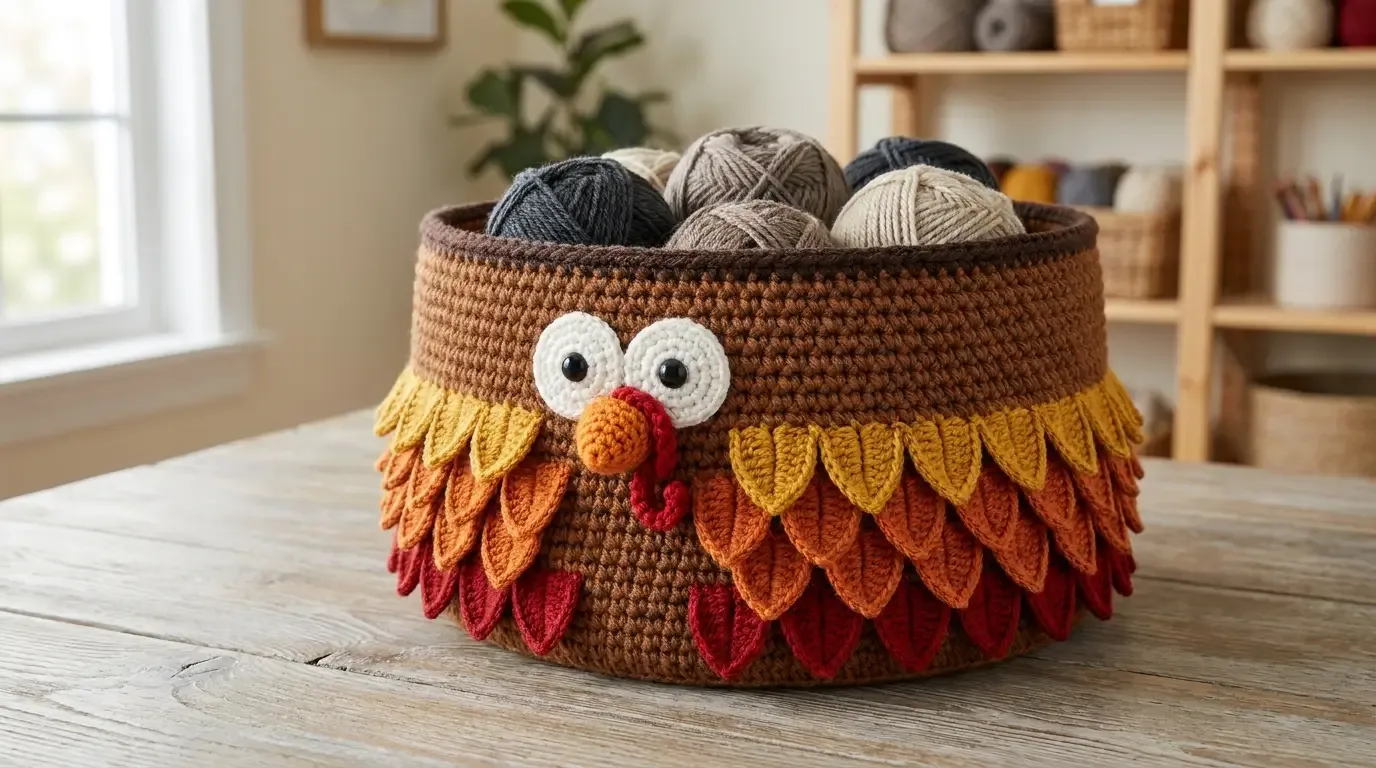
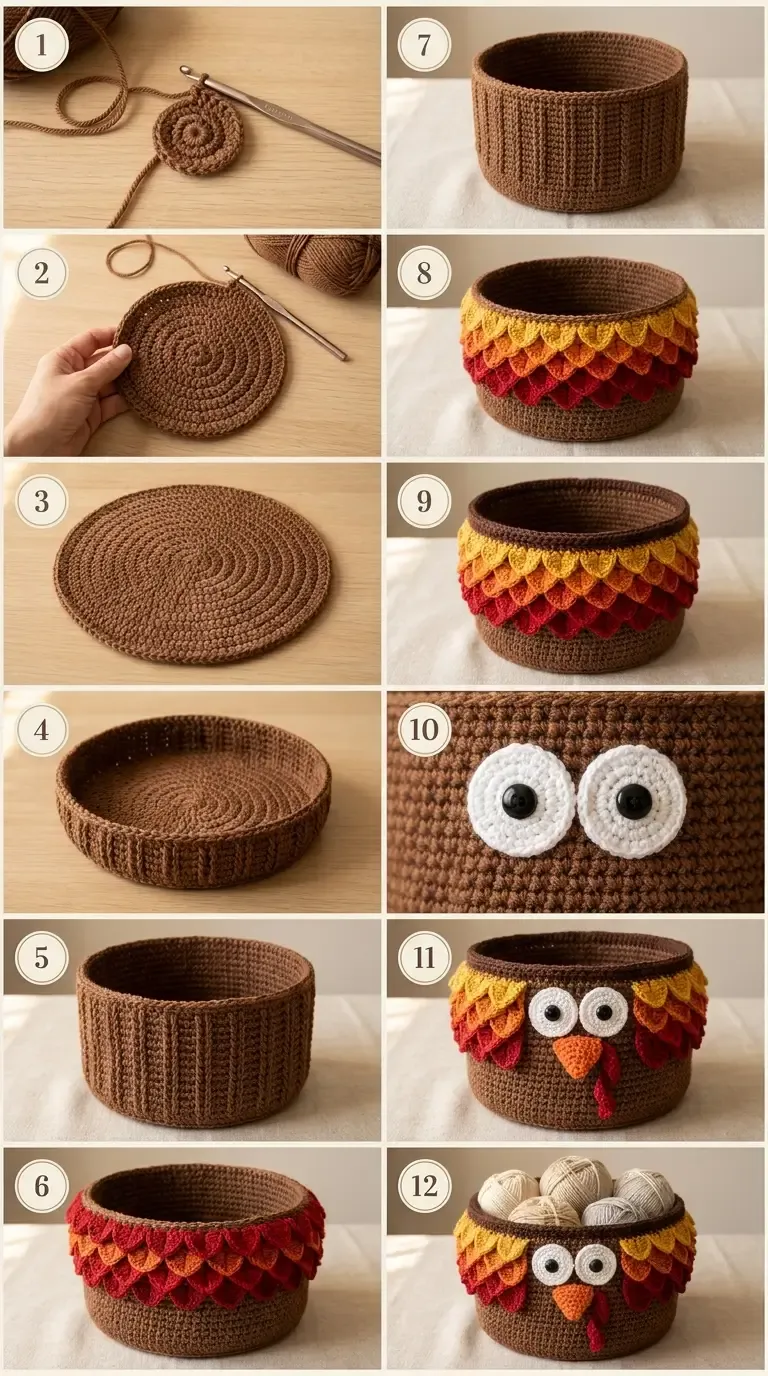
This cheerful turkey basket keeps a few yarn balls close at hand. It has a firm circular base, upright brown walls, three overlapping rows of crochet scales, and a small face on the front.
About this original basket pattern
The Thanksgiving Turkey Yarn Basket is a roomy, open-top holder with a flat round base, upright brown sides, and three overlapping bands of red, orange, and golden crochet scales. Two white crocheted eyes with black button centers, a small orange beak, and one curled red wattle complete the front. The pattern does not add a separate turkey head, tail fan, wings, feet, handles, or lining.
This is an independently developed HookElla pattern in US crochet terms. It is inspired by the appearance of Dorianna Rivelli’s turkey basket, but uses its own stitch counts and written construction. It has not been physically test-crocheted.
Materials
- #4 worsted-weight yarn, approximately 850–1,100 yards total, estimated: about 650–800 yd brown, 55–80 yd each red, orange, and golden yellow, 25–35 yd cream, plus a few yards of orange for the beak. The color ranges are planning estimates and may vary with tension; they have not been measured.
- 5.5 mm (I-9) hook as a starting point. This is HookElla’s selection, not a resolved source specification: The Lavender Chair’s public materials list a 5.5 mm hook, while Ravelry metadata lists 5.0 mm.
- Two black sew-on buttons, about 15–18 mm across.
- Tapestry needle, scissors, stitch marker, and measuring tape.
Use firm, smooth yarn and a hook that makes a dense fabric. If the basket sides feel floppy, swatch with a smaller hook. Source listings suggest worsted/aran yarn, but provide no gauge or yarn quantity; the quantities and gauge below are HookElla estimates.
Finished size and fit
The intended base is approximately 11.3–12 inches (28.7–30.5 cm) across, with an estimated 7–8-inch (18–20 cm) wall height. These are calculated targets, not measured finished dimensions. The basket is meant for yarn and light craft supplies, not as a load-bearing container.
Gauge and sizing check
For a sizing check, aim for about 15 hdc and 12 rounds = 4 inches (10 cm) on a relaxed joined-round swatch. In the wall fabric, aim for about 15 dc and 10 rounds = 4 inches. These are independently selected target gauges, not a report of a physically measured sample. Make a swatch in the round using the stitch you intend to use; post stitches and crocodile scales affect height and bulk.
At 15 stitches per 4 inches, 136 stitches give a calculated circumference of 36.3 inches and a circular diameter of about 11.5 inches (36.3 ÷ π). At 12 base rounds per 4 inches, 17 rounds produce about 5.7 inches of radial depth, or 11.3 inches across. These two estimates are close, but neither confirms actual fit or dimensions.
Abbreviations (US terms)
- ch — chain
- sl st — slip stitch
- sc — single crochet
- hdc — half double crochet
- dc — double crochet
- FPdc — front-post double crochet: yarn over, insert hook from front to back and back to front around the post of the indicated stitch, yarn over and pull up a loop, then finish as a dc
- inc — work 2 stitches in the same stitch
- MR — adjustable/magic ring
- BLO — back loop only
- st(s) — stitch(es)
The beginning chain on joined rounds is for height only and does not count as a stitch. Join with a slip stitch to the first actual stitch unless the instruction says to join into a chain space. Move the marker to the first stitch after each join.
Special stitches: front post and layered scale
Each scale is worked around the two upright dc posts of one small V-shaped group. Work 5 dc around the first post, moving down it; ch 1; then work 5 dc around the second post, moving back up. The ten dc form one fan-shaped scale around that pair of posts. Between scales, ch 1. Keep each scale in front of the previous colored layer so the red, orange, and yellow bands overlap visibly.
Pattern instructions: notes and construction
- The basket is worked from the center of its base upward in joined rounds. Do not turn between rounds.
- The base increases by 8 stitches per round from 8 to 136. The 136-stitch count is used for the wall and for the spaced base groups of 17 scales (17 × 8 positions).
- The scale bands alternate a round that places V groups with a round that works scales around the V posts. A V group is 2 dc in one stitch separated by ch 1.
- The fabric has not been physically tested. Check that the base lies flat, the wall stands upright, and each next scale band sits above and slightly in front of the previous band.
1. Crochet the circular base
With brown yarn, make an MR. Beginning ch 1 never counts. Join each round with a sl st to its first sc or hdc and do not turn.
- Round 1: Ch 1, work 8 hdc into the MR. Join — 8 sts.
- Round 2: Ch 1, work 2 hdc in each stitch around. Join — 16 sts.
- Round 3: Ch 1, repeat (2 hdc in next st, hdc in next st) 8 times. Join — 24 sts.
- Round 4: Ch 1, repeat (2 hdc in next st, hdc in next 2 sts) 8 times. Join — 32 sts.
- Round 5: Ch 1, repeat (2 hdc in next st, hdc in next 3 sts) 8 times. Join — 40 sts.
- Round 6: Ch 1, repeat (2 hdc in next st, hdc in next 4 sts) 8 times. Join — 48 sts.
- Round 7: Ch 1, repeat (2 hdc in next st, hdc in next 5 sts) 8 times. Join — 56 sts.
- Round 8: Ch 1, repeat (2 hdc in next st, hdc in next 6 sts) 8 times. Join — 64 sts.
- Round 9: Ch 1, repeat (2 hdc in next st, hdc in next 7 sts) 8 times. Join — 72 sts.
- Round 10: Ch 1, repeat (2 hdc in next st, hdc in next 8 sts) 8 times. Join — 80 sts.
- Round 11: Ch 1, repeat (2 hdc in next st, hdc in next 9 sts) 8 times. Join — 88 sts.
- Round 12: Ch 1, repeat (2 hdc in next st, hdc in next 10 sts) 8 times. Join — 96 sts.
- Round 13: Ch 1, repeat (2 hdc in next st, hdc in next 11 sts) 8 times. Join — 104 sts.
- Round 14: Ch 1, repeat (2 hdc in next st, hdc in next 12 sts) 8 times. Join — 112 sts.
- Round 15: Ch 1, repeat (2 hdc in next st, hdc in next 13 sts) 8 times. Join — 120 sts.
- Round 16: Ch 1, repeat (2 hdc in next st, hdc in next 14 sts) 8 times. Join — 128 sts.
- Round 17: Ch 1, repeat (2 hdc in next st, hdc in next 15 sts) 8 times. Join — 136 sts.
The base should lie flat. If it cups, the fabric may be too tight or the circle needs more ease; if it ripples, the hook or tension may be too loose. Do not proceed until it lies reasonably flat.
2. Turn the base and build the lower brown wall
- Round 18: Ch 1, sc BLO in each stitch around. Join — 136 sc. This creates a firm hinge at the base edge.
- Round 19: Ch 2 (does not count), dc in each stitch around. Join — 136 dc.
- Round 20: Ch 2, repeat (FPdc around next stitch post, dc in next 3 sts) 34 times. Join — 136 sts.
- Round 21: Ch 2, dc in each stitch around. Join — 136 dc.
- Round 22: Ch 2, repeat (FPdc around next stitch post, dc in next 3 sts) 34 times. Join — 136 sts.
- Round 23: Ch 2, dc in each stitch around. Join — 136 dc.
- Round 24: Ch 2, repeat (FPdc around next stitch post, dc in next 3 sts) 34 times. Join — 136 sts.
- Round 25: Ch 2, dc in each stitch around. Join — 136 dc.
- Round 26: Ch 2, repeat (FPdc around next stitch post, dc in next 3 sts) 34 times. Join — 136 sts.
For an FPdc, wrap the hook around the upright post itself; skip that stitch’s top loops so it is not worked a second time. This decorative round uses one old stitch position per new stitch, keeping 136 positions around the basket.
3. Add the red feather band
Join red yarn at the back. For the placement round, each repeat uses eight positions from the preceding 136-stitch round: three dc, one skipped stitch, a two-dc V in the next stitch, then three skipped stitches. This creates 17 V groups around the basket.
- Round 27 (red V round): Ch 2 (height only). Repeat (dc in next 3 sts, skip next st, work 2 dc in next st with ch 1 between them, skip next 3 sts) 17 times. Join with sl st to first dc. There are 17 V groups; 136 prior stitch positions are accounted for.
- Round 28 (red scales): Sl st into the ch-1 gap between the two dc of any V; ch 1 for height only. Around the first dc post of that V work 5 dc from the top toward the base; around the second post work 5 dc from the base toward the top. Repeat (ch 1, make the same 10-dc scale around the two posts of the next V) for the remaining 16 V groups. After the final scale, ch 1 to make the last separator and join with a sl st to the first dc of the first scale — 17 scales, each with 10 dc; exactly 17 separator spaces. The starting height chain is not one of the separators.
Fasten off red after joining. Leave the scale edges free so they lift away from the basket surface.
4. Add the orange and golden feather bands
For each new V round, join the next color in a separator ch-1 space between scales. Each V round makes one V into each separator space, then adds a ch-1 space before the next repeat. The following scale round works around the posts of those V’s.
- Round 29 (orange V round): Join orange in any ch-1 separator space. Ch 2, then work (dc, ch 1, dc) in that same space; ch 1. Repeat in each of the remaining 16 separator spaces. Join to the first dc — 17 V groups and 17 separator spaces.
- Round 30 (orange scales): Sl st into the ch-1 gap between the posts of any orange V; ch 1 for height only. Work one 10-dc scale around those posts, then repeat (ch 1, work a 10-dc scale around the next V’s posts) for the remaining 16 V groups. Ch 1 after the final scale and join with a sl st to the first dc — 17 scales and 17 separator spaces. Fasten off.
- Round 31 (golden V round): Join yellow in any separator space. Repeat the Round 29 placement once in each of the 17 spaces — 17 V groups and 17 separator spaces.
- Round 32 (golden scales): Work the Round 30 scale sequence in golden yellow, around all 17 V groups — 17 scales and 17 separator spaces. Join and fasten off.
The colored feathers should step upward: red at the lower edge, orange in the middle, and yellow at the top. Ease each new placement round around the basket without pulling tight. The fan stitches sit over the previous layer, while the V placement remains attached to the separator gaps above it.
5. Restore the brown top edge and finish the rim
Join brown in any ch-1 space between the yellow scales.
- Round 33: Ch 1, work 8 sc in each of the 17 separator spaces around. Join — 136 sc.
- Round 34: Ch 2 (does not count), dc in each stitch around. Join — 136 dc.
- Round 35: Ch 2, repeat (FPdc around next stitch post, dc in next 3 sts) 34 times. Join — 136 sts.
- Round 36: Ch 2, dc in each stitch around. Join — 136 dc.
- Round 37: Ch 1, hdc BLO in each stitch around. Join — 136 hdc.
- Round 38: Ch 1, work reverse sc in each stitch around for a firm, corded edge. Join and fasten off — 136 sts.
If reverse single crochet is unfamiliar, work a regular sc round instead. It will make a clean rim with a slightly different edge. Weave the yarn tail through several inside stitches.
6. Make and attach the face
Eyes (make 2)
With cream yarn, make an MR and work 8 sc into it. Join. Round 2: Ch 1, work 2 sc in each stitch around; join — 16 sc. Fasten off with a long sewing tail. Flatten each eye disk. Position the pair on the brown front, just above the yellow feather band, about 1–1¼ inches apart. Sew around each disk through the basket fabric.
Sew one black button securely at the center of each eye, passing the thread through the eye disk and the basket wall. Knot and bury the thread inside. Buttons are small parts; supervise use and keep the basket away from young children.
Beak
With orange yarn, ch 7.
- Row 1: Sc in second ch from hook and in each remaining ch — 6 sc.
- Row 2: Ch 1, turn, sc2tog, sc in next 2 sts, sc2tog — 4 sts.
- Row 3: Ch 1, turn, sc2tog twice — 2 sts.
- Row 4: Ch 1, turn, sc2tog — 1 st.
Fasten off with a sewing tail. Place the broad edge just below and between the eyes; sew it to the basket along its sides and base. Leave the center lightly raised.
Curled red wattle
With red yarn, ch 5. Work 3 sc in the second chain from hook and 3 sc in each of the next 3 chains — 12 sc. Fasten off. The extra stitches naturally curl the strip. Tack one end below the beak and let the curl hang to one side; secure the remaining length with small stitches so it stays in the pictured single-wattle shape.
Assembly and finishing
Lay the basket on a flat surface and gently shape the base. Check that the side wall stands upright and the rim is even. Secure and weave in all ends on the inside, following the stitches for at least an inch. Keep the face centered opposite the join. Do not add a separate head, tail fan, wings, feet, handle, or lining.
For another yarn-storage idea, see the Chunky Crochet Hanging Basket.
Tips and troubleshooting
- Base waves or cups: Recheck tension and the swatch. A smaller hook can firm loose work; a larger hook can relax a cupped base. Change the hook before changing the round counts.
- Body flares: Check that each wall round still has 136 stitches and that the ch-2 is not accidentally counted as a stitch.
- Scales pull or overlap too tightly: Loosen the joining chains and scale stitches. The fans should drape over the layer beneath without cinching the basket.
- A placement repeat seems off: Mark each eighth base position. There should be 17 equal groups around 136 stitches and 17 separator spaces in each V/scale repeat round.
- Buttons feel loose: Re-sew with strong thread through the basket wall and secure the knot inside; omit buttons and embroider black centers if the basket will be handled around children.
- Changing size: This pattern is proportioned around 136 stitches and 17 motifs. Changing the base count requires a multiple of eight and a matching number of scale repeats; changing only the base diameter can make the body and feather layers mismatch. Treat any resized version as untested.
FAQ
Why is there a 5.0 mm and 5.5 mm hook difference in the references?
The Lavender Chair’s public blog materials list 5.5 mm, while Ravelry’s metadata lists 5.0 mm. The available listings do not resolve the discrepancy. This independent HookElla version names 5.5 mm as a starting point and asks you to swatch for a firm fabric.
Does the source give a gauge or yarn quantity?
The public source information reviewed for this article does not state a gauge or yardage. HookElla’s gauge and yarn quantities are clearly labeled estimates selected for this separate construction.
Can I use this as a laundry or heavy storage basket?
No. It is a soft crochet container intended for yarn and light craft supplies. Heavy contents can stretch the base and distort the sides.
Inspiration credit
This independently written HookElla pattern is visually inspired by Dorianna Rivelli’s Turkey Yarn Basket for The Lavender Chair. Her public listing describes a worsted-weight, bottom-up basket with a round base, textured walls, layered crocodile-stitch feathers, crocheted face details, and a brown rim. The source listings differ on hook size (5.5 mm on the blog and 5.0 mm in Ravelry metadata) and do not provide a gauge or yarn quantity. HookElla’s counts and instructions above were developed independently; the original designer’s instructions and photographs are not reproduced. See Dorianna Rivelli’s original pattern listing and The Lavender Chair pattern page.
Helpful questions
Is this the original Lavender Chair pattern?
No. This is a separately written HookElla pattern with its own stitch counts and construction details. It is visually inspired by Dorianna Rivelli's turkey yarn basket; her original pattern is credited near the end.
How much yarn will I need?
Plan for about 850–1,100 yards total. The brown body uses most of it; red, orange, golden yellow, and cream use smaller amounts. These are unmeasured planning estimates, not the source designer's quantities.
What size will the finished basket be?
At the stated target gauge, the base math suggests about 11.5 inches across. Crochet tension, yarn, and blocking change the actual result, so treat roughly 11–12 inches as an estimate and measure your work as you go.
Is the basket tested?
No physical HookElla sample has been test-crocheted. The stitch arithmetic and construction sequence have been reviewed on paper; that does not verify real yarn behavior, gauge, or final dimensions.
Is this a toy?
No. It is decorative storage. Sew-on buttons and small crocheted features can be choking hazards; keep the basket and its detachable contents away from unsupervised young children.
Inspiration credit
This original HookElla basket takes visual inspiration from the turkey yarn basket by Dorianna Rivelli of The Lavender Chair. The construction and instructions here were developed independently; the source designer's pattern and photographs are not reproduced. Dorianna Rivelli's Turkey Yarn Basket.