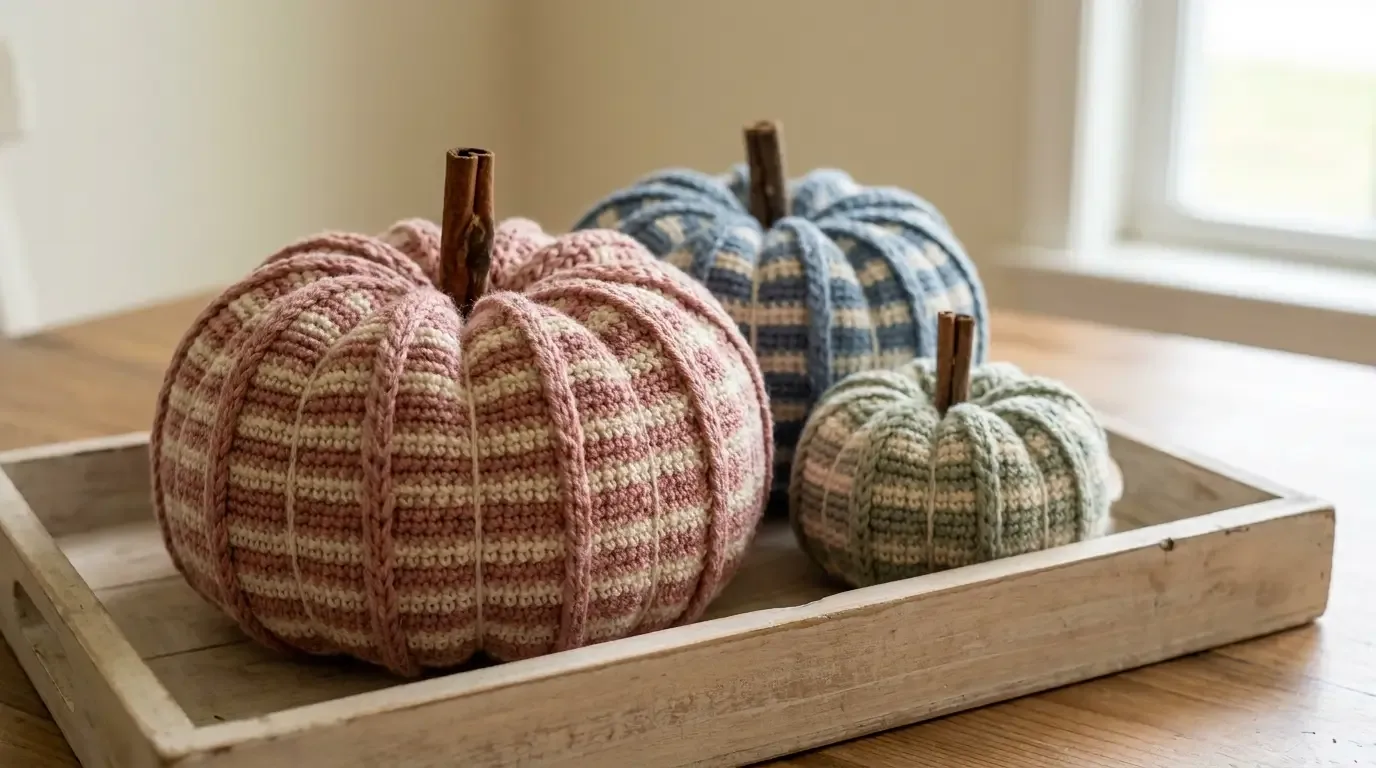
Soft checks, rounded shaping, and a cinnamon-stick stem make this Country Gingham Pumpkin an inviting autumn accent. HookElla’s original instructions below build a small, medium, or large gingham pumpkin with front-post ribs and a stuffed, gathered finish.
A soft checked pumpkin for autumn
The Country Gingham Pumpkin pairs a homespun check with a plump, gathered silhouette. Make a trio in coordinating shades for a mantel, or use one larger pumpkin as the centre of a table vignette. The raised ribs catch the light and make the colour blocks look almost woven.
MJ’s Off The Hook Designs is credited as the original inspiration. HookElla’s recipe below is written from scratch with new stitch counts, colour planning, and shaping so you can make the pictured gingham pumpkin directly from this page. The Ravelry listing is included for designer credit.
Public project details
The pattern is listed for DK-weight yarn, a 5 mm crochet hook, and Small, Medium, and Large finished sizes. Its construction begins at the base and continues upward in the round. Front-post double-crochet ribbing gives the pumpkin its sturdy vertical channels, while planned colour changes create the gingham/checker effect.
The combination is approachable for crocheters who are comfortable reading colour changes and working post stitches. Choose a smooth DK yarn so the checks stay crisp; a wool blend gives a rustic hand, while washable acrylic is practical for seasonal storage.
Materials and palette planning
For a project inspired by the public sample, gather:
- DK yarn in a light ground shade and one or two contrast colours;
- a 5.0 mm crochet hook, adjusted only after checking your swatch;
- yarn needle, scissors, stitch markers, and a measuring tape;
- polyester fiberfill for a resilient, rounded form;
- a short piece of cotton rope or a cinnamon stick for the stem;
- optional pins or clips to keep colour-change joins tidy.
Gingham reads best when one colour is clearly lighter than the other. A cream-and-blue palette feels coastal, pink-and-oatmeal feels soft and vintage, and sage with natural cream suits a quiet farmhouse shelf. Keep the number of colours limited so the checks remain legible.
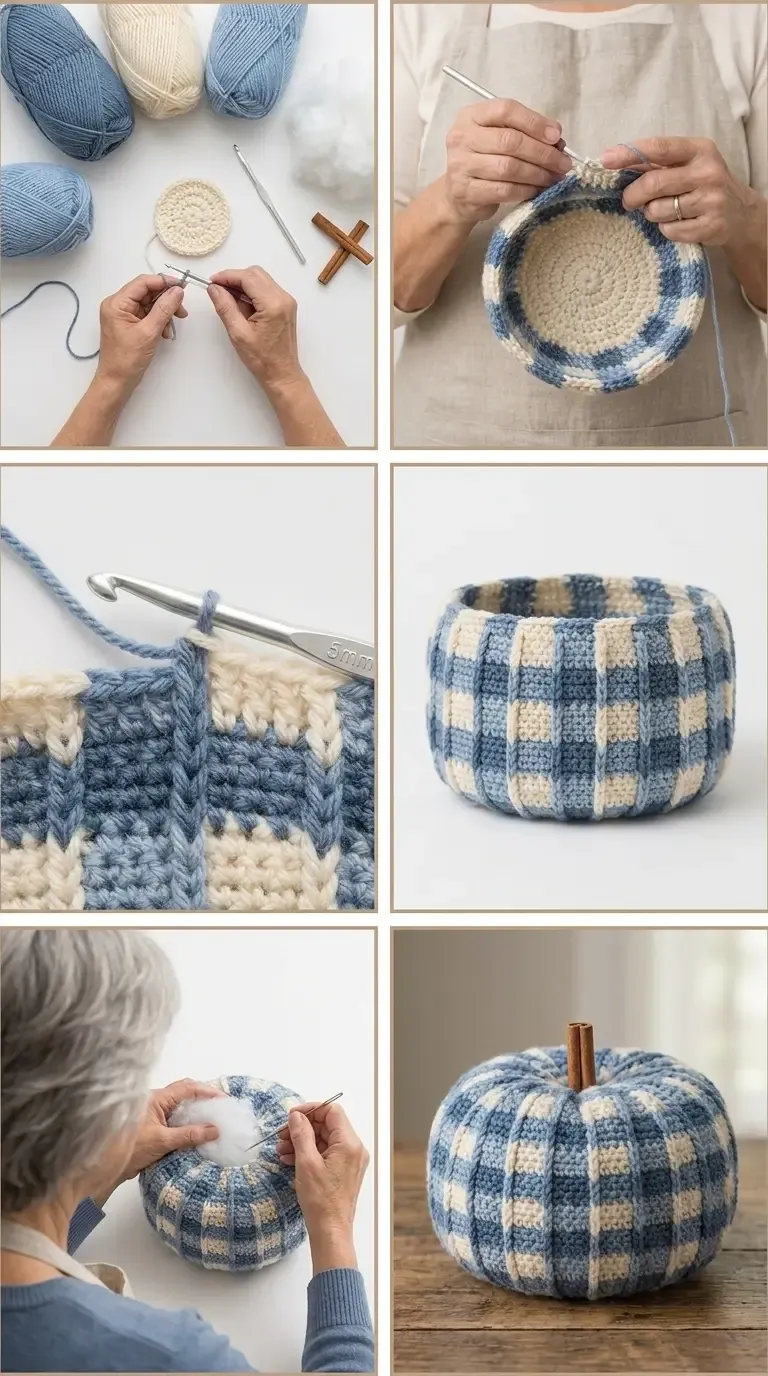
The HookElla construction image accompanies the original recipe on this page.
HookElla pumpkin instructions
Use US terms. Keep the first stitch marked and work in a continuous spiral unless a round is labelled as a join. The numbers below are a flexible HookElla recipe; measure your work because yarn and tension change the finished size.
- Make the base. With the 5 mm hook and the light colour, make a magic ring and work 6 sc into it. Increase evenly by 6 sc on every round (12, 18, 24, 30, and so on) until the circle measures about 4 in for Small, 5 in for Medium, or 6 in for Large. Slip stitch to the first stitch only if your colour-change method needs a closed round.
- Start the gingham body. Work sc around without increases for two rounds. Change colour on the final yarn-over of the last stitch. Alternate two rounds of the light shade with two rounds of the contrast shade. For checks, change the contrast colour every fourth stitch on the contrast rounds, carrying the unused shade loosely inside; on the next pair of rounds, shift the contrast blocks by two stitches. Repeat the four-round checker unit until the body is about 2½, 3½, or 4½ in tall for Small, Medium, or Large.
- Add raised ribs. On the next round, work FPDC around the next stitch, sc in the next 5 sts around, adjusting the final repeat so the round closes evenly. Repeat the rib round after every two plain sc rounds. Keep the post stitches relaxed so the fabric can be gathered later.
- Taper the crown. Stuff lightly. Work one round of sc in the next 4 sts, invdec around, then one plain round. Continue alternating a decrease round and a plain round until 12–18 stitches remain, depending on size. Add the last handfuls of stuffing before closing.
- Close and segment. Cut yarn with a long tail, thread it through the remaining stitches, pull closed, and knot inside. With a darning needle and matching yarn, pass from the crown centre to the base centre along each FPDC rib, pulling just enough to form even lobes. Make 8 ribs for Small, 10 for Medium, or 12 for Large.
- Add the stem. Insert a short cinnamon stick or a tightly crocheted cord into the centre opening. Stitch around it several times from the inside. Trim and hide the tail; the stem is decorative, not a handle.
How the visible construction comes together
The pumpkin begins with a compact circular base. From there, the body grows upward in joined or continuous rounds, with colour changes placed to form small checked blocks. Front-post double crochet is used as a raised ribbing element: the post stitches travel vertically and later become the channels that define each segment.
As the body reaches the chosen size, the top opening is reduced and the form is filled. Stuff gradually, turning the piece as you work so the fibre does not collect in one lump. A firm but squeezable fill gives the ribs room to show without making the pumpkin hard.
The final shaping is decorative and structural. The HookElla decrease rhythm and needle channels above draw the stuffed tube into even pumpkin lobes while keeping the crown centred.
Choosing a size
Use the three size options to build a layered display: a small pumpkin in front, a medium pumpkin beside it, and a large pumpkin behind. If you are making a single accent, select the size that leaves a little breathing room around the stem and lets the ribs read from across the room.
For a personal adaptation, swatch the gingham section first. A different yarn or tension changes both circumference and stuffing. Keep each check two rounds tall and shift the contrast blocks by two stitches on the next pair of rounds.
Stem and finishing ideas
A cinnamon stick gives the pumpkin a natural scent and a warm woodland finish. Sand any sharp end, keep the stick short enough to sit securely, and anchor it at the top centre. A crocheted or cotton-rope stem is a softer option for homes with curious pets or children; knot or stitch it firmly so it cannot pull free.
Hide colour-change tails inside the body before stuffing. Once the top is closed and the segments are shaped, check that the ribs are evenly spaced, give the pumpkin a gentle squeeze to distribute the fill, and lightly steam only if the yarn label permits it. Store the finished pumpkin out of direct sun so the contrast colour stays bright from season to season.
Styling a gingham pumpkin trio
Group pumpkins on a wooden tray with dried leaves, a small vase, or a stack of cookbooks. Repeat one colour from the checks elsewhere in the room—a blue mug, a sage cushion, or a pink candle—to make the display feel intentional. Smaller sizes also work in a tiered bowl or as a centrepiece around a battery tea light (never place real flame against yarn).
Credit and use
MJ’s Off The Hook Designs is credited for the original Country Gingham Pumpkin inspiration. The stitch counts and shaping on this page are HookElla’s own recipe; please do not redistribute this article as a separate pattern or claim the designer’s original work.
For another cosy seasonal project, browse HookElla’s fall crochet home-decor patterns. A small gingham pumpkin is quick to display; a coordinated set turns the same stitch language into a whole autumn story.
Helpful questions
Who designed the Country Gingham Pumpkin?
The design inspiration is credited to MJ's Off The Hook Designs. This page contains an original HookElla pumpkin recipe with its own stitch counts and shaping.
What yarn and hook are listed publicly?
The public details specify DK yarn and a 5 mm crochet hook.
What sizes can be made?
Make the HookElla Small, Medium, or Large version by stopping the increase rounds at the diameter listed in the size table below.
How is the pumpkin shaped?
It is worked bottom-up in the round, then stuffed and shaped with vertical surface ribs or ties that define the pumpkin segments.
What creates the gingham look?
Alternating light and contrast blocks create a checked fabric, while front-post double-crochet ribbing adds raised vertical texture.
What can I use for the stem?
The public concept allows either a rope-style stem or a cinnamon stick. Secure the stem firmly and keep it decorative rather than load-bearing.