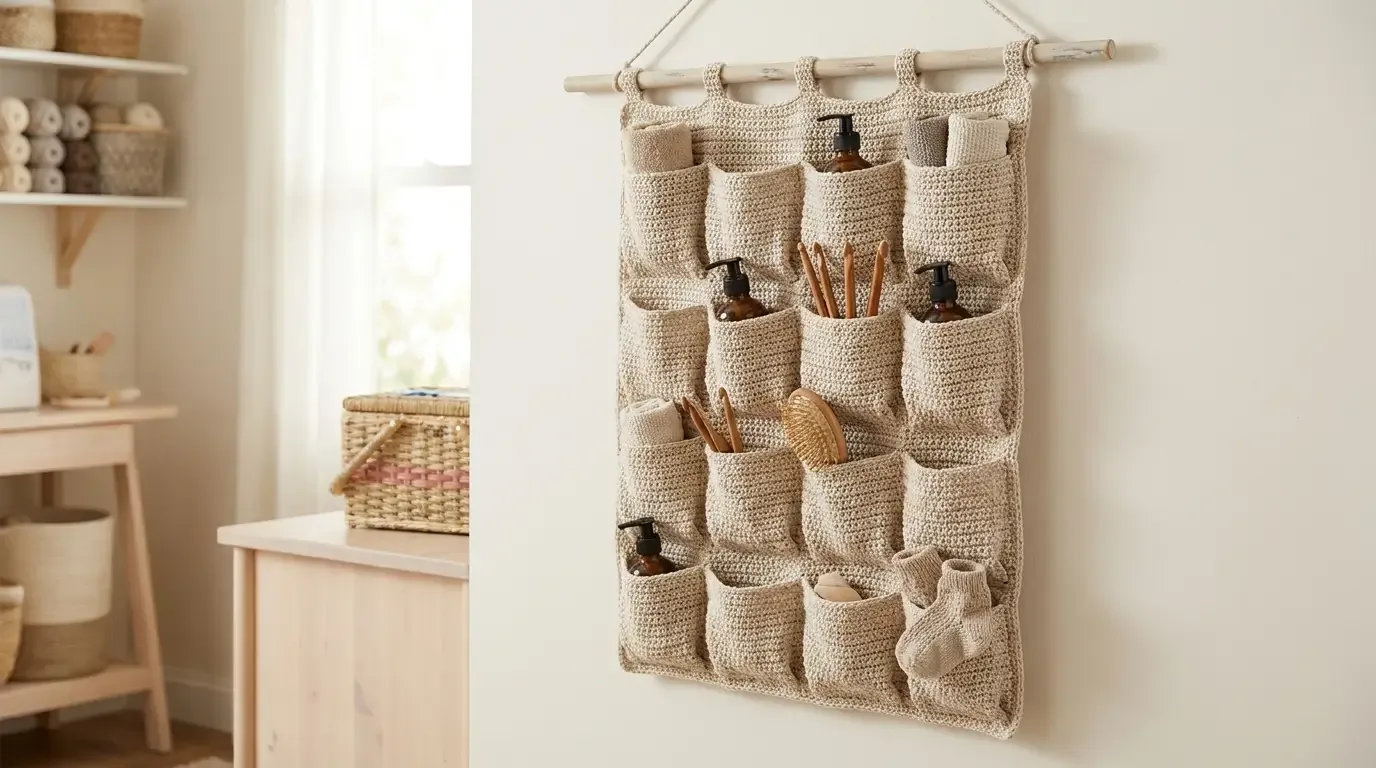
Turn a blank wall into useful storage with a soft organizer that keeps craft tools, toiletries, mail, and small household items visible. This original HookElla design combines a firm crochet backing with sixteen wider pocket fronts, pleated lower corners for depth, and a wooden-dowel hanging system.
A useful wall of pockets
The 16-Pocket Crochet Wall Organizer is designed for the small things that otherwise disappear into drawers. Sixteen soft pockets create a visual inventory for craft tools, mail, bathroom supplies, charging cables, or children’s art materials. A firm backing keeps the grid tidy, while pleated lower corners let each pocket hold more than a flat patch can.
This is an original HookElla pattern written from the supplied construction specifications and storyboard.
Finished size and materials
The completed backing measures approximately 24 × 30 inches. The dowel and loops add a little height above the panel. Make the pockets in a neutral colour for a quiet room, or use one colour per row to make sorting easier.
Materials:
- approximately 1,800–2,200 yd worsted/#4 yarn;
- a 5.0 mm (H/8) crochet hook;
- yarn needle, scissors, stitch markers, and measuring tape;
- a straight wooden dowel about 28 inches long;
- five sturdy cord or crochet hanging loops;
- wall hardware rated for the organizer and its light contents.
Abbreviations (US terms)
ch chain, sc single crochet, hdc half double crochet, sl st slip stitch, st stitch, rep repeat, BLO back loop only.
Gauge and fabric
Aim for about 15 sc × 16 rows = 4 inches in the chosen yarn. The fabric should be firm enough that a pocket does not gape when empty, but flexible enough to sew through without a hard ridge.
If your gauge is looser, use a smaller hook or add a stabilizing row. If it is tighter, use a larger hook so the backing does not become heavy and rigid.
Backing panel
The backing is a 24 × 30 inch rectangle worked in rows.
- Chain 91 for a starting width close to 24 inches at the target gauge.
- Row 1: sc in the second chain from the hook and across; ch 1, turn.
- Repeat Row 1 until the panel measures approximately 30 inches tall. At the stated gauge this is about 120 rows, but measure rather than relying on the count.
- Work one final round of sc around the entire rectangle, placing 3 sc in each corner. Fasten off and weave in the end.
Keep the top and bottom edges straight. If the panel curls, lightly steam or damp-block it before attaching pockets.
Pocket front: make 16
Each pocket front is intentionally wider than its finished opening so the lower corners can fold into depth pleats.
- Chain 29 for a pocket front about 7½ inches wide.
- Work sc in rows until the piece measures about 7 inches tall.
- Add one round of sc around the rectangle, placing 3 sc in each corner.
- Work a final BLO sc round across the top edge only. This creates a firm lip that resists stretching.
For shorter pockets, stop at 5½–6 inches tall. For taller pockets, add rows before the edging. Keep all sixteen fronts identical.
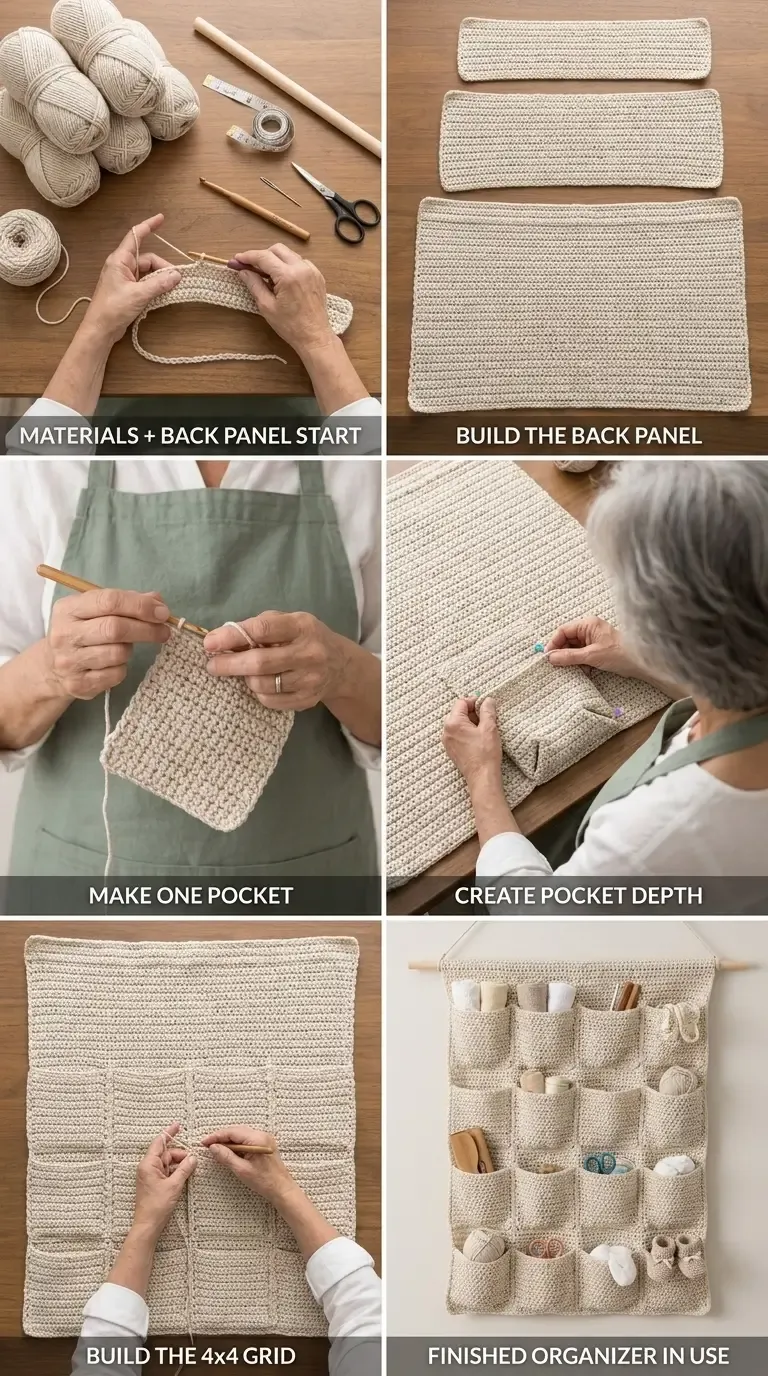
The HookElla construction image is a visual guide to the original dimensions and assembly stages.
Form the lower-corner pleats
The pocket front is wider than the space it will occupy. Create a pleat at each lower corner before attaching it:
- Lay the pocket front flat with the right side facing up.
- Fold the lower-left corner inward by about ½ inch, bringing the side edge toward the centre.
- Make the same fold on the lower-right corner so both pleats mirror one another.
- Pin or clip the folds. The top edge should remain open and straight.
The pleats consume the extra width and create a small bellows effect. If you want deeper pockets, fold only ¼ inch at each corner; if you want a flatter pocket, fold closer to ¾ inch.
Pocket placement: the 4 × 4 grid
Lay the backing right side up. Mark four columns and four rows with a washable marker or removable pins.
For 16 pockets:
- leave about 1½ inches of side margin;
- space columns roughly ¼–½ inch apart;
- leave about 1 inch between pocket rows;
- keep the lowest row at least 1½ inches above the backing’s bottom edge;
- leave a clear top band of about 3 inches for reinforcement and hanging loops.
Centre the grid before sewing. The pocket fronts should overlap neither the side border nor the top dowel sleeve.
Attach the pockets
With each pleat still clipped, sew or slip stitch the lower edge and both side edges to the backing. Use matching yarn and small, even stitches through both layers. Do not close the top edge.
At each lower corner, pass the needle through the folded pleat twice. This distributes the pull when a pocket is filled. Test the depth with a lightweight object before attaching the next row.
For a crochet-only finish, work a round of sc around three sides of the pocket front, then surface slip stitch that edge to the backing. A sewn mattress stitch is flatter and is often easier to control on thick fabric.
Reinforce the top and add the dowel sleeve
Fold the top 2 inches of the backing toward the wrong side to form a sleeve wide enough for the 28-inch dowel. Sew or crochet the lower edge of the sleeve securely across the full width. Leave both ends open so the dowel can slide through.
Add a second line of reinforcement just below the sleeve. This spreads the weight of the organizer across the backing rather than concentrating it in the five loops.
Five hanging points
Make five loops from sturdy crochet chains or doubled cord. Each loop should be long enough to pass around the dowel and return to the panel—about 4–5 inches after joining.
Space the loops evenly: one near each side edge, one centred, and two between the centre and sides. Sew each loop through the reinforced top band with a small rectangle of tight stitches. Add an X through the rectangle for extra security.
Slide the dowel through all five loops and the sleeve. The dowel should extend slightly beyond the panel at both ends. Mount it with two wall brackets or hooks rated for the organizer and its contents.
Light-load safety
This organizer is intended for lightweight items only. Use it for yarn scraps, mail, glasses, charging cables, toiletries, soft craft tools, or small fabric pieces. Do not store liquids, heavy books, sharp scissors, hot items, or anything that could injure someone if it fell.
Install the dowel into suitable wall hardware, not drywall alone. Check the loops, sleeve, pocket seams, and wall brackets regularly. Keep scissors, medication, cleaning products, and small choking hazards out of reach of children.
Resizing guidance
To change the width, adjust the backing chain by multiples of your gauge and resize the dowel so it extends beyond both sides. To change the height, add or remove rows before the top sleeve.
For the pocket grid, keep the same relationship: one pocket per cell, a visible gap between cells, and enough margin for the sleeve and bottom border. A 3 × 4 organizer uses 12 pockets; a 5 × 4 organizer uses 20. Recalculate yarn from the number of pocket fronts and add one extra skein for a larger backing.
Keep pockets shallow if the organizer will hang in a high-traffic walkway. Deeper pleats are best for a secure craft-room or closet location.
Finishing and care
Weave all ends between the backing and pockets where possible. Lightly block the empty organizer on a flat surface, then let it dry before inserting the dowel. Spot-clean first; if the yarn label allows washing, remove the dowel and all contents, wash gently, and dry flat.
For another practical home project, explore HookElla’s Mary Maxim Arm Chair Caddy Showcase or browse the Blankets & Home collection.
Sixteen pockets turn a simple rectangle into a useful piece of wall furniture. Keep the backing firm, let the lower pleats create room, and distribute the hanging load across all five reinforced points.
Helpful questions
How large is the organizer?
The backing panel is approximately 24 inches wide by 30 inches tall before the hanging loops and dowel are added.
How many pockets are included?
Make 16 pockets and place them in four columns by four rows.
What creates pocket depth?
Each pocket front is wider than its opening, and the lower corners are folded into small pleats before the sides and bottom are sewn to the backing.
What dowel and hanging system are used?
The organizer uses an approximately 28-inch wooden dowel and five reinforced hanging points spaced across the top edge.
What can the pockets hold?
Use them for light craft supplies, mail, glasses, toiletries, charging cables, and similar lightweight items. Do not load them with heavy tools, liquids, or sharp objects.
Can I resize the organizer?
Yes. Change the number of pocket columns and rows, keep a clear gap between pockets, and resize the dowel so it extends beyond the finished width.