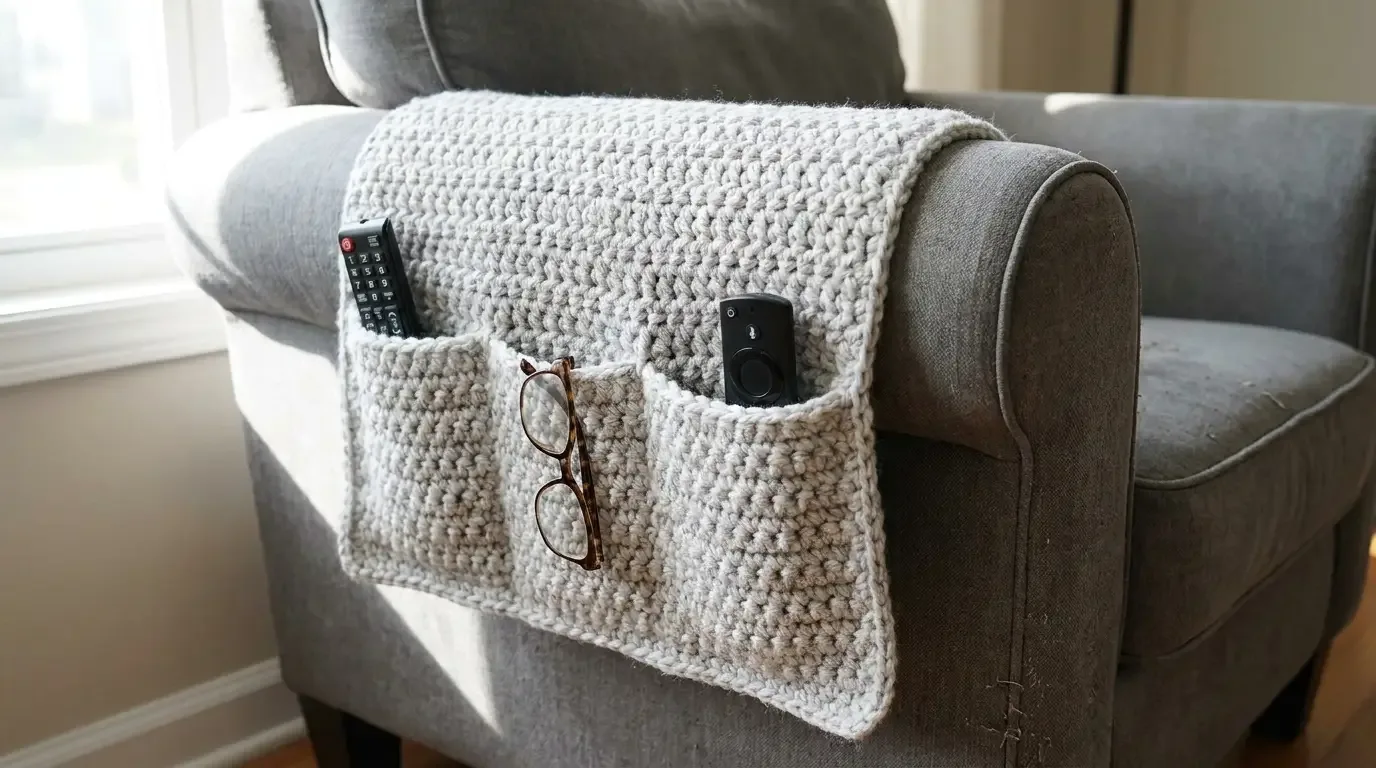
A cosy chair becomes a reading and television station with one useful handmade accessory. Mary Maxim’s Arm Chair Caddy drapes over the arm, anchors with its long body, and adds pockets for remotes, glasses, notebooks, and other small essentials.
A practical pocket for your favourite chair
The Mary Maxim Arm Chair Caddy is a small home project with an immediate everyday payoff. Instead of reaching behind the cushion for the remote or setting glasses on the floor, you get a soft organizer that stays within arm’s reach. The light-gray sample is calm enough for a living room and textured enough to look handmade rather than purely utilitarian.
Mary Maxim is credited as the original design source. The complete HookElla construction below is written from scratch for a 12 × 32 inch light-load caddy; the Mary Maxim listing remains included for attribution.
Verified public specifications
Mary Maxim lists the finished caddy at approximately 12 × 32 inches. The project uses #5 bulky yarn and a 6 mm (J-10) hook. The sample is shown in light gray and is presented as an easy-level home-decor project.
The long dimension is what allows the caddy to travel over an armchair arm and hang down the outside. The shorter width creates a manageable pocket field without making the chair feel covered. Measure your chair before beginning if you are considering a colour or yarn substitution.
Materials and styling palette
For a look close to the public sample, choose:
- #5 bulky yarn in light gray;
- a 6.0 mm (J-10) crochet hook;
- scissors and yarn needle;
- measuring tape and removable markers;
- optional fabric labels or a small wooden tag for gifting.
Bulky yarn makes the caddy work up quickly and gives the pockets enough body for lightweight objects. Soft acrylic or acrylic-blend yarn is practical for a washable home accessory. A smooth yarn makes pocket openings easier to see; a lightly textured yarn adds warmth without obscuring the shape.
Visible construction concept
The HookElla construction image shows three useful stages: a long rectangular panel, smaller pocket panels, and the final attachment. The long panel forms the part that rests over the chair arm. Pocket pieces are placed along the hanging section and sewn or crocheted on so their lower and side edges are secure while the top remains open.
The construction is intentionally modular in appearance. Follow the HookElla stitch counts, pocket measurements, placement, and joining sequence in the section below rather than estimating from the photograph.
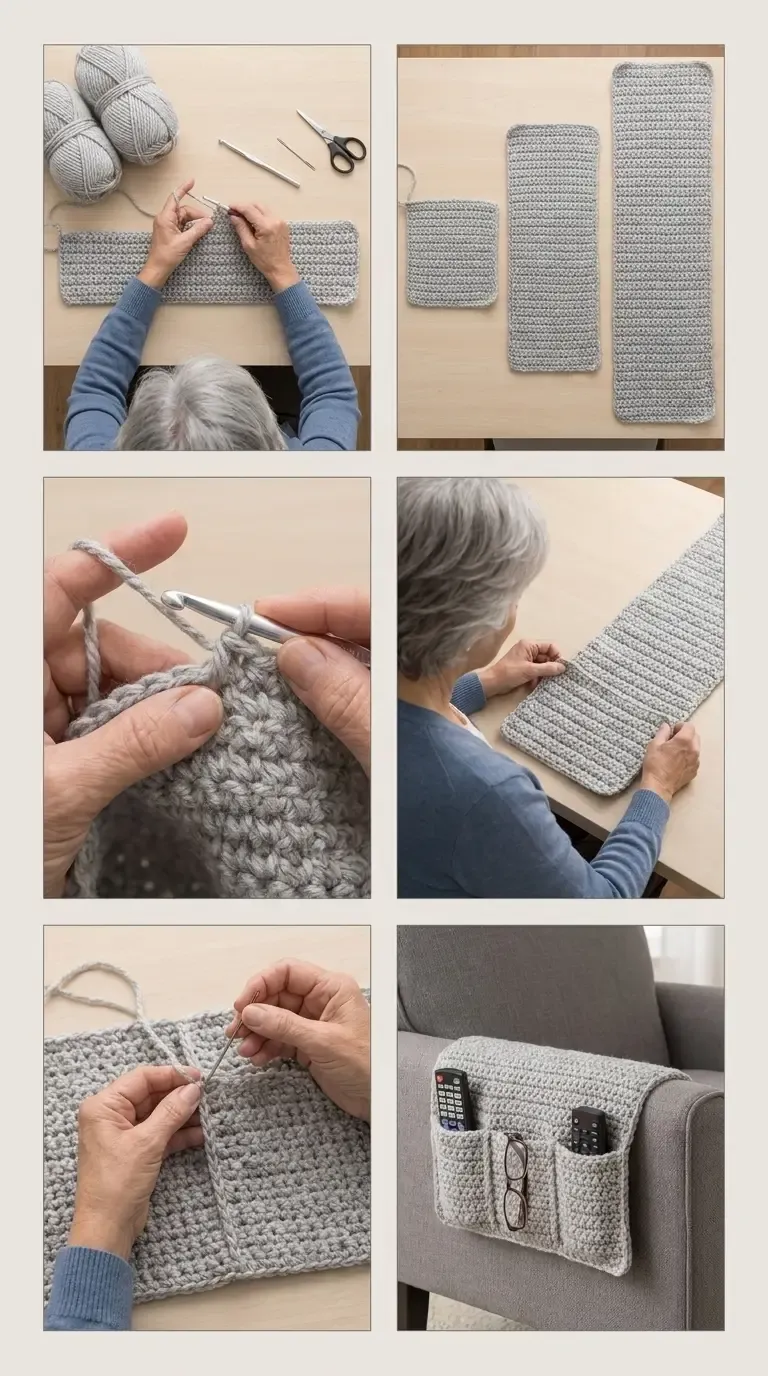
The HookElla image illustrates the construction stages for the original recipe below.
HookElla arm-chair caddy instructions
Use US terms and work in half double crochet (hdc) for a soft, dense fabric.
- Swatch and panel. With #5 bulky yarn and the 6 mm hook, make a swatch. Chain enough stitches for a 12 inch width (about 27 chains at a typical bulky gauge). Work hdc rows until the panel measures 32 inches long. Turn with ch 1; keep the edges straight by placing one hdc in every stitch.
- Round the edges. Work one round of sc around the rectangle, placing 2 sc in each corner. Fasten off and weave in the tail. Lightly steam or damp-block so the panel folds smoothly over a chair arm.
- Make pockets. For each pocket, chain enough for a 5½ inch width (about 13 chains), then work hdc rows to 7 inches tall. Add one sc round around three sides and the top. Make two pockets, or make four smaller pockets by reducing the foundation chain and height.
- Shape pocket depth. At each lower corner, fold a ½ inch tuck toward the centre back. Clip the tucks, then sew the pocket’s lower and side edges to the hanging half of the panel. Leave the top edge open and reinforce both folded corners with a second line of stitches.
- Position and attach. Drape the panel over the arm and mark the pocket centres while it is on the chair. Keep the upper pocket opening easy to reach and leave at least 1 inch between pockets. Sew through the panel and pocket edging with mattress stitch, hiding knots on the wrong side.
- Finish. Weave ends, test each pocket with a lightweight remote or glasses case, and trim any loose loops. The caddy should lie flat over the arm without pulling the upholstery.
Planning the pocket arrangement
Before attaching pockets, place the empty caddy over your own chair and test the reach. The upper pocket should sit where your hand naturally falls; a lower pocket can hold a notebook or yarn tool. Keep enough space between openings that objects can be removed without catching on the neighbouring pocket.
Useful pocket contents include:
- television or lamp remotes;
- reading glasses and a glasses case;
- a phone and charging cable;
- pens, sticky notes, and a small notebook;
- crochet hooks and one small project pouch.
Avoid heavy books, scissors with exposed points, mugs, or anything that could damage upholstery if it falls. The caddy is a light organizer, not a load-bearing bag.
Gauge and chair fit
Because the finished size is given as approximately 12 × 32 inches, make a small swatch in the chosen bulky yarn before committing to yardage. Compare the swatch’s width and drape rather than relying on the label’s suggested hook.
- If the panel is too stiff to bend over the arm, use a larger hook or a softer yarn.
- If it stretches under a remote, tighten tension or use a firmer fibre.
- If your chair arm is wider than the public size, measure the top span and allow enough length to hang down the outside.
Do not block the piece aggressively. A gentle steam or damp shaping is enough to settle the panel while preserving the pocket openings.
Colour ideas for a custom caddy
Light gray is easy to pair with charcoal, cream, navy, sage, blush, or mustard. A two-tone version can use a neutral long panel with a darker pocket band, making each opening easy to identify. For a gift, match the recipient’s chair or reading nook rather than the rest of the yarn stash.
Finishing and care
Weave the ends securely on the wrong side, especially around pocket corners where the fabric receives repeated pulling. Check that the top pocket edges are smooth and that no yarn loops can catch glasses or remote buttons.
Spot-clean whenever possible. If the yarn label allows washing, remove everything from the pockets, place the caddy in a mesh bag, wash gently, and reshape flat. Let it dry completely before placing it back on furniture.
Credit and project suitability
Mary Maxim is credited for the original Arm Chair Caddy inspiration. The stitch counts and assembly above are HookElla’s own adaptable recipe; do not present it as Mary Maxim’s written pattern.
This project suits a confident beginner who is comfortable crocheting rectangles, counting rows, sewing or crocheting seams, and checking measurements against furniture. The stitch work is approachable; accuracy matters most when positioning the pockets and keeping the long panel straight.
For another useful home make, explore HookElla’s Jessie Stash Basket Showcase or browse the Blankets & Home collection.
The Arm Chair Caddy is a lovely reminder that crochet can solve tiny daily frustrations. Make it in a quiet neutral, fill the pockets with the things you reach for most, and let your favourite chair become a little more organised.
Helpful questions
Who publishes the Arm Chair Caddy pattern?
Mary Maxim is credited as the original design source. HookElla’s instructions below describe an original 12 × 32 inch caddy recipe.
What size is the finished caddy?
The public specification is approximately 12 by 32 inches.
What yarn and hook are listed?
The public listing specifies
What does the visible construction look like?
The HookElla version uses a long crocheted panel that drapes over the chair arm, with separate pocket panels attached along the lower section.
What can the pockets hold?
They are useful for remote controls, glasses, a phone, pens, a small notebook, or current crochet tools. Keep heavy or sharp objects out of the pockets.
Can I resize the caddy?
Measure the arm and drape first, then make the HookElla panel to the finished 12 × 32 inch target or adjust the rows to suit your chair.