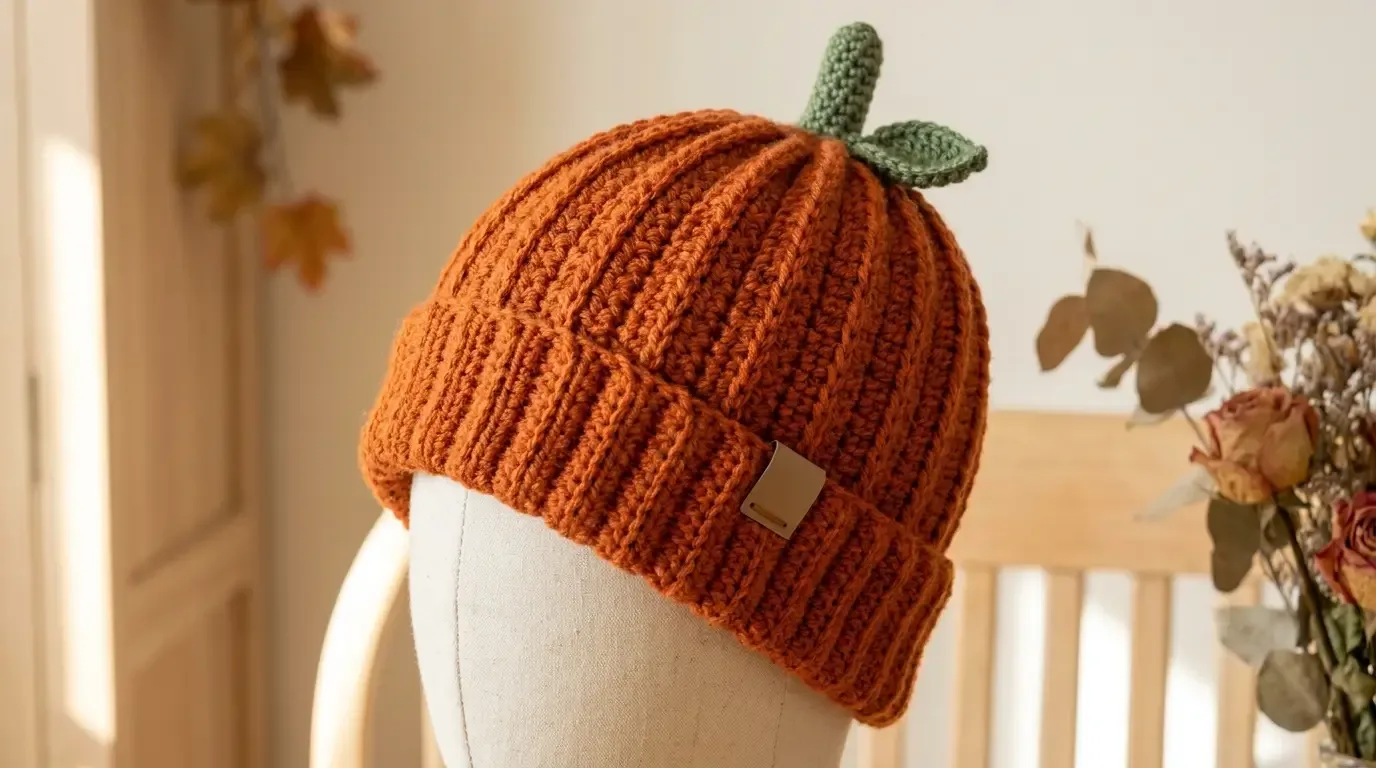
A little pumpkin character, a cozy folded brim, and raised ridges make this beanie a cheerful autumn make. This original HookElla pattern is worked from the crown down in joined rounds, with post stitches forming the vertical channels and a matching crochet stem and leaf sewn on at the end.
About this pattern
Pumpkin Ridge is a cozy fall beanie with a smooth, rounded crown, raised pumpkin-like channels, a deep folded cuff, and a small green stem and leaf. The hat is crocheted from the center of the crown outward, then down the sides in joined rounds. Front-post half-double crochet makes the body ridges; front-post/back-post ribbing continues directly into the cuff. The stem and leaf are made separately and sewn to the crown.
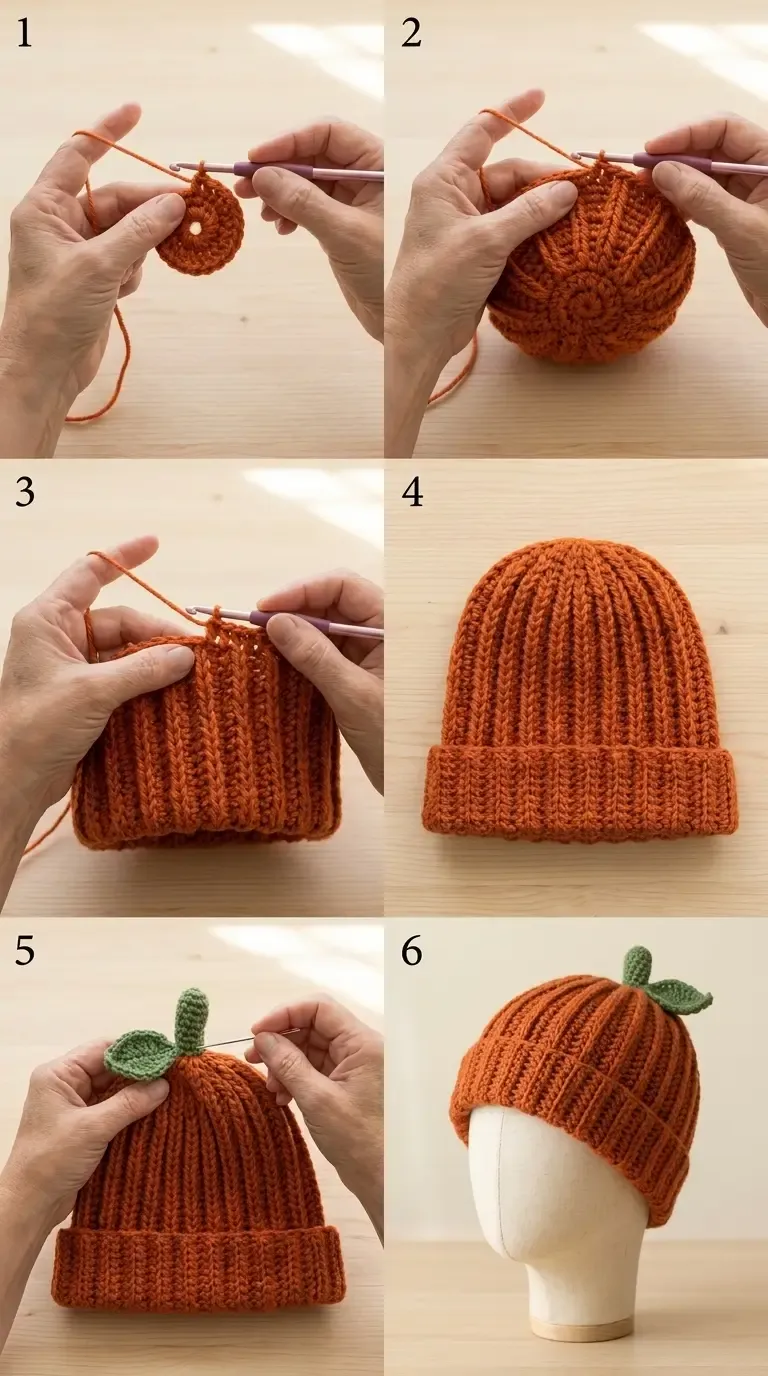
This is a HookElla original with its own stitch sequence and counts. The instructions below are complete on this page. The construction infographic is a visual guide to selected stages only; use the written round counts as the technical directions. This pattern has not been physically test-crocheted.
Materials
- 250–300 yd (229–274 m) DK / category 3 yarn in burnt pumpkin orange. A smooth, plied yarn shows the post-stitch ridges clearly.
- 20–30 yd (18–27 m) DK / category 3 yarn in muted leaf green for the stem, leaf, and optional vine.
- US H/8 (5 mm) hook for the hat; US 7 (4.5 mm) hook for the cuff, stem, and leaf, or sizes needed to meet gauge.
- Stitch marker, tapestry needle, scissors, and tape measure.
Finished size and fit
One adult size is written for a head circumference of 21–22 in (53–56 cm). At the target gauge, the relaxed hat circumference is about 21.8 in (55.4 cm). The body from the lower edge of the crown to the cuff fold measures about 8 in (20.3 cm); the folded cuff adds about 2 in (5 cm), for a finished depth of approximately 10 in (25.4 cm), not including the stem. The small stem extends about 1.5 in (3.8 cm) above the crown.
These are gauge-based calculations, not measurements from a physical sample. Because the post-stitch body has less stretch than plain fabric, check the fit around the wearer’s head before beginning the cuff.
Gauge
In the raised body stitch after washing and drying your swatch as you plan to care for the hat, target 9 stitches and 8 rounds = 2 in (5 cm). Measure the fabric across the center of a swatch worked in the round; the front-post columns count as stitches. A useful swatch is at least 5 in (12.5 cm) across and includes several ridge repeats. The 5 mm hook is a starting point. If your swatch is too small, try a larger hook; if too large, try a smaller one. Yarnivo’s crochet gauge calculator can help check measurement arithmetic, but it cannot determine stretch or replace a washed swatch.
Abbreviations (US terms)
- BLO — back loop only
- BPhdc — back-post half double crochet
- ch — chain
- FPhdc — front-post half double crochet
- hdc — half double crochet
- inc — 2 hdc in the same stitch
- MR — adjustable magic ring
- rep — repeat
- sc — single crochet
- sl st — slip stitch
- st(s) — stitch(es)
- yo — yarn over
The beginning chain does not count as a stitch. Join each hat round with a slip stitch to the first stitch, then ch 1; do not work into the joining slip stitch or the chain-1. Mark the first stitch of each round if helpful.
Special stitches
Front-post half double crochet (FPhdc): Yo, insert the hook from front to back to front around the post of the indicated stitch, yo and pull up a loop, yo and draw through all 3 loops. The stitch sits in front of the fabric.
Back-post half double crochet (BPhdc): Yo, insert the hook from back to front to back around the post of the indicated stitch, yo and pull up a loop, yo and draw through all 3 loops. The stitch sits behind the fabric.
Increase (inc): Work 2 hdc into the same stitch. The stitch count increases by one.
Pattern instructions
Crown
With orange and the 5 mm hook, make an MR. Work in joined rounds. Keep the magic ring tail secure until the crown is complete.
- Round 1: Ch 1, work 7 hdc into MR. Join with sl st to first hdc. 7 sts.
- Round 2: Ch 1, work 2 hdc in each st around. Join. 14 sts.
- Round 3: Ch 1, rep
[hdc in next st, inc]7 times. Join. 21 sts. - Round 4: Ch 1, rep
[hdc in next 2 sts, inc]7 times. Join. 28 sts. - Round 5: Ch 1, rep
[hdc in next 3 sts, inc]7 times. Join. 35 sts. - Round 6: Ch 1, rep
[hdc in next 4 sts, inc]7 times. Join. 42 sts. - Round 7: Ch 1, rep
[hdc in next 5 sts, inc]7 times. Join. 49 sts. - Round 8: Ch 1, rep
[hdc in next 6 sts, inc]7 times. Join. 56 sts. - Round 9: Ch 1, rep
[hdc in next 7 sts, inc]7 times. Join. 63 sts. - Round 10: Ch 1, rep
[hdc in next 8 sts, inc]7 times. Join. 70 sts. - Round 11: Ch 1, rep
[hdc in next 9 sts, inc]7 times. Join. 77 sts. - Round 12: Ch 1, rep
[hdc in next 10 sts, inc]7 times. Join. 84 sts. - Round 13: Ch 1, rep
[hdc in next 11 sts, inc]7 times. Join. 91 sts. - Round 14: Ch 1, rep
[hdc in next 12 sts, inc]7 times. Join. 98 sts.
The crown has fourteen increase rounds: each adds seven stitches, so the final count is 7 × 14 = 98. At gauge, the circle measures about 7 in (17.8 cm) across. Do not pull the joins tight; the center should lie flat rather than cup sharply.
Raised pumpkin body
The body uses a seven-stitch repeat, worked 14 times around the 98-stitch round. The FPhdc sits over the ridge stitch from the previous round; six hdc make the recessed section between ridges. This creates 14 continuous raised columns down the body.
- Round 15: Ch 1, rep
[FPhdc around next st, hdc in next 6 sts]14 times. Join. 98 sts: 14 FPhdc and 84 hdc. - Rounds 16–32: Ch 1, rep
[FPhdc around the FPhdc from previous round, hdc in next 6 sts]14 times. Join each round. 98 sts each round.
Work exactly 18 body rounds, Rounds 15–32. Count fourteen front-post stitches before joining. If a post stitch is accidentally skipped, correct it in that round so the ridge remains continuous. The circumference at target gauge is 98 ÷ 4.5 = about 21.8 in (55.4 cm).
Folded ribbed cuff
The cuff continues directly from the body—there is no separately made band. Switch to the 4.5 mm hook. In the first ribbing round, work around the stitch posts from Round 32; thereafter work each post stitch around its matching post from the previous cuff round.
- Round 33: Ch 1, rep
[FPhdc around next st, BPhdc around next st]49 times. Join. 98 sts. - Rounds 34–48: Ch 1, rep
[FPhdc around next FPhdc, BPhdc around next BPhdc]49 times. Join each round. 98 sts each round.
There are 16 cuff rounds in total. At 4 rounds per inch, the cuff is about 4 in (10 cm) deep before folding and about 2 in (5 cm) when folded. Fasten off and weave the tail to the inside. Fold the cuff upward evenly; do not sew it down unless you want a permanently fixed fold.
Stem, leaf, and optional vine
Make these pieces with the 4.5 mm hook and green yarn. They are sewn to the finished crown after the hat is complete.
Stem
- Round 1: Make MR, ch 1, work 6 sc into ring. Join. 6 sts.
- Rounds 2–6: Ch 1, sc in each st around. Join. 6 sts each round.
Fasten off with a 10 in (25 cm) tail. Pull the MR closed. Lightly roll the small tube between your fingers; do not overstuff it. Sew its open end firmly over the center of the hat crown, passing through several crown stitches.
Leaf
Ch 8.
- Row 1: Starting in 2nd ch from hook, sc in next ch, hdc in next ch, dc in next 2 ch, hdc in next ch, sc in next ch, then work 3 sc in the final ch. Rotate to work along the unused underside of the foundation chain: sc in next ch, hdc in next ch, dc in next 2 ch, hdc in next ch, sc in next ch. Sl st at the base. 15 sts, plus joining sl st.
Fasten off, leaving a sewing tail. Flatten the leaf gently. Sew its base beside the stem with the tip pointing outward; tack once near the middle so the leaf lies against the hat without folding sharply.
Optional curling vine
With green, ch 14. Sl st in 2nd ch from hook and in each remaining ch. Fasten off with tails at both ends. The short slip-stitch strip naturally curls; coil it loosely beside the stem and sew down at the base and one point along its length. The vine is optional and is not shown in the supplied finished photograph, so omit it for an exact photo match.
Assembly
Close the adjustable crown ring securely, then sew the stem over its center. Attach the leaf beside the stem at its base; tack the leaf lightly near the middle so it rests naturally. Add the optional curling vine last, anchoring it at the stem base and one additional point. Do not pierce through both layers of the hat when sewing these small appliqués; catch only the crown fabric and weave each tail into the inside.
Finishing and care
Weave in all orange and green ends securely on the inside, changing direction once and following stitch paths for at least 1.5 in (4 cm). Check that the crown center is closed, the vertical ridges are not pulled tight, and the cuff folds evenly. The hat should sit comfortably above the ears without stretching the crown into a sharp point.
Fit adjustments and troubleshooting
If the hat is too tight, first recheck the washed gauge swatch and try a larger hook; the body is designed around 98 stitches and fourteen ridges, so adding random stitches will break the repeat. If it is too loose, use a smaller hook after swatching. If the crown cups, confirm that all seven increases were made in every increase round and that gauge is not too tight. If it ripples, check that no round has more than seven increases. If the ribs lean, make sure each FPhdc is worked around the FPhdc from the previous round.
Frequently asked questions
Is the crown worked from the center outward?
Yes. Begin with seven hdc in an adjustable ring and increase by seven stitches on each of the next thirteen rounds. Then continue with the body rounds at 98 stitches.
Does the folded cuff need to be sewn in place?
No. The cuff is worked directly from the hat body and folds upward. Leave it free for adjustable depth, or tack it invisibly at the side seams if you prefer it to stay folded.
Can I add the optional vine?
Yes. It is a separate small decorative detail. The finished HookElla photograph shows the hat with the stem and leaf; the vine is optional and is not needed for the beanie’s fit or construction.
Follow the yarn label for washing. Hand wash gently when possible, press water out in a towel, reshape the crown and cuff, and dry flat. Avoid ironing the raised texture. Because the stem and leaf are small attached parts, sew them securely and inspect the seams periodically; this fashion hat is not intended for a child under three if decorative pieces could detach.
For another adult hat construction, browse HookElla’s Wearables & Accessories patterns or see the Cloudridge 3D Beanie.
Inspiration and attribution
Pumpkin Ridge is an independently authored HookElla design. Its broad seasonal pumpkin-beanie inspiration is credited to Michelle Moore of MJ’s Off The Hook Designs, designer of The Pumpkin Patch Hat. No instructions, charts, or distinctive stitch sequences from that paid pattern are reproduced here.
Helpful questions
Is this the Pumpkin Patch Hat pattern from MJ’s Off The Hook Designs?
No. Pumpkin Ridge is an independently written HookElla pattern. It shares only the broad pumpkin-beanie idea; it does not reproduce that designer’s instructions.
Is the pattern physically tested?
No physical sample test is claimed. Stitch counts, repeat arithmetic, construction order, and gauge-based measurements were checked mathematically. Make a swatch and check fit as you work.
Can I omit the leaf or vine?
Yes. The stem and leaf are sewn-on decorative pieces, and the short curling vine is optional. The hat itself is complete without them.
How do I adjust the size?
This page gives one adult size. Do not add crown increases or rounds arbitrarily: changing the crown count affects both its diameter and the body circumference. Use a new swatch and recalculate the crown before altering the stitch count.