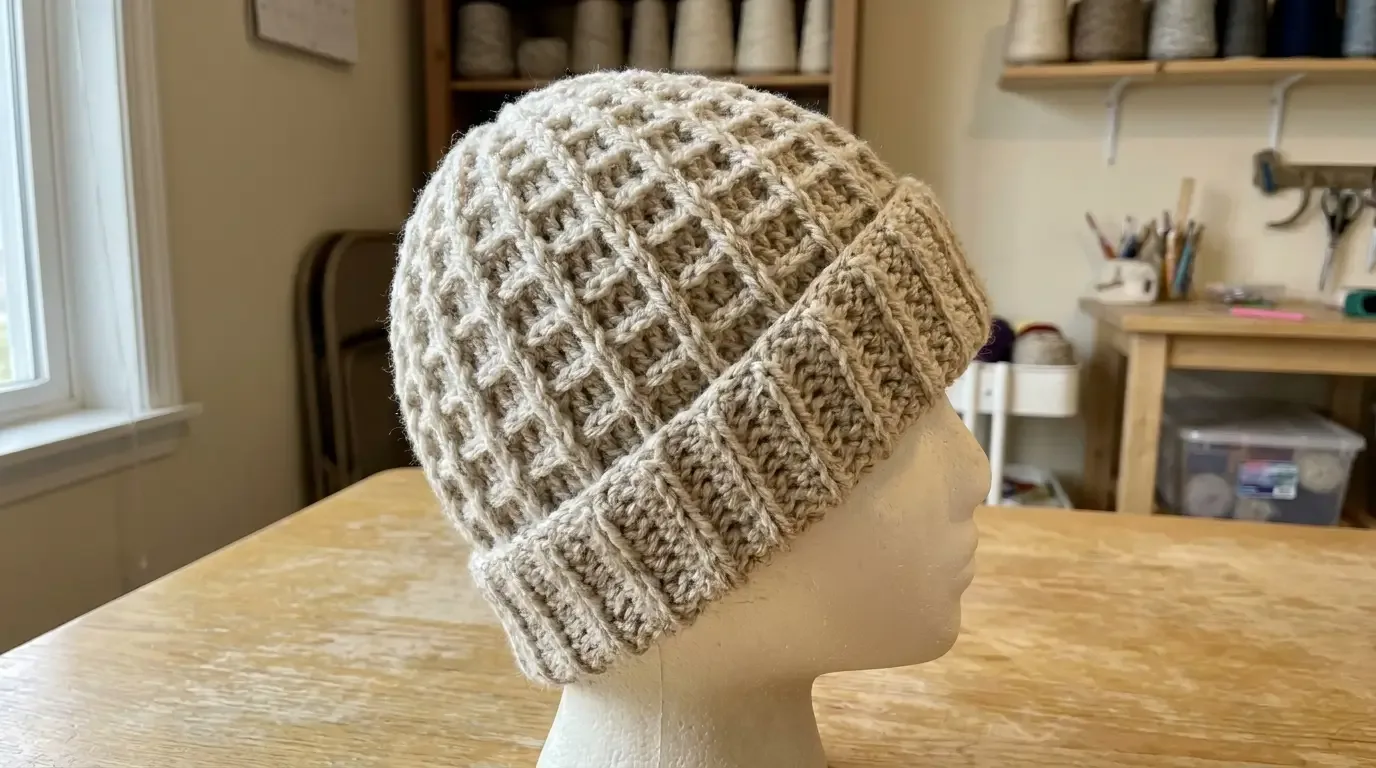
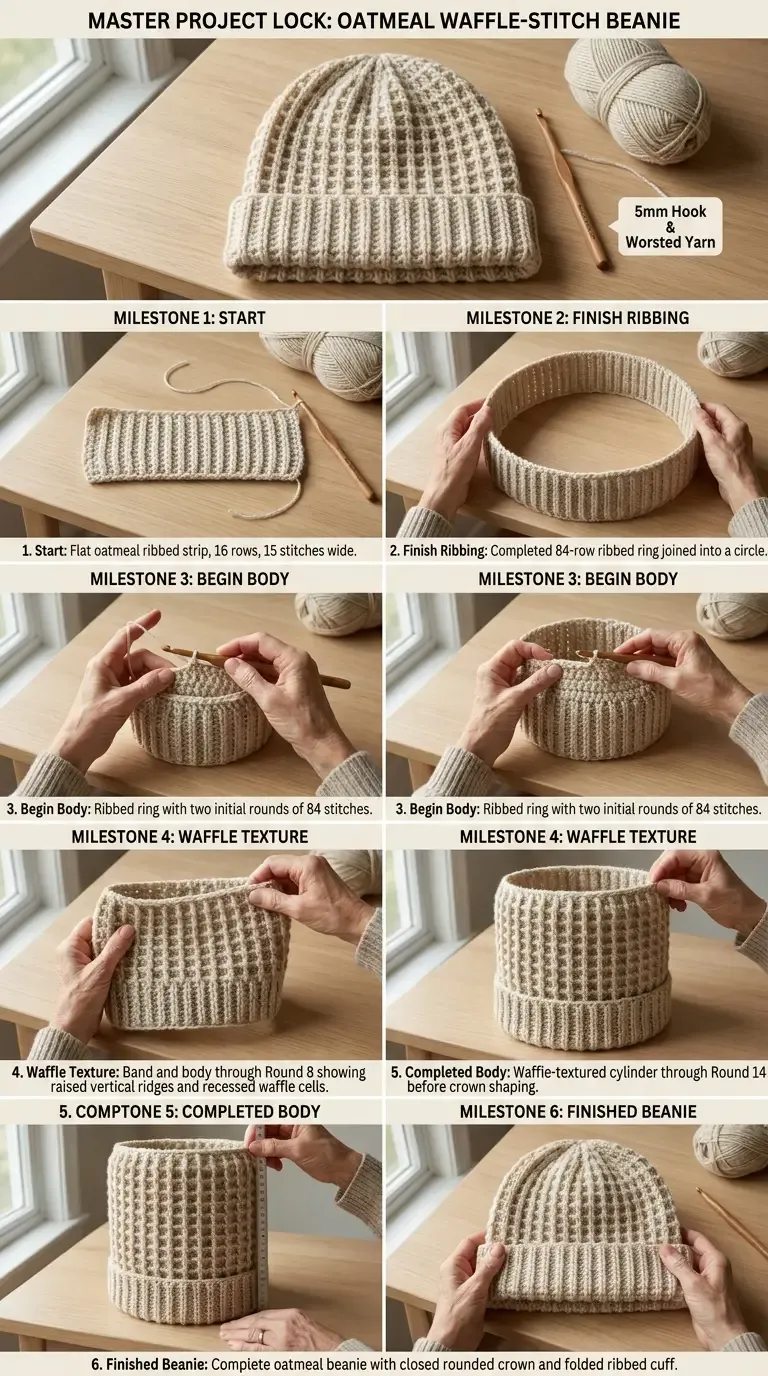
This independently written HookElla beanie pairs a two-round waffle texture with a ribbed band worked flat and joined into a ring. The listed gauge and finished measurements are planning targets, not HookElla sample results.
About this pattern
The Oatmeal Waffle-Stitch Beanie is an adult hat with a raised, repeating grid, a gently rounded crown, and a folded ribbed cuff. Its band is crocheted flat first, joined at the short ends, and then used as the foundation for the body. The hat has no separate sewn-on cuff, pom-pom, tag, or extra color.
The waffle and ribbing gauges below are targets for planning, not measurements taken from a HookElla sample. The pattern has not been physically tested. Make and measure both swatches before relying on the estimated fit.
Materials
- 200–240 yd (183–219 m) estimated #4 medium/worsted-weight yarn in oatmeal or warm cream. The amount depends on yarn, tension, and how deeply you fold the cuff.
- 5 mm (H/8) crochet hook, or a size that gives the target gauge.
- Stitch markers, measuring tape, scissors, and a yarn/tapestry needle.
Finished size and fit
This is one adult size, planned for approximately 21–22.5 in (53.5–57 cm) head circumference. At the target waffle stitch gauge, 84 stitches work out to about 19.76 in (50.2 cm) relaxed around: 84 × 4 ÷ 17. That is roughly 1.24–2.74 in smaller than the intended head range, but the actual negative ease depends on your yarn, gauge, and fabric stretch. This estimate is not a fit guarantee.
The planning target for finished height is about 8.5–9 in (21.5–23 cm) with the cuff folded approximately 1.5 in. This is an estimate assembled from separate fabric sections, not a measured dimension. The 15-row sc ribbing is intended to make a band about 3 in wide before folding; its height is not determined by the waffle-body gauge. Measure the beanie as you work and adjust only after checking the effect on the cuff and crown proportions.
Gauge and swatching
Target gauge in the waffle-textured fabric is 17 stitches and 11 rounds per 4 in (10 cm) after the swatch has relaxed. This target is informed by the visual reference, not independently measured HookElla fabric. Waffle stitches can draw in, so use the actual repeat rather than a plain-dc swatch.
For a practical check, work a swatch at least 6 repeats wide and 6 rounds tall, alternating Waffle A and Waffle B as described below. Let it rest flat, then measure the center 4 in without stretching. Separately crochet a strip of 15 sc BLO rows and measure how many rows make 3 in; the base band uses 84 rows and is meant to measure 19.5–20 in relaxed before seaming. That circumference target corresponds to roughly 16.8–17.2 band rows per 4 in. The 15-stitch band width is intended to measure about 3 in before folding (roughly 20 rows per 4 in), so check it separately. You can use the Yarnivo crochet gauge calculator to convert your measured swatch, but a calculator cannot establish how the finished hat will stretch or fit.
If the relaxed 84-stitch body circumference or the 84-row band measurement is substantially different from your target, change hook/tension and swatch again before beginning. The crown below is specifically calculated for 84 stitches; changing the count means recalculating the crown as well.
Abbreviations (US terms)
- BLO — back loop only
- ch — chain
- dc — double crochet
- dc2tog — double crochet two together
- FPdc — front-post double crochet
- rep — repeat
- sc — single crochet
- sl st — slip stitch
- st(s) — stitch(es)
Special stitches and construction notes
Back-loop-only single crochet (sc BLO): Work a single crochet into the back loop only of the stitch, leaving the front loop unused. The row ridges form the ribbed band.
Front-post double crochet (FPdc): Yarn over, insert the hook from front to back and back to front around the post of the indicated stitch, yarn over and pull up a loop, then finish as a regular double crochet. Do not work into that stitch’s top loops as well.
Double crochet two together (dc2tog): Yarn over, insert into the next stitch and draw up a loop; yarn over and pull through two loops. Yarn over, insert into the following stitch and draw up a loop; yarn over and pull through two loops. Yarn over and pull through all three loops remaining on the hook. Two stitches become one.
All beginning chains are height chains only and do not count as stitches. Join every body round with a slip stitch to its first actual stitch, not to the chain or joining slip stitch. Do not turn the body rounds. The band is joined before the body begins; make sure it is not twisted.
The two-round waffle sequence is independently specified here as three-position groups. Waffle A places one raised post stitch followed by two regular double crochets; Waffle B places two raised post stitches followed by one regular double crochet. Each group uses three stitches, and the alternation moves the raised groups across the fabric to make a grid. Always work the next round around the posts in the immediately preceding round.
Complete pattern instructions
Ribbed band — worked flat
The band is 15 stitches wide and 84 rows long. Its rows go around the head; its 15-stitch width becomes the folded cuff height.
- Foundation: Ch 16.
- Row 1: Sc in the second ch from the hook and in each remaining ch across; turn. 15 sc.
- Rows 2–84: Ch 1, which does not count as a stitch. Sc BLO in each of the 15 stitches across; turn. 15 sc each row. Work 83 rows in this instruction, for a total of 84 rows including Row 1.
Before seaming, measure the band relaxed. The target is approximately 19.5–20 in. If it is too short or long, adjust the row count by multiples of three to preserve the body repeat; the number of stitches picked up for the body and the crown shaping must then be recalculated. Do not use the 84-stitch crown unchanged on a different circumference.
Bring the first and last row edges together without twisting. Join the short ends with a slip-stitch seam through matching edge loops, or sew them together with the yarn needle. Keep the seam even and low-profile. The long unjoined edge is the top edge where the body will be worked.
Body — joined rounds
Place a marker at the first stitch of each round if helpful. Work into the top edge of the ribbed ring.
- Round 1: Ch 1 (does not count). Work 1 sc into each of the 84 row ends around the band, spacing them evenly; join with a sl st to the first sc. 84 sc.
- Round 2: Ch 2 (does not count). Dc in each stitch around; join to the first dc. 84 dc.
- Round 3 — Waffle A: Ch 2. Repeat [FPdc around the post of the next stitch, dc in the top loops of each of the next 2 stitches] 28 times; join to the first FPdc. 84 sts: 28 FPdc and 56 dc.
- Round 4 — Waffle B: Ch 2. Repeat [FPdc around the posts of the next 2 stitches, dc in the top loops of the next stitch] 28 times; join to the first FPdc. 84 sts: 56 FPdc and 28 dc.
- Round 5 — Waffle A: Repeat Round 3. 84 sts.
- Round 6 — Waffle B: Repeat Round 4. 84 sts.
- Round 7 — Waffle A: Repeat Round 3. 84 sts.
- Round 8 — Waffle B: Repeat Round 4. 84 sts.
- Round 9 — Waffle A: Repeat Round 3. 84 sts.
- Round 10 — Waffle B: Repeat Round 4. 84 sts.
- Round 11 — Waffle A: Repeat Round 3. 84 sts.
- Round 12 — Waffle B: Repeat Round 4. 84 sts.
- Round 13 — Waffle A: Repeat Round 3. 84 sts.
- Round 14 — Waffle B: Repeat Round 4. 84 sts.
In a regular dc, insert under both top loops of the stitch. For an FPdc, encircle the post and skip that stitch’s top loops; this preserves one stitch position per post. Each A or B repeat consumes three previous stitches and makes three stitches, so 28 repeats use all 84 positions and keep the circumference constant. Rounds 3–14 are six complete A/B pairs.
Rounded crown
Keep joining to the first actual stitch without turning. On each decrease round, repeat the bracketed sequence exactly 12 times. The decrease groups are centered evenly around the hat.
- Round 15: Ch 2. Repeat [dc in next 5 sts, dc2tog over next 2 sts] 12 times; join. 72 sts.
- Round 16: Ch 2. Repeat [dc in next 4 sts, dc2tog over next 2 sts] 12 times; join. 60 sts.
- Round 17: Ch 2. Repeat [dc in next 3 sts, dc2tog over next 2 sts] 12 times; join. 48 sts.
- Round 18: Ch 2. Repeat [dc in next 2 sts, dc2tog over next 2 sts] 12 times; join. 36 sts.
- Round 19: Ch 2. Repeat [dc in next st, dc2tog over next 2 sts] 12 times; join. 24 sts.
- Round 20: Ch 2. Dc2tog over the next 2 sts 12 times; join. 12 sts.
Fasten off, leaving a tail about 12 in long. Thread it through the top loops of the 12 remaining stitches, pull firmly to close the crown, then secure the tail on the inside and weave it through several stitches.
Assembly and finishing
The band seam is the only side seam. Turn the hat right side out and position the seam at the back. Fold the lower band upward about 1.5 in so the ridged ribbing shows as a cuff. The band is integral and should not be sewn on as a separate piece. Adjust the fold evenly around the hat; do not add a pom-pom or other decoration if you want to preserve the pictured design.
Weave in the starting and ending tails. Follow the yarn label for care. If blocking, use a gentle method suitable for the fiber and do not flatten the raised waffle texture.
Fit adjustments and troubleshooting
- Band is too tight or loose: Measure the flat strip relaxed before seaming. Adjust its row count in multiples of three, then make the body pickup count match the new total. The crown schedule here is only for 84 stitches; rework the decrease spacing for another count.
- Body is too tight: Check the actual waffle gauge across the raised fabric. The 84-stitch target projects to about 19.76 in relaxed at 17 sts per 4 in. Waffle texture may pull in, so do not assume the plain-dc gauge applies.
- Grid appears as ribs instead of squares: Confirm that the raised posts are worked around posts in the immediately preceding round and that Round 3 A alternates with Round 4 B. Keep all 84 positions; do not work into a post’s top loops a second time.
- Band seam twists: Lay the ring flat and trace both long edges before joining. If the ring has a half-turn, undo the seam and realign it.
- Crown looks pointed or puckered: Check that every decrease round has exactly 12 evenly distributed decreases. Tight joins or tight turning chains can also gather the crown unevenly.
- Height differs from the estimate: Round height differs among sc, dc, and post-stitch fabric. Measure the hat after Round 14 and after the crown; the 8.5–9 in target is not a guarantee or a reason to omit crown rounds.
Frequently asked questions
Is this worked from the bottom up?
Yes. The back-loop ribbed band is first worked flat, joined into a ring, and the body and crown are then worked upward from its long edge.
Does this pattern have a separate cuff?
No. The cuff is part of the same ribbing strip that forms the band. It is folded up after the hat is complete.
Is the pattern physically tested, and are the measurements exact?
No. The gauges are targets, and the dimensions and yardage are estimates. The stitch counts, repeat arithmetic, round transitions, and decrease sequence have been checked mathematically; physical swatching and fitting are still needed.
How do I change the size?
This is a single adult size. Changing the circumference requires coordinating the band row count, body pickup count, three-stitch waffle repeat, and crown decreases. The provided 84-stitch instructions should not be stretched into a different size without recalculating those parts.
For a simpler texture with continuous vertical ribs, see HookElla’s ribbed crochet beanie pattern.
Helpful questions
Is this the Rich Textures Crochet pattern?
No. These are complete, independently specified HookElla instructions using a separately written ribbed band, waffle repeat, and crown schedule. Sarah's design is credited at the end as visual inspiration only.
Has this hat been physically tested?
No. The stitch and round gauges are targets for the maker to swatch, and the dimensions and yardage are estimates. The stitch counts, repeats, and crown arithmetic have been checked, but no sample has been crocheted.
Can I change the ribbing circumference?
The written crown is designed for 84 stitches and 28 waffle repeats. Changing the ribbing length requires matching the pickup count to a multiple of three and recalculating the crown decreases; the base instructions do not automatically resize.
Does the pattern include a pom-pom?
No. The finished design is oatmeal cream with a folded ribbed cuff and rounded crown, without a pom-pom or added decoration.
Inspiration credit
This is an independently specified HookElla pattern. Sarah of Rich Textures Crochet's oatmeal waffle beanie informed the broad visual inspiration; her written instructions, charts, and photographs are not reproduced here. Sarah's Waffle Beanie, Rich Textures Crochet.