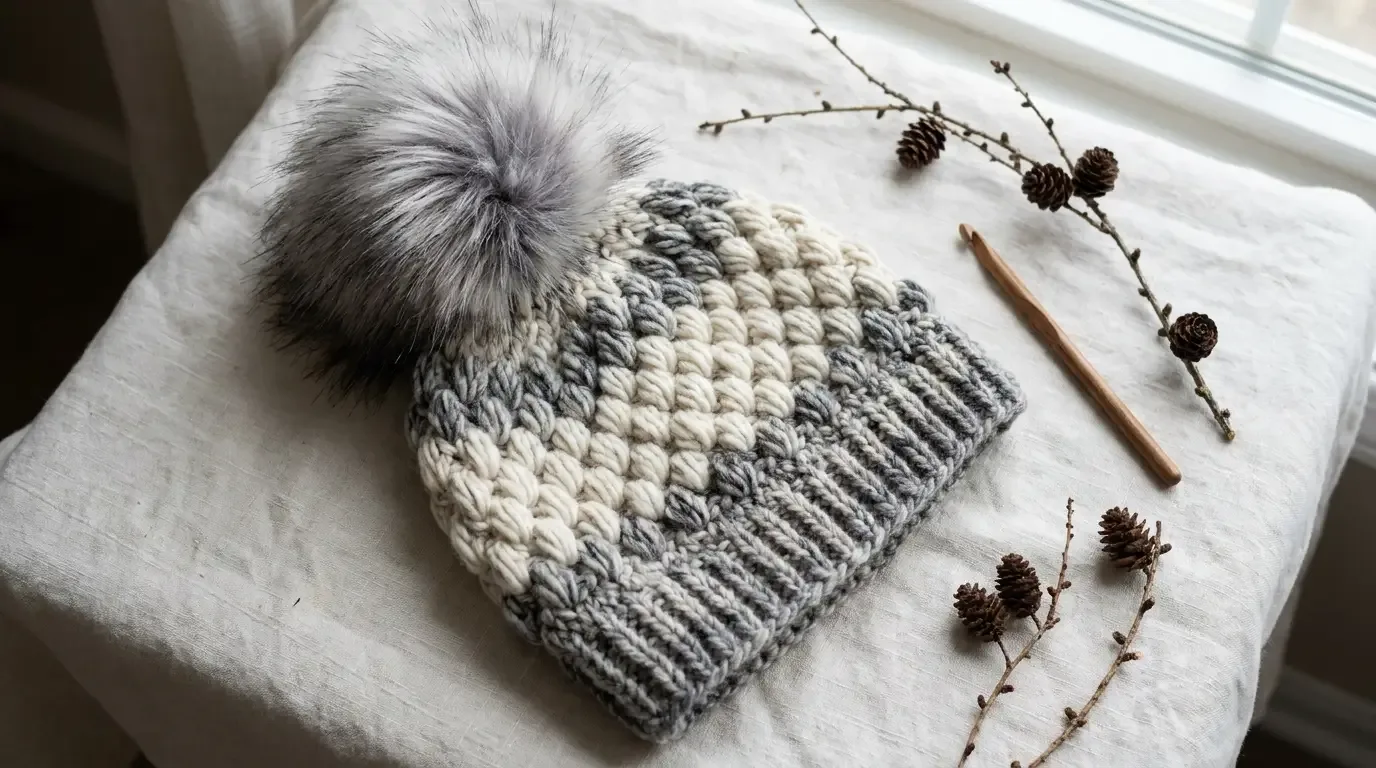
Soft charcoal-to-cream color changes and rounded puff clusters give this cozy beanie its frosted, dimensional look. The hat is worked as one sideways panel: a narrow ribbed cuff is built into one edge, the panel is seamed into a tube, and the crown is gathered closed.
About this pattern
The Frosted Ridge Beanie is a HookElla original designed around a sideways panel, rather than the protected stitch sequence in the separate Sheltering Ridge pattern by Tonya Bush. Its rounded texture comes from a standard five-leg half-double-crochet puff, placed in alternating positions on two right-side rows of a four-row repeat. The first 12 stitches of every row make the integrated ribbed band; the other 32 stitches form the hat body.
The pictured yarn is a self-striping charcoal, gray, and cream medium-weight cake. Its color changes happen naturally as you work each row around the circumference. The panel is joined along its first and last rows, gathered at the crown, and finished with one oversized faux-fur pom-pom. The written pattern below is complete without a construction infographic; the supplied six-stage graphic has been excluded because it shows a different construction sequence.
Materials
- 250–300 yd (229–274 m) medium-weight / #4 yarn. The pictured palette is Caron Blossom Cakes in Charcoal or a similar self-striping gray-and-cream yarn. Yardage is an estimate; puff clusters use more yarn than plain stitches.
- US H/8 (5 mm) crochet hook, or the size needed to match gauge.
- Tapestry needle, locking stitch marker, scissors, and tape measure.
- One oversized gray faux-fur pom-pom with a sew-on loop. A detachable pom-pom is optional; see the safety note in Finishing.
Choose a soft yarn that feels comfortable against the forehead. If using a cake yarn, begin at a charcoal section for a darker cuff, then let the gray and cream transitions fall where they may. Do not cut or rejoin at every color transition.
Finished size and fit
One adult-medium size is written for a head circumference of about 21–22 in (53–56 cm). At the target gauge, the relaxed panel circumference is about 21.1 in (53.6 cm). The flat panel is about 21.1 in (53.6 cm) long by 12.6 in (32 cm) high before seaming and folding. The 12-stitch ribbed section is about 3.4 in (8.7 cm) before folding and shows about 1.7 in (4.4 cm) as a doubled cuff. The resulting brim-to-crown depth is approximately 10.9 in (27.6 cm).
These are gauge calculations, not sample measurements. The ribbed edge has some give, but the puff fabric is comparatively firm. Measure the wearer and check the panel as you work rather than assuming the fabric will stretch to a larger size.
Gauge and sizing check
In the puff-textured body, after washing and drying the swatch as you plan to care for the hat, target 14 stitches and 11 rows = 4 in (10 cm). Stitch gauge is measured across the panel from the cuff edge toward the crown; row gauge is measured along the panel, which becomes the hat circumference after seaming.
Make a swatch at least 6 in square containing both puff placements and plain rows. Measure across the center, not the edges. The 5 mm hook is a starting point, not a guarantee of gauge. If your stitch gauge is too tight, try a larger hook; if your row gauge is off, adjust tension or hook and swatch again. The 58-row circumference and the cuff/body split are written for the target gauges. Yarnivo’s crochet gauge calculator can help check the measurement arithmetic, but it cannot predict stretch, fit, or substitute for a washed swatch.
Abbreviations (US terms)
- BLO — back loop only
- ch — chain
- hdc — half double crochet
- puff — five-leg half-double-crochet puff (defined below)
- rep — repeat
- RS / WS — right side / wrong side
- sc — single crochet
- st(s) — stitch(es)
- stitch marker — removable marker used to mark the cuff/body boundary
- turn — turn the work to begin the next row
- yo — yarn over
The turning chain does not count as a stitch. A completed puff is one stitch. Its locking chain is part of the puff and does not add a stitch.
Special stitches and construction notes
Five-leg hdc puff: In the indicated stitch, yo, insert hook in the stitch, yo and pull up a loop, yo and pull through 2 loops, leaving the last loop on the hook five times. There are 6 loops on the hook. Yo and draw through all 6 loops, then ch 1 to close and lock the puff. The puff uses one stitch and counts as one stitch. Work the five legs loosely enough to pull through the final loops without straining. Do not work into the locking chain on the next row.
Row orientation: Rows 1, 3, 5, and every other textured row begin at the cuff edge and move toward the crown edge. The even rows travel back from crown to cuff. The cuff is the first 12 stitches of each row; the body is the remaining 32. Place a marker at the boundary as a reminder, moving it to the corresponding boundary on each new row.
Puff placement: Motif A uses [sc in next st, puff in next st, sc in next 2 sts] eight times. Motif B shifts each puff two stitches by using [sc in next 3 sts, puff in next st] eight times. Each repeat consumes and produces four stitches, so both motifs fit exactly across the 32 body stitches.
Pattern instructions
Foundation
With the charcoal end of the cake if available, ch 46. The first two chains are skipped; the remaining 44 positions are divided into 12 cuff stitches and 32 body stitches. Keep the working yarn relaxed so the foundation edge can stretch gently.
- Row 1 (RS, cuff to crown): Hdc in 3rd ch from hook and next 10 ch (12 hdc for cuff). Sc in each of the remaining 32 ch (body). Turn. 44 sts. (12 hdc, 32 sc.)
- Row 2 (WS, crown to cuff): Ch 1. Sc in each of the first 32 body sts. Hdc BLO in each of the last 12 cuff sts. Turn. 44 sts. (32 sc, 12 hdc.)
Four-row body repeat
Rows 3–6 form one repeat. Keep the yarn changes natural; do not cut the cake at color transitions. Each row has 44 stitches, and the turning chain never counts.
- Row 3 (RS, cuff to crown; Motif A): Ch 1. Hdc BLO in each of the first 12 cuff sts. Across the next 32 body sts, rep
[sc in next st, puff in next st, sc in next 2 sts]8 times. Turn. 44 sts. (12 hdc, 24 sc, 8 puffs.) - Row 4 (WS, crown to cuff): Ch 1. Sc in each of the first 32 body sts. Hdc BLO in each of the last 12 cuff sts. Turn. 44 sts. (32 sc, 12 hdc.)
- Row 5 (RS, cuff to crown; Motif B): Ch 1. Hdc BLO in each of the first 12 cuff sts. Across the next 32 body sts, rep
[sc in next 3 sts, puff in next st]8 times. Turn. 44 sts. (12 hdc, 24 sc, 8 puffs.) - Row 6 (WS, crown to cuff): Ch 1. Sc in each of the first 32 body sts. Hdc BLO in each of the last 12 cuff sts. Turn. 44 sts. (32 sc, 12 hdc.)
Repeat Rows 3–6 thirteen more times, ending after Row 58. There are 14 four-row repeats (56 rows), plus Rows 1–2, for 58 rows total. Keep the same cuff/body split and repeat counts throughout. Fasten off with a tail about 30 in (76 cm) long for the side seam. The seam joins Row 1 to Row 58; it does not close the crown.
Form the tube and gather the crown
Lay the panel flat with the RS facing up. Bring the first-row edge and Row 58 edge together, matching cuff to cuff and body to body. With the long tail and a tapestry needle, mattress-stitch through the corresponding loops along all 44 stitch positions, from the cuff edge to the crown edge. Keep the seam flexible and secure the yarn at both ends. The panel is now a tube with one long cuff edge and one open crown edge.
Thread a separate 20 in (50 cm) length of matching yarn onto the needle. Along the crown edge, catch one sturdy edge loop from each of the 58 rows. Because the work reverses direction at every row, the crown edge is the last stitch of odd rows and the first stitch of even rows. Do not catch the cuff-side edge. Pass through all 58 loops a second time, then draw the yarn gradually to close the opening. Distribute the gathers evenly, sew across the small center opening several times, and weave the tail securely inside. This forms the rounded gathered crown without a separate disk or decrease rounds.
Construction image
The six-stage infographic supplied with this project is intentionally not included: its panels depict a ring cuff and body rounds, which do not match this pattern’s flat panel and side seam. The finished HookElla photo above is the matching featured image. A corrected process illustration can be added later if supplied; it is not needed to follow the complete written instructions.
Assembly and finishing
Fold the lower ribbed section upward so it doubles back over itself and shows about 1.7 in (4.4 cm) of ribbing. Smooth the fold around the circumference; leave it free to unfold unless you prefer to tack it invisibly at the side seam and opposite side.
Sew the faux-fur pom-pom through its attachment loop to the gathered crown with several passes of strong matching yarn. Secure the knot inside the hat and weave the ends through the dense crown fabric. If you use a removable button-backed pom-pom, attach the button firmly and inspect it regularly; omit detachable parts for young children or anyone for whom a loose button could be hazardous.
Weave in all remaining ends on the inside, following the stitch paths for at least 2 in (5 cm) and changing direction once. If the yarn label permits, gently hand wash or machine wash in a mesh bag, reshape without flattening the puffs, and dry flat. Do not iron or press the raised texture. Brush faux fur only as its care label allows.
Fit adjustments and troubleshooting
- The circumference is too small or large: First confirm the 11-row gauge after washing. The written adult-medium size uses 58 rows; changing row count changes circumference, so add or remove complete four-row blocks only after measuring. Keep an even number of complete blocks and check that the side edges will meet without stretching.
- The hat is too short or tall: Stitch gauge controls panel height. The 12-stitch cuff and 32-stitch body are written for this silhouette. Do not add stitches casually: the body repeat needs 32 stitches. If changing hook size does not produce a comfortable fit, re-swatch before altering the written stitch counts.
- The puff row count drifts: Place a marker at the start of each body section. Motif A and Motif B each have eight repeats of four stitches (32 body stitches total); count eight puffs before turning.
- Puffs feel tight or hard to close: Pull up each of the five puff legs to a consistent height and keep the loops relaxed. If the hook cannot pass through all six loops comfortably, use a slightly larger hook for the puff row and verify the resulting fabric gauge.
- The cuff edge curls: Keep the foundation chain loose and work every cuff stitch through the back loop only. A washed swatch will show whether a different hook size gives the band enough stretch.
- The crown closes unevenly: Catch all 58 row-end loops, pass through them twice, and tighten in small increments while distributing the gathers around the opening.
- The seam is bulky: Use mattress stitch through corresponding edge loops only; avoid catching multiple layers or pulling the seam tight.
Frequently asked questions
Is this beanie worked in the round?
No. It is one flat sideways panel worked in rows, seamed into a tube. The crown is gathered from the row ends; there are no body rounds or separate crown piece.
Do I need to change colors manually?
No. The pictured effect comes from self-striping gray-and-cream yarn. Continue working from the same cake and let the color transitions fall naturally. If substituting a solid yarn, the shape and puff texture remain, but the frosted bands will not.
Is the finished pattern physically tested?
No physical test crochet is claimed. Foundation, repeat, stitch-count, seam, crown-gather, and gauge-derived dimensions have been checked mathematically. Make and wash a swatch, and verify the fit against the wearer before finishing.
Can I make the hat larger?
This page fully writes one adult-medium size. A larger circumference requires a recalculated row count and fit check; simply adding an arbitrary number of rows may disrupt the texture repeat or make the seam mismatch. The listed instructions should not be treated as a graded size range.
For another dimensional adult hat, see the Cloudridge 3D Beanie or browse HookElla’s Wearables & Accessories.
Inspiration and attribution
This is an independently developed HookElla pattern using a standard five-leg puff, its own offset placement, and separately checked counts and construction. It is not the Sheltering Ridge pattern and does not reproduce Tonya Bush’s protected instructions. The broad puff-textured beanie inspiration is credited to Tonya Bush of Nana’s Crafty Home.