This HookElla pattern describes a clean-edged, top-down beanie with a plain double-crochet crown and continuous vertical post-stitch ribs. Its circumference, crown diameter, and height are clearly labeled gauge-based estimates; the pattern has not been physically sample-tested.
About this pattern
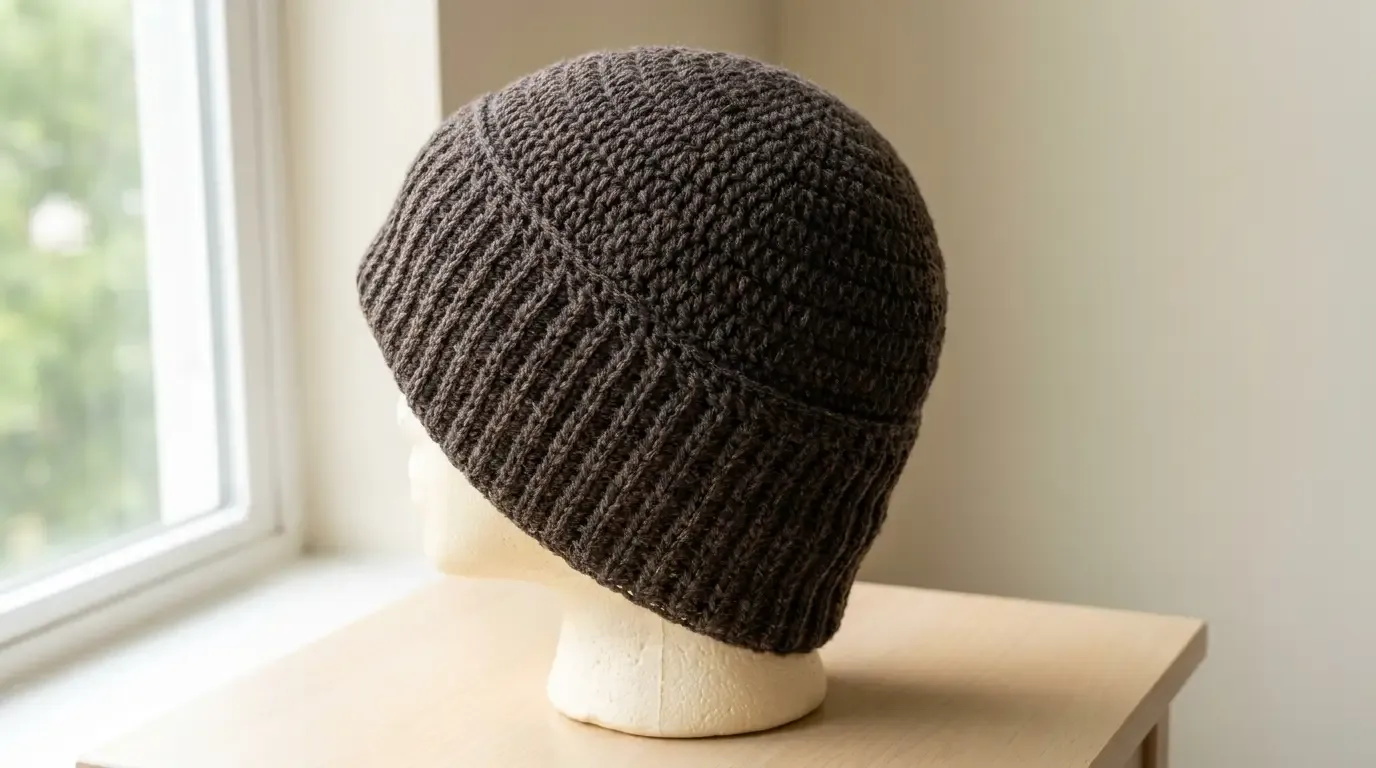
The Dark Brown Ribbed Beanie is an independently specified, adult-size, top-down crochet hat. A smooth double-crochet crown transitions into narrow 1×1 vertical ribs made by alternating front-post and back-post double crochet. The featured photograph is the exact user-supplied image authorized for HookElla publication. The optional six-stage graphic is omitted; the complete written directions below are the pattern.
The dimensions are estimates based on stated target gauges, not measured sample results. This pattern has not been physically tested.
Materials
- Approximately 180–240 yd (165–220 m) of #4 medium/worsted-weight yarn in dark heather brown. This is an estimate; actual use varies with yarn and tension.
- 5 mm (H/8) crochet hook, or size needed to approach the gauge targets below.
- Stitch marker, scissors, measuring tape, and yarn needle.
Finished size and fit
One adult size is specified, intended for an estimated 21–23 in (53–58.5 cm) head circumference. The design target is approximately 8.5–9.5 in (21.5–24 cm) from crown center to lower edge. These are planning targets, not measured finished dimensions or tested fit claims.
Gauge and size check
The size estimate uses separate round-height assumptions for the two fabrics; none is a measured sample gauge:
- Stitch gauge around: 13 stitches per 4 in (10 cm). With 72 stitches, 72 × 4 ÷ 13 = 22.15 in (56.3 cm) around before stretch.
- Crown double-crochet round gauge: about 6.8 rounds per 4 in (10 cm). The 72-stitch round projects to a circumference of 22.15 in, or a flat diameter of 22.15 ÷ π = 7.05 in (17.9 cm). The radius is 3.525 in; six evenly spaced increase rounds therefore need about 3.525 ÷ 6 = 0.588 in per round, equivalent to 4 ÷ 0.588 = 6.8 rounds per 4 in. Rounds 1–8 at that target add about 8 × 4 ÷ 6.8 = 4.71 in (12 cm) from the crown center through the two transition rounds.
- Post-stitch body round gauge: about 8 rounds per 4 in (10 cm). Nine rib rounds then add 9 × 4 ÷ 8 = 4.50 in (11.4 cm).
Together, the assumed crown/transition depth and nine-round rib section give an estimated overall height of 4.71 + 4.50 = 9.21 in (23.4 cm). At the same post-stitch gauge, the original 14 rib rounds would add 7 in and yield about 11.71 in overall, too tall for the stated 8.5–9.5 in target. The body schedule below is therefore corrected from 14 to 9 rounds. The stitch gauge and different round heights remain estimates: swatch both fabrics before relying on the dimensions. This is arithmetic-based sizing, not a physically tested fit.
For a practical gauge check, work the crown through Round 6 and verify the disc approaches 7.05 in across without pronounced rippling or cupping. Separately make a joined post-stitch swatch; measure both its stitch width and its round height after it relaxes. If either target is materially different, the estimates will change and the pattern needs a sample check before it can be represented as matching the photo.
Abbreviations (US terms)
- BLO — back loop only
- BPdc — back-post double crochet
- ch — chain
- dc — double crochet
- FPdc — front-post double crochet
- inc — 2 dc in the same stitch
- MR — adjustable magic ring
- rep — repeat
- sl st — slip stitch
- st(s) — stitch(es)
Special stitches and construction notes
Front-post double crochet (FPdc): Yarn over, insert the hook from front to back and then back to front around the post of the indicated stitch, yarn over and pull up a loop, then complete a double crochet normally. The post sits in front of the fabric.
Back-post double crochet (BPdc): Yarn over, insert the hook from back to front and then front to back around the post of the indicated stitch, yarn over and pull up a loop, then complete a double crochet normally. The post sits behind the fabric.
The beginning ch 2 does not count as a stitch. Join each round with a slip stitch to the first actual stitch, not to the beginning chain or joining slip stitch. Do not turn. Place a marker in the first stitch if useful. The 1×1 rib is established in Round 9; on every later round, work FPdc around an FPdc and BPdc around a BPdc to keep the ribs vertically aligned.
Complete crochet instructions
Crown and transition
With the 5 mm hook, make an adjustable MR. Ch 2 at the beginning of each round; it does not count. Join with a sl st to the first actual dc. Count the stitches before joining, and do not work into the join or beginning chain.
- Round 1: Work 12 dc into the MR, pull the ring closed, and join. 12 sts.
- Round 2: Work 2 dc in each stitch around and join. 24 sts.
- Round 3: Repeat [dc in next stitch, 2 dc in next stitch] 12 times and join. 36 sts.
- Round 4: Repeat [dc in next 2 stitches, 2 dc in next stitch] 12 times and join. 48 sts.
- Round 5: Repeat [dc in next 3 stitches, 2 dc in next stitch] 12 times and join. 60 sts.
- Round 6: Repeat [dc in next 4 stitches, 2 dc in next stitch] 12 times and join. 72 sts.
- Round 7: Ch 2, dc in each stitch around and join. 72 sts.
- Round 8: Repeat Round 7. 72 sts.
Each increase round consumes all stitches from the preceding round and adds exactly 12: 12 → 24 → 36 → 48 → 60 → 72. The bracketed repeat is worked exactly 12 times per round.
Vertical ribbed body
The 72-stitch count remains unchanged. On Round 9, alternate the post stitches to establish the ribs. Thereafter, identify each stitch by its raised post and work the same stitch type around it on the next round.
- Round 9: Ch 2. Repeat [FPdc around next stitch post, BPdc around next stitch post] 36 times; join. This makes 36 FPdc and 36 BPdc; 72 sts.
- Round 10: Ch 2. Work FPdc around each FPdc post and BPdc around each BPdc post around; join. 72 sts.
- Round 11: Repeat Round 10. 72 sts.
- Round 12: Repeat Round 10. 72 sts.
- Round 13: Repeat Round 10. 72 sts.
- Round 14: Repeat Round 10. 72 sts.
- Round 15: Repeat Round 10. 72 sts.
- Round 16: Repeat Round 10. 72 sts.
- Round 17: Repeat Round 10. 72 sts.
Rounds 9–17 contain 9 post-stitch rounds. Keep the work untwisted and check that each front ridge remains directly above a front ridge, and each back ridge above a back ridge. This written size has no separate brim, folded band, sewn-on edging, or embellishment.
Assembly
The crown and ribbed body are one continuous piece worked in joined rounds, so no panel seam or separate band is required. The only closure is the adjustable ring at the crown; secure it using the starting tail from the inside.
Finishing and care
After Round 17, fasten off, leaving a short tail. Pull the tail through the final loop and snug it without tightening the lower edge. Weave the tail through several inside stitches. Close any remaining center hole by weaving the magic-ring tail firmly through the first round. Follow the yarn label for washing and drying; reshape flat while damp if the fiber permits. Do not press the raised ribs flat.
Fit adjustments and troubleshooting
- Crown ripples: Verify the 12-stitch increase in every crown round and check that the crown gauge is not too short vertically for the stitch width. Do not remove increases without recalculating the circumference and crown shape.
- Crown cups: Check for missed increases and compare the flat disc against the 7.05 in width projection. A changed hook may affect both stitch and round gauge; recheck both.
- Ribs lean or twist: Confirm every round has 36 FPdc and 36 BPdc, and work each stitch around the matching post from the preceding round.
- Opening is too tight or loose: Check the 13-stitch-per-4-in circumference target around the body. Post stitches are elastic, but stretch does not replace a gauge check.
- Hat is too tall or short: Measure after Round 8 and after Round 17. The final depth depends on two separate round gauges; do not add or remove rounds without checking how it changes the pictured proportions.
Frequently asked questions
Is this worked from the top down?
Yes. The crown begins in an adjustable ring, expands through six increase rounds, and continues into the vertical post-stitch body.
Does the hat have a folded brim?
No. The lower edge is the final round of the continuous ribbed body; it is not folded or separately sewn on.
Is this physically tested or ready to download?
No. The dimensions are estimates calculated from the separate gauge assumptions above, not sample measurements. The complete written instructions are available on the page and in its printable pattern route.
Inspiration credit
This is an independently specified HookElla pattern, not a reproduction of Chellie Plummer’s Lakeside Beanie. The Lakeside Beanie informed the broad visual reference of a clean, top-down, vertically ribbed hat; its protected instructions are not included here.
Helpful questions
Is this the Lakeside Beanie pattern?
No. These are independently specified HookElla instructions, not Chellie Plummer’s Lakeside Beanie pattern. The source pattern is credited at the end for visual inspiration only.
Has this beanie been physically tested?
No. The circumference, crown diameter, and overall height are estimates calculated from the stated separate gauge assumptions. The stitch counts and repeat arithmetic have been checked, but no sample has been crocheted.
Does the design have a folded brim or pom-pom?
No. The written design has a continuous ribbed body and a simple lower edge, with no separate or folded brim and no pom-pom.
Inspiration credit
This independently specified HookElla pattern was developed from standard crochet methods. The clean, vertically ribbed beanie is also informed by the broad visual style of Chellie Plummer’s Lakeside Beanie; her instructions are not reproduced here. Lakeside Beanie by Chellie Plummer, 5 Knots North.