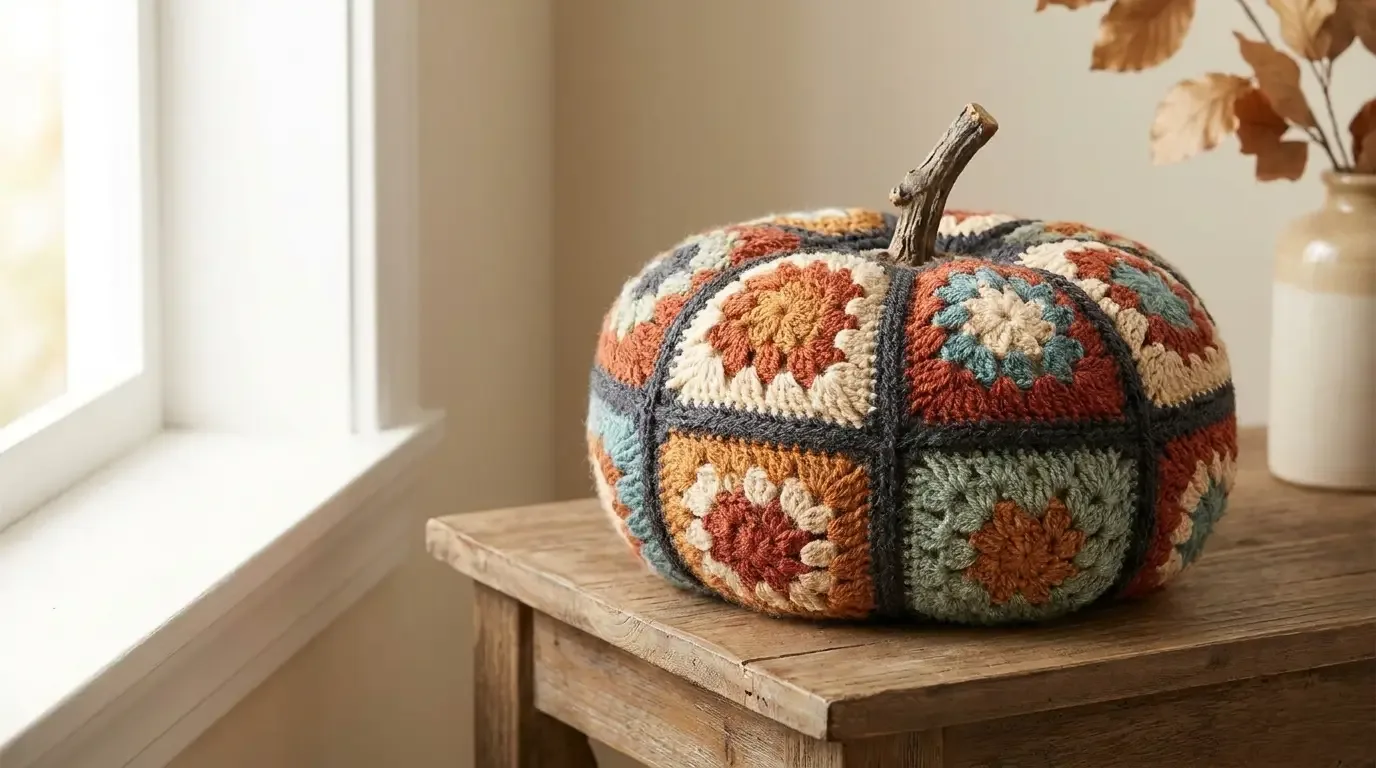
These granny-square pumpkins turn a classic motif into a soft, patchwork autumn accent. The HookElla recipe below uses colourful motifs, a dark joining shade, stuffing, and a real or crocheted stem to build a rounded seasonal display.
Patchwork pumpkins for a warm autumn shelf
A crochet pumpkin does not have to be plain orange. Whistle and Ivy’s Granny Square Pumpkins use colourful motifs to create a patchwork surface that feels both vintage and fresh. The HookElla interpretation leans into rust, sage, cream, blue, and charcoal, letting every square act like a tiny quilt block.
Whistle and Ivy is credited for the original Granny Square Pumpkins inspiration. The official pattern link is retained for attribution; the complete HookElla recipe on this page uses its own motif counts and pumpkin shaping.
What the public pattern information tells us
The project uses one granny-square motif in three HookElla arrangements: a compact small pumpkin, a medium tube, or a taller large panel. Choose the layout before joining so the ribs remain balanced.
The public materials list worsted-weight yarn with a 3.5 mm hook, plus polyfil, a stem or stick, river stones or glass gems, and a darning needle. For the chunky sample, Whistle and Ivy used two strands of #5 yarn held together with a 7 mm hook. Changing yarn weight is encouraged as a way to make a different pumpkin scale.
Materials for a HookElla-style display
Gather:
- worsted yarn in a fall palette, or two strands of #5 yarn for a larger, chunkier pumpkin;
- a 3.5 mm hook for worsted yarn or a 7 mm hook for the chunky version;
- polyester polyfil;
- a smooth stem, twig, or purchased wooden stem;
- river stones or glass gems for a stable base;
- darning needle, scissors, and stitch markers.
Choose a joining shade—charcoal, deep brown, olive, or cream—that outlines the squares and visually divides the pumpkin ribs. Keep the joining yarn consistent even when the motif colours change.
Colour planning that looks collected, not chaotic
Make a small palette card before crocheting. A balanced autumn mix might include:
- pumpkin rust and burnt orange;
- muted sage and moss;
- dusty blue or faded teal;
- warm ivory;
- charcoal or deep mushroom brown.
Repeat one or two colours across multiple squares so the finished pumpkin feels connected. Place the darkest squares near the lower half for visual weight, and reserve the lightest motifs for areas where you want the flower-like centres to stand out.
Construction overview
1. Crochet the motif family
Repeat the HookElla granny-square recipe in different colour orders. Make enough motifs for your chosen layout and keep their final blocked size identical. A square that is only slightly larger will change the pumpkin’s circumference once several panels are joined.
The HookElla construction image shows the motif as a flower-like centre surrounded by clustered rounds and a contrasting outer frame. That visual is a planning reference, not a substitute for Whistle and Ivy’s written motif instructions.
2. Choose one of the documented arrangements
Whistle and Ivy includes three layout variations. The arrangement controls whether the finished pumpkin reads as a compact patchwork ball, a longer pumpkin with a taller side wall, or another balanced panel configuration.
Lay the finished squares on a table before joining. Rotate motifs so the centre flowers are distributed rather than all pointing in one direction. Photograph the layout, then join with the method specified in the original pattern.
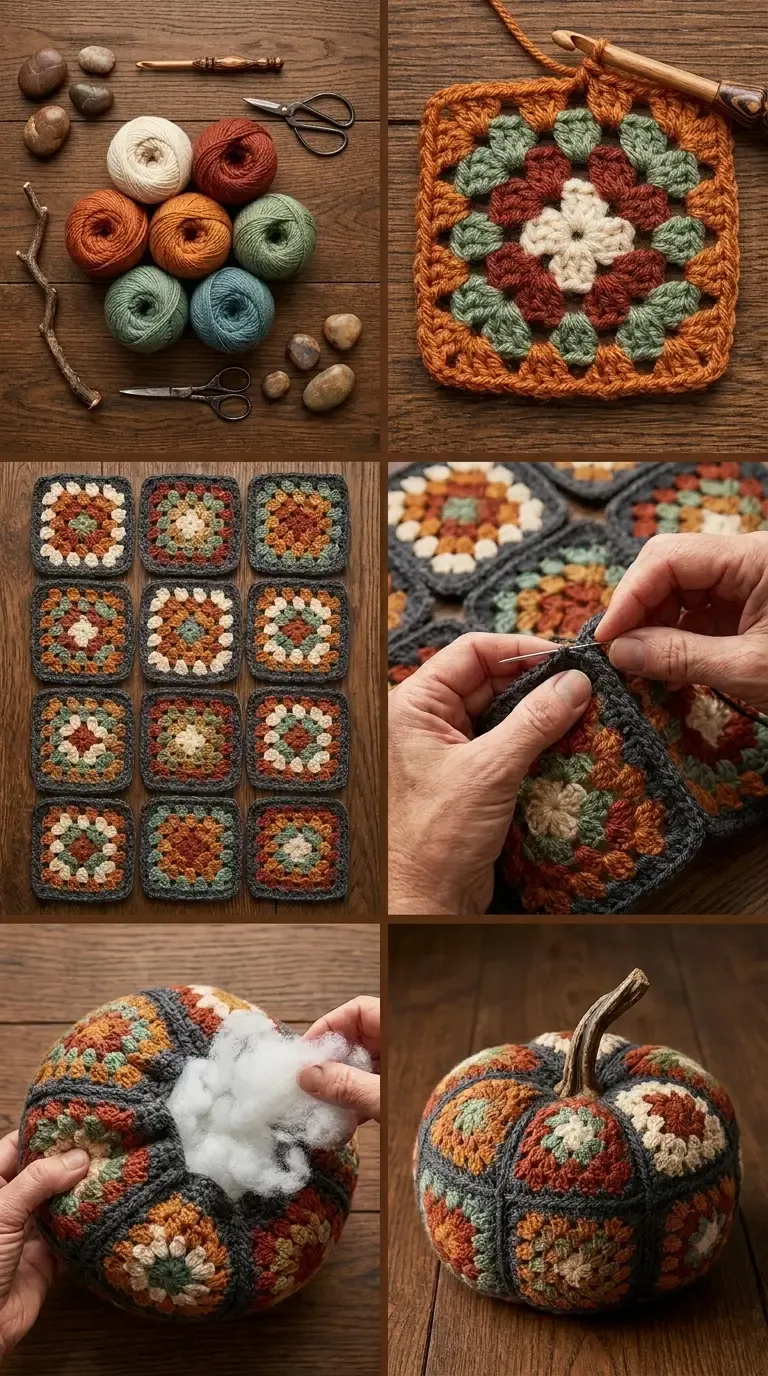
The HookElla image accompanies the original motif and assembly instructions below.
3. Build the pumpkin shell
Once the panels are joined, the fabric forms a rounded shell with an opening at the top. The joining lines become natural pumpkin ribs. For a simple HookElla layout, make eight squares for a small pumpkin, ten for a medium, or twelve for a large; join them into two side-by-side panels, then join the panel edges into a tube. Work slowly around corners so the shell does not twist.
HookElla motif recipe
Using worsted yarn and a 3.5 mm hook, make a magic ring. Round 1: work 8 groups of 2 dc separated by ch 1. Round 2: work a 3-dc cluster in each chain space, with ch 2 between groups. Round 3: work 3 dc in each gap, placing ch 2 at the four corners. Round 4: work 3 dc in each side space and (3 dc, ch 2, 3 dc) in each corner. Fasten off, change colours between rounds as desired, and block every square to the same size. For a chunky version, hold two strands of #5 yarn together with a 7 mm hook and stop after the square measures about 5–6 inches.
4. Stuff and weight the base
Add a small pouch of river stones or glass gems at the bottom before filling the rest with polyfil. The weight keeps a decorative pumpkin from rolling or tipping, especially when made with chunky yarn.
Add stuffing in small handfuls and turn the pumpkin as you work. Firm stuffing creates a rounder shape; lighter stuffing gives a softer, squishier pumpkin. Do not overfill the top opening before the final shaping passes.
5. Close, shape, and add the stem
Gather the top opening according to the source pattern’s finishing method, then use a darning needle and matching yarn to create the pumpkin’s top indentation. Pull the yarn through the shell in several evenly spaced channels to emphasize the ribs.
Insert the stem securely and check that no sharp twig edge can catch the yarn. A smooth purchased stem is the safest choice for homes with children or pets. The stem should be decorative rather than a handle.
Styling ideas
Group three sizes on a tray with dried leaves, a neutral candle, and a small bowl of pinecones. A single large pumpkin makes a strong bookcase accent, while several mini pumpkins look lovely along a mantel. The patchwork squares also pair naturally with a cream crochet throw or a woven basket.
For a modern palette, use rust, ivory, and charcoal. For cottage style, add sage and faded denim. For a playful display, make every motif different but keep one shared outer frame colour.
Gauge, substitutions, and resizing
There is no single finished gauge for every yarn weight because the designer intentionally presents the pattern as adaptable. Your key checkpoints are:
- all squares have the same blocked dimensions;
- the joined shell closes without puckering;
- the stuffing does not show through;
- the stem opening remains centred.
If you use chunky yarn held double, expect a larger pumpkin and a heavier shell. Use more polyfil gradually rather than forcing the seams, and add enough base weight to keep the larger shape stable. For a tiny pumpkin, use lighter yarn, a smaller hook, and a small amount of stuffing; replace stones with a securely sewn weighted pouch.
Finishing and care
Weave all tails before stuffing so they cannot migrate through the shell. Spot-clean with a barely damp cloth and air-dry completely. Do not machine wash a pumpkin containing a real stem or loose stones. Inspect the stem, seams, and weighted pouch each season.
These pumpkins are decorative home accents, not baby toys. Keep small stones, glass gems, stuffing, and stems away from young children and pets.
Credit and safety
Whistle and Ivy is credited for the original concept. The motif counts, square quantities, joining, and shaping above are HookElla’s own recipe. Keep stones, stuffing, and stems away from young children and pets; these are decorative pumpkins, not toys.
For another seasonal project, explore HookElla’s Festive Wreath Coaster or the Blankets & Home collection.
Granny Square Pumpkins are a satisfying way to turn a favourite motif into autumn decor. Choose a thoughtful palette, keep every square consistent, and let Whistle and Ivy’s original pattern guide the parts that make the pumpkin’s shape work.
Helpful questions
Who designed Granny Square Pumpkins?
Whistle and Ivy is credited as the original design inspiration. The motif and assembly recipe below are written in original HookElla wording.
Are complete instructions included here?
Yes. HookElla provides an original motif recipe, panel layout, stuffing method, and shaping sequence below.
What materials does the public source list?
The public information lists worsted-weight yarn, a 3.5 mm hook, polyfil, a stem or stick, river stones or glass gems, and a darning needle. The chunky sample uses two strands of
How many layouts can I make?
The HookElla recipe offers small, medium, and large panel arrangements using the same blocked square.
Can I make a larger pumpkin?
Yes, the designer notes that changing yarn weight can create larger chunky pumpkins. Keep the layout balanced and adjust stuffing and weighting to the finished size.
Are the pumpkins washable?
Spot-clean finished pumpkins whenever possible. A real stem, stones, and stuffing may not tolerate machine washing, so follow the yarn label and keep the project dry.