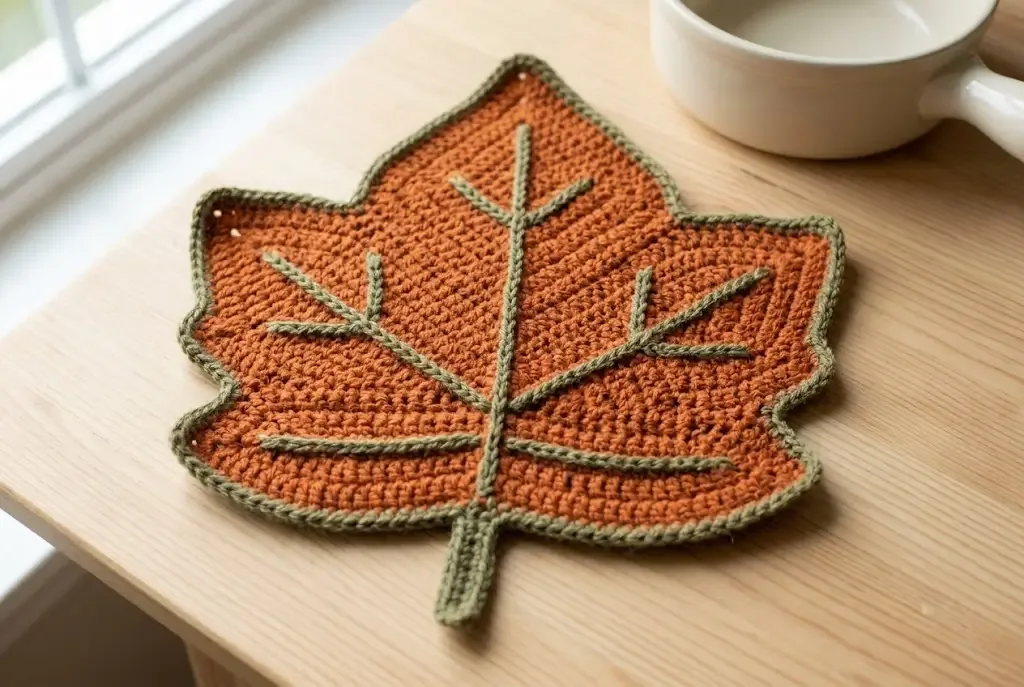
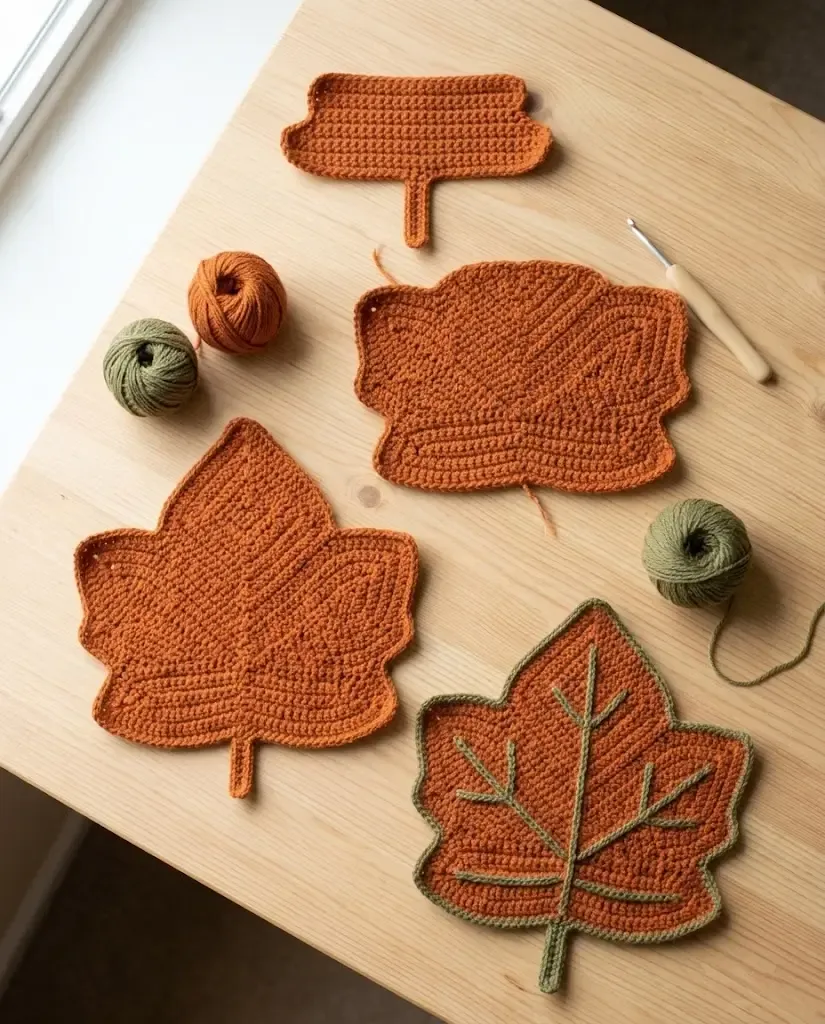
This maple leaf mat brings autumn color to a coffee table, breakfast nook, or seasonal display. The flat orange panel is built with simple single-crochet rows, then finished with a green outline, stem, and a few stitched veins that make the leaf shape easy to recognize.
About this pattern
This flat maple leaf is designed as a small seasonal home accent rather than a stuffed item. The orange center is made in rows, with increases creating the broad middle and decreases tapering it toward the top point. A single round of olive-green single crochet defines the edge; simple surface stitches suggest the central vein and side veins.
The written pattern is an original HookElla interpretation of the supplied project images. It uses US crochet terminology and has not been physically tested, so compare your panel to the finished measurements as you work.
Materials
- Worsted-weight (category 4) yarn: approximately 100 yd (91 m) rust or pumpkin orange
- Small amounts of olive-green yarn for edging and veins
- Small amount of brown or olive yarn for the stem
- 5 mm (H-8) crochet hook
- Tapestry needle, scissors, rust-proof pins, and a measuring tape
Finished size and gauge
The finished mat is approximately 11 × 10 in (28 × 25 cm), including the stem. Gauge is flexible for decor; aim for about 4 single crochet stitches and 4 rows per inch (16 stitches and 16 rows per 4 in / 10 cm). If your gauge differs, follow the panel measurements and keep the fabric firm enough to lie flat.
Abbreviations
- ch — chain
- sc — single crochet
- sc2tog — single crochet two stitches together
- sl st — slip stitch
- st(s) — stitch(es)
Pattern notes
- Turning chains do not count as stitches.
- The orange panel is worked flat, turning after every row.
- Increases are made by working 2 sc in the first and last stitch of an increase row.
- Decrease rows use sc2tog once at each edge.
- The green edging is worked around the finished panel; place 3 sc in each point so the outline does not pull.
Instructions
Orange leaf panel
With orange yarn, ch 2.
- Row 1: 3 sc in the second chain from the hook — 3 sts. Turn.
- Row 2: Ch 1, 2 sc in the first stitch, sc in the next stitch, 2 sc in the last stitch — 5 sts. Turn.
- Row 3: Ch 1, sc across — 5 sts. Turn.
- Row 4: Ch 1, 2 sc in the first stitch, sc across to the last stitch, 2 sc in the last stitch — 7 sts. Turn.
- Row 5: Ch 1, sc across — 7 sts. Turn.
- Rows 6–12: Repeat Rows 4–5 three more times, then work one additional increase row. You will have 15 sts after Row 12. Turn.
- Rows 13–15: Ch 1, sc across — 15 sts. Turn after each row.
- Row 16: Ch 1, sc2tog, sc across to the last 2 sts, sc2tog — 13 sts. Turn.
- Row 17: Ch 1, sc across — 13 sts. Turn.
- Rows 18–28: Repeat Rows 16–17 five times, then work one additional decrease row. You will have 3 sts after Row 28. Turn.
- Row 29: Ch 1, sc3tog by inserting the hook in each of the 3 stitches, yarn over and pull through all loops — 1 st. Fasten off.
The panel should measure approximately 9.5–10 in (24–25.5 cm) from the bottom edge to the top point and 8–9 in (20–23 cm) across its widest row. If your measurements are smaller or larger, adjust the number of plain rows before the decrease section rather than changing the increase math.
Green edging
Join olive-green yarn at the bottom center of the panel. Work sc evenly around the entire outline, placing 3 sc in each outer point and 2 sc in any tight corner. Along straight edges, work approximately 1 sc in each row end. Join with a sl st to the first sc and fasten off. Do not pull the edging tight; the leaf should remain flat.
Stem
With brown or olive yarn, ch 12.
- Row 1: Sc in the second chain from the hook and across — 11 sc.
- Rows 2–3: Ch 1, sc across — 11 sc.
Fasten off, leaving a sewing tail. Fold the strip lengthwise, whipstitch the long edges together, and flatten the seam. Sew the stem to the bottom center of the leaf, overlapping the green edging by about 1 in (2.5 cm).
Vein embroidery
Thread olive-green yarn onto a tapestry needle. Use surface slip stitches or simple running stitches to make one central vein from the stem to the top point. Add three short diagonal branches on each side, spacing them across the broad middle of the leaf. Keep the stitches relaxed so the orange fabric does not pucker. Secure the ends on the back and trim them.
Finishing and care
Weave in every remaining end on the back. Lightly wet-block the leaf by pinning around its outline, paying special attention to the points, then allow it to dry completely. Use it as a decorative mat or centerpiece layer; follow the yarn label for washing and reshape it flat while damp.
Helpful tips
- Place a stitch marker in the first stitch of long rows so the edge increases and decreases are easy to find.
- Count the stitches after every increase and decrease row; the panel should change by exactly two stitches on those rows.
- If the leaf cups, loosen your edging tension or add one extra sc at a straight edge section.
- For a smaller applique, use a lighter yarn and smaller hook while keeping the same stitch sequence.
Helpful questions
Can I use this leaf as a wall or garland decoration?
Yes. The flat fabric works as a table mat, centerpiece layer, or applique. Add a hanging loop to the stem if you want to display it vertically.
Does the leaf need to be blocked?
Light blocking helps the points lie flat. Pin the damp leaf to its outline and let it dry fully before adding the embroidered veins.
Can I change the leaf colors?
Absolutely. Use rust, gold, or burgundy for the panel and any contrasting green, brown, or cream for the edging and veins.