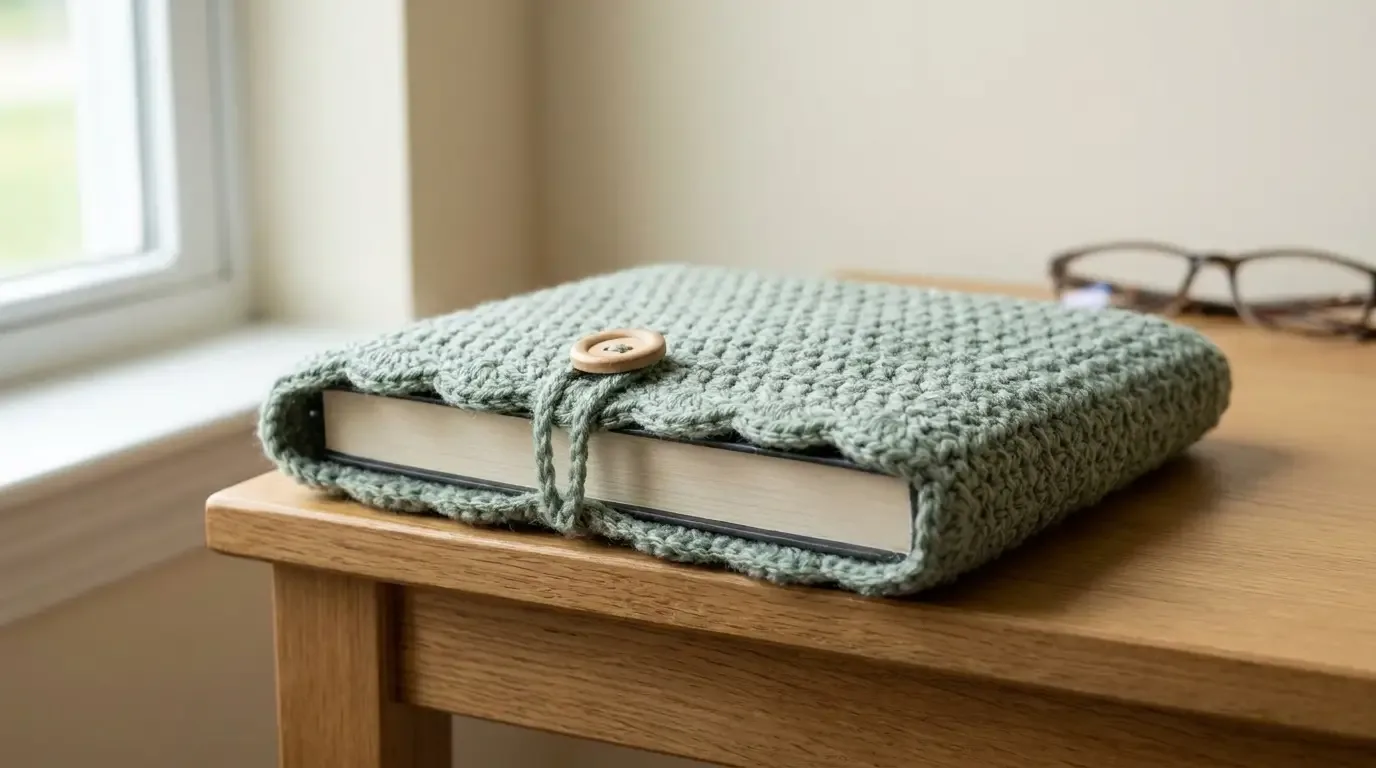
Protect a favorite paperback or journal with a soft handmade sleeve that feels useful every time you pick it up. This minimalist design uses two matching half-double-crochet panels, a delicate scalloped front edge, and a simple button-and-loop closure in calm worsted yarn.
A simple cover for a favorite book
This Minimalist Scallop Crochet Book Sleeve turns a practical rectangle into a thoughtful handmade accessory. Two half-double-crochet panels create a softly textured pocket, while the scalloped front edge adds just enough detail to feel special without overwhelming the book inside.
The sample is worked in muted sage with a natural wooden button, but the design is intentionally easy to personalize. Make one for a paperback, journal, e-reader, recipe notebook, or planner, then adjust the dimensions so the fit is snug without being tight.
Finished size and fit
The sample sleeve measures approximately 9 × 6.5 inches (23 × 16.5 cm) before inserting a book. It is sized for a medium hardcover or similarly proportioned notebook. Because book thickness varies, use the actual book as your measuring guide rather than relying on the cover dimensions alone.
For a good fit, the finished sleeve should be about ¼–½ inch wider than the closed book and ¼ inch taller than the book’s height. The extra room lets the cover slide in without stretching the scallops or pulling against the button loop.
Materials
- Approximately 180–220 yd (165–201 m) worsted-weight category 4 yarn
- 4.5 mm crochet hook, or the size needed to meet gauge
- One smooth wooden button, approximately ¾–1 inch (2–2.5 cm)
- Tapestry needle
- Scissors
- Flexible measuring tape
- Stitch markers or removable clips for holding the panels together
Choose a yarn with enough body to protect the book but enough softness to fold around the cover. Smooth cotton gives a crisp stitch definition; acrylic is lightweight and washable; a wool blend adds warmth and a little natural spring.
Gauge
Aim for approximately 13 HDC stitches and 12 rows = 4 inches (10 cm) in the main fabric. Gauge is a starting point because the sleeve is fitted to an object, but matching the width keeps the scallop repeat predictable.
Make a small HDC swatch, wash it if the finished sleeve will be washed, and measure after it dries. If your fabric is too loose, go down a hook size. If it feels stiff or the panel is smaller than expected, try a larger hook.
Abbreviations (US terms)
- ch — chain
- dc — double crochet
- hdc — half double crochet
- sc — single crochet
- sl st — slip stitch
- st(s) — stitch(es)
- rep — repeat
Pattern notes
- Turning chains do not count as stitches.
- Work both panels flat in rows, turning after every row.
- The sample foundation is ch 29, which produces 28 HDC stitches after Row 1.
- The scallop repeat uses four top-edge stitches, so 28 stitches create seven even scallops.
- The scalloped edge is worked on the front panel only; the back panel remains plain for a smooth button-loop landing. If you prefer a scallop on both sides, repeat the edging on the back before joining.
Make the two HDC panels
Make two identical rectangles in the main yarn.
- Foundation: Ch 29.
- Row 1: Hdc in the second chain from the hook and in each chain across. 28 hdc. Ch 1 and turn.
- Rows 2–20: Hdc in each stitch across. 28 hdc in every row. Ch 1 and turn after each row.
After Row 20, each panel should measure close to 9 inches wide × 6½ inches tall. If your row gauge is taller or shorter, continue or stop when the panel reaches the target height. Keep both panels the same size.
Fasten off the back panel and weave in its ends. Leave the front panel attached for the scalloped edging, or rejoin yarn at the top-right corner with the right side facing.
Add the scalloped front edge
Work across the 28-stitch top edge of the front panel:
- Join yarn at the first stitch. Ch 1; this does not count as a stitch.
- Repeat across: Skip 1 stitch, work 5 dc in the next stitch, skip 1 stitch, sl st in the next stitch.
- At the end of the row, you will have seven scallops. Fasten off and weave in the edge securely.
The five double crochets should fan outward without pulling the top edge tight. If the scallops cup, loosen your tension slightly. If the edge waves heavily, check that every repeat used exactly four base stitches.
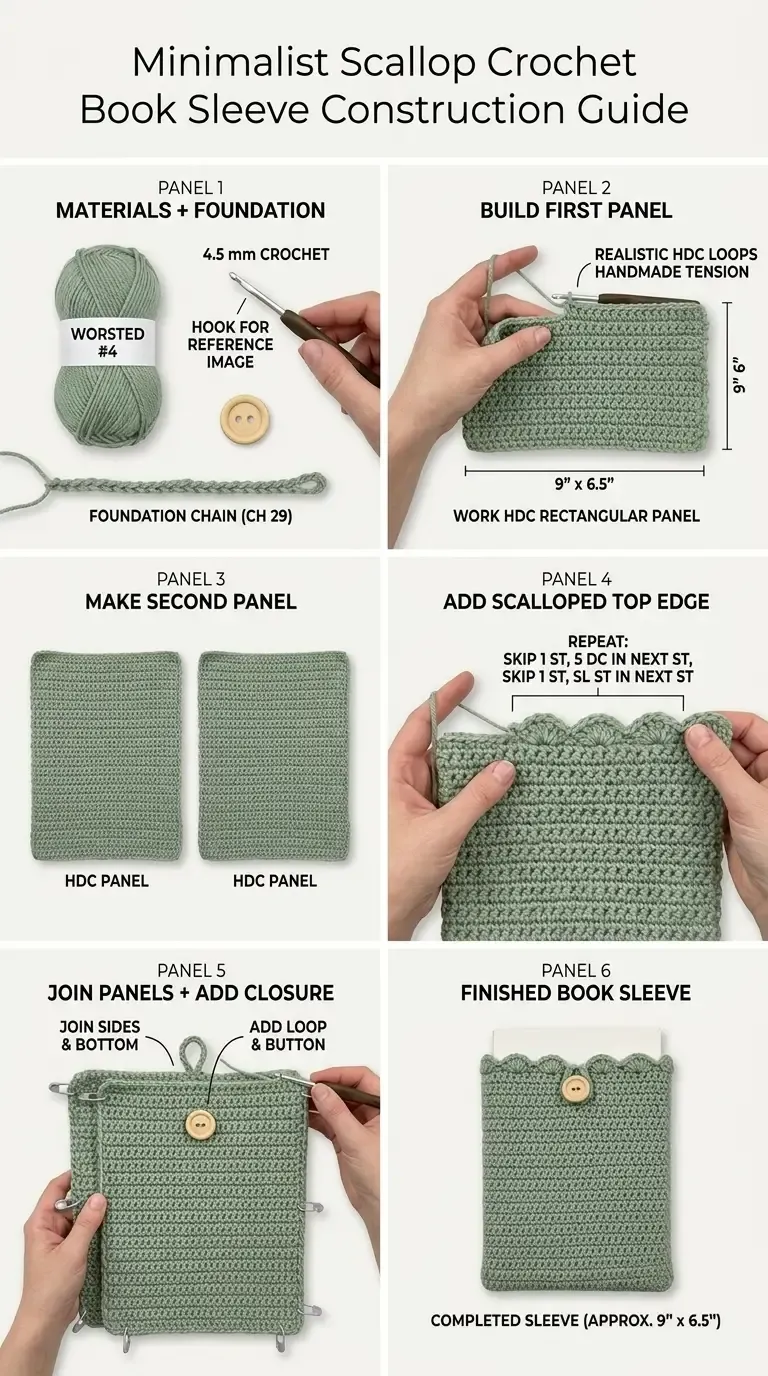
The construction image shows the sample sequence and proportions; measure your own book before final assembly.
Join the sleeve
Place the front and back panels wrong sides together, aligning the bottom and side edges. The scalloped front edge should face outward. Clip the sides so the rows stay even.
Using a tapestry needle and matching yarn, sew the two side edges and the bottom edge together with a neat mattress stitch or whip stitch. Work through the outer loops only if you want a flatter seam; use both loops for extra strength on a heavy hardcover.
Leave the top edge open. At each upper corner, make two or three small reinforcing stitches so the opening does not stretch when a book is inserted. Weave the joining tails through the seam allowance and trim only after checking the pocket with the actual book.
Add the centered button loop
The loop is attached to the center of the back panel’s top edge and reaches over the front scallops.
- Lay the sleeve flat with the front facing up. Mark the center stitch of the back panel; with 28 stitches, the center is between stitches 14 and 15.
- Join yarn at the marked center and chain 12 for a loop approximately 2½ inches long. Adjust the chain so it fits snugly around your button.
- Slip stitch back into the same center area to anchor the loop. Work 3–4 additional securing stitches across the top edge, then fasten off.
- Sew the wooden button to the front panel, centered about 1 inch below the scalloped edge. Use several passes of strong yarn through the button holes and the panel fabric.
Test the closure with the book inside. The loop should hold the book in place without stretching the scallops or pulling the panels apart.
Resizing guidance
Change the width
Measure the book’s width plus the desired ease. At the sample gauge, each HDC is approximately 0.3 inch wide. Add or remove chains in multiples of 4 so the top edge remains compatible with the four-stitch scallop repeat. For a centered seven-scallop sample, use 28 panel stitches; for a wider sleeve, 32 stitches gives eight scallops, 36 gives nine, and so on.
Remember that the foundation chain is one stitch longer than the final HDC count: for 28 stitches, chain 29; for 32 stitches, chain 33.
Change the height
Add or remove plain HDC rows before the scallop edging. At the sample row gauge, each two rows change the height by roughly ⅔ inch. Stop when the panel is the book’s height plus about ¼ inch, then make the second panel to match exactly.
Fit a thick book
For a very thick book, add ease to the width rather than trying to stretch the sleeve over the cover. You can also seam the sides with a slightly smaller allowance, but keep the button placement centered after the book is inserted.
Troubleshooting
- Panels do not match: Measure after blocking and adjust the second panel to the first rather than relying only on row count.
- Scallops are uneven: Confirm that each repeat consumes four top-edge stitches and that the panel stitch count is divisible by four.
- The sleeve is too loose: Use a smaller hook or reduce the panel width by one four-stitch repeat.
- The sleeve is too tight: Add one four-stitch repeat or use a larger hook; do not force the book inside.
- Button loop shifts sideways: Mark the center before sewing and test the loop with the book in place.
- Seam feels bulky: Use outer-loop mattress stitch and keep the joining yarn at the same tension as the panels.
Care and gifting
Follow the yarn label for washing. A removable book makes cleaning easy: take the book out, wash gently if the fiber allows, reshape the sleeve while damp, and dry flat. Avoid storing a damp book inside the sleeve.
For gifting, pair the sleeve with a paperback, journal, bookstore gift card, or handwritten reading list. A sage sleeve with a natural button works for any season; dusty blue, warm cream, or terracotta make equally thoughtful color choices.
For more handmade accessories, browse HookElla’s Chunky Crochet Cowl, Champagne Crochet Scarf, and Ribbed Crochet Beanie.
This minimalist sleeve is a satisfying small project: two rectangles, one tidy scalloped edge, and a closure that makes the finished piece feel complete. Measure your book, keep the HDC tension even, and let the wooden button provide the final handmade detail.
Helpful questions
What book size does this sleeve fit?
The sample is approximately 9 inches wide by 6.5 inches tall and suits a medium hardcover, planner, or similarly sized book. Measure your book before starting and use the adjustment notes for a custom fit.
Why are two panels used instead of one folded rectangle?
Separate panels keep the front scallop crisp and let you adjust the back and front independently. Joining three sides creates a stable pocket while leaving the top open.
Can I make the sleeve wider or taller?
Yes. Change the foundation chain for width and add or remove HDC rows for height. Keep the panel stitch count compatible with the scallop repeat if you want seven even shells.
How is the scallop edge formed?
The front top edge repeats skip one stitch, five double crochet in the next stitch, skip one stitch, and slip stitch in the next stitch. One repeat uses four stitches.
Can I use a zipper instead of a button?
You can substitute a zipper or snap, but the written pattern is designed for a centered yarn loop and wooden button. Test the closure on the actual book before sewing it permanently.
What yarn works best?
Smooth worsted yarn gives a firm but flexible sleeve and makes the HDC rows easy to count. Cotton, acrylic, and washable wool blends all work; choose a fiber that suits the book’s everyday use.