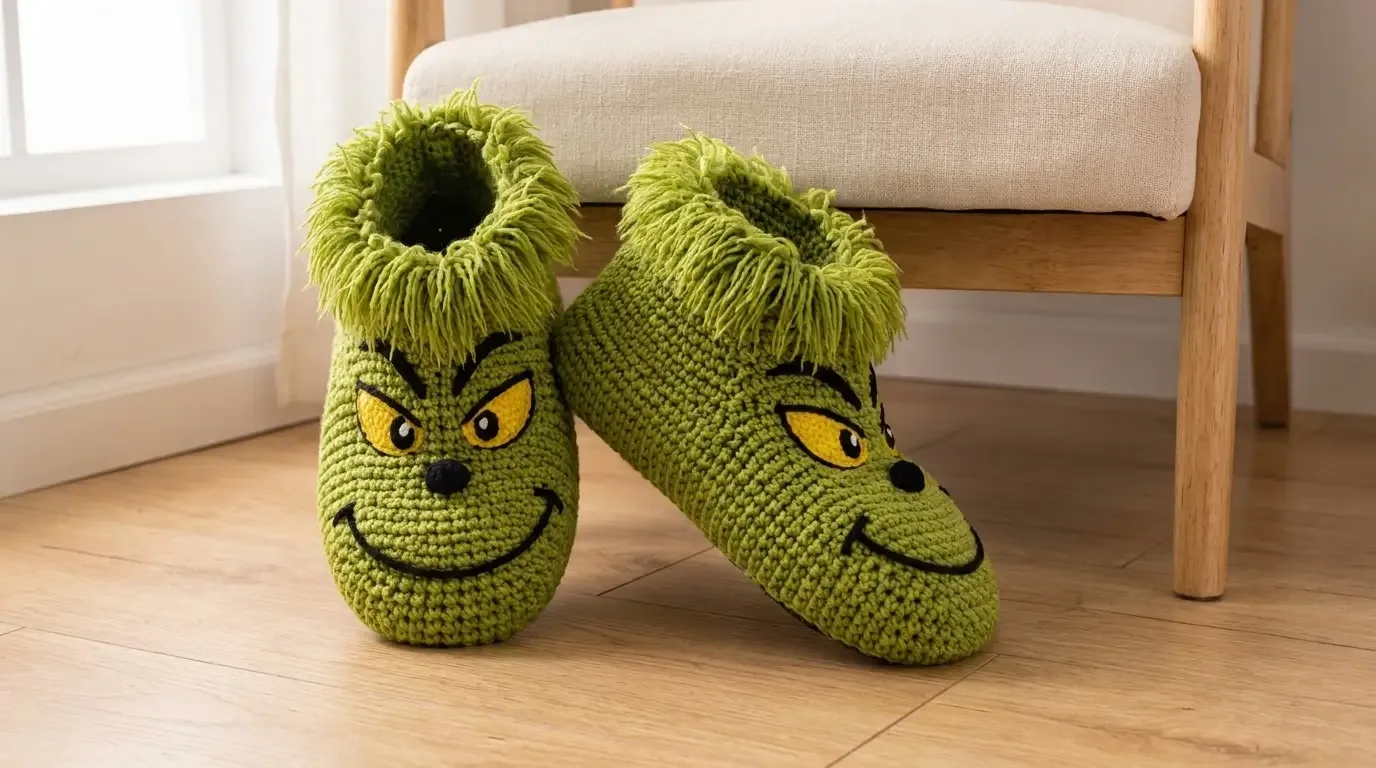
These cozy adult slippers start with a double-layer oval sole, then shape into a rounded toe and roomy slip-on opening. A fuzzy lime cuff and securely embroidered monster face bring the mischievous finish.
Moss Mischief Monster Slippers
These playful slip-ons combine a dense green crochet fabric with a fuzzy lime cuff and a face made from embroidered details. The sole is worked twice for a little extra cushion, the upper narrows gently around the foot, and the finished opening stays easy to step into. Make the pair in moss or olive green, then add yellow eyes, a black nose, expressive brows, and a curved grin.
The broad monster-slipper concept is credited to the Etsy listing used as a visual reference. The construction and complete written directions below were developed independently by HookElla; this is not the seller’s paid PDF pattern.
Materials and finished size
- Main yarn: medium #4 worsted-weight yarn, approximately 230–280 yd (210–256 m) in moss or olive green for one adult pair.
- Cuff yarn: approximately 25–40 yd (23–37 m) of lime eyelash, loop, or brushed novelty yarn. The amount depends on its thickness and how many cuff rounds you work.
- Face scraps: small amounts of golden yellow, black, and white yarn.
- Hooks: 4.5 mm for the sole and upper, 5.5 mm for the cuff, and 3.5 mm for the face embroidery or small appliqués.
- Tapestry needle, scissors, stitch markers, measuring tape, and optional thin felt or flexible foam for sole inserts.
The pattern uses US crochet terms. Select the size by foot length, not shoe size: Small fits a foot about 22.5–23 cm (8⅞–9 in) long and makes a sole about 23.5 cm (9¼ in); Medium fits about 23.5–24 cm (9¼–9½ in) and makes a sole about 24.5 cm (9⅝ in); Large fits about 24.5–25 cm (9⅝–9⅞ in) and makes a sole about 25.5 cm (10 in). These are target measurements; yarn and tension affect the result. The finished opening is intentionally relaxed for an easy slip-on fit.
Gauge and fabric
With the 4.5 mm hook and main yarn, 18 sc × 20 rounds = 4 in (10 cm) in a firm single-crochet fabric. The sole is made to measurements as well as counts: check the oval after Round 6 and adjust hook size if it does not match the selected sole length. Keep the stitches compact enough that the sole does not stretch open, but not so tight that the panels curl.
Abbreviations
- ch — chain
- sc — single crochet
- sc2tog — single crochet two together (one decrease)
- inc — 2 sc in the same stitch
- BLO — back loop only
- sl st — slip stitch
- st(s) — stitch(es)
Pattern notes
- Turning chains do not count as stitches.
- Work the soles in joined rounds, beginning each round with ch 1 and joining with a sl st. The ch 1 is not included in stitch counts.
- Place a marker in the first stitch of each round and move it as you go.
- The sole increase groups sit at the rounded ends; work the long sides evenly.
- Make two identical sole panels for each slipper. The joined seam is the foundation for the upper.
- Work two slippers alike. For the second slipper, mirror the placement of the face details if you want the pair to look toward one another.
Instructions
1. Make two oval sole panels per slipper
Use the 4.5 mm hook and main green yarn. Choose the foundation chain for your size:
| Size | Foundation chain | Stitch count after Round 6 | Target sole length |
|---|---|---|---|
| Small | 40 | 122 | 23.5 cm (9¼ in) |
| Medium | 42 | 126 | 24.5 cm (9⅝ in) |
| Large | 44 | 130 | 25.5 cm (10 in) |
Round 1: Ch the number for your size. Starting in the second ch from the hook, work 2 sc in that ch, sc in each ch across until 1 ch remains, work 4 sc in the last ch. Working along the underside of the foundation chain, sc in each remaining chain across, then work 2 sc in the same starting chain as the first stitches. Join. Small: 82 sts; Medium: 86 sts; Large: 90 sts.
Round 2: Ch 1. Inc in each of the first 2 sts, sc along the straight side to the 4-stitch curve, inc in each of the next 4 sts, sc along the other straight side to the final 2 sts, inc in each of the last 2 sts. Join. Small: 90; Medium: 94; Large: 98 sts.
For Rounds 3–6, keep the side stitches plain and increase only in the two rounded ends. At the starting end, the curve straddles the round join: work the first half at the beginning and the second half at the end of the round. At the far end, work the full curve in one group. Move the markers so each curve group remains easy to identify.
- Round 3: At the starting end, work (sc, inc) twice at the beginning and twice at the end; at the far curve, work (sc, inc) 4 times. Sc evenly along both sides between curves. Small: 98; Medium: 102; Large: 106 sts.
- Round 4: At the starting end, work (sc, inc, sc) twice at the beginning and twice at the end; at the far curve, work (sc 2, inc) 4 times. Sc evenly along both sides between curves. Small: 106; Medium: 110; Large: 114 sts.
- Round 5: At the starting end, work (sc 2, inc) twice at the beginning and twice at the end; at the far curve, work (sc 3, inc) 4 times. Sc evenly along both sides between curves. Small: 114; Medium: 118; Large: 122 sts.
- Round 6: At the starting end, work (sc 3, inc) twice at the beginning and twice at the end; at the far curve, work (sc 4, inc) 4 times. Sc evenly along both sides between curves. Small: 122; Medium: 126; Large: 130 sts.
Fasten off. Make a second matching panel. If using an insert, cut two thin ovals slightly smaller than the crocheted sole and round their edges so they do not poke through the seam.
2. Join the cushioned soles
Place the two panels together with wrong sides facing. With the 4.5 mm hook, join the green yarn through corresponding stitches on both panels and sc around the full edge, catching one stitch from each panel in every stitch. Keep the panels aligned and do not skip stitches. Join to the first sc and fasten off. You should have 122 (126, 130) joining sts for Small (Medium, Large). If using inserts, slide them between the panels before the final quarter of the seam is closed.
3. Work the upper
With the right side facing, attach green yarn at the back center of the joined sole. Setup round: Ch 1, sc BLO in each joining stitch around; join. This turns the fabric upward and keeps the sole edge defined. 122 (126, 130) sts.
The upper narrows by 8 stitches per decrease round. Each decrease round contains eight sc2tog stitches, spaced evenly around the oval. To place them neatly, use eight markers spaced around the round and put one sc2tog in each marked section; distribute the plain sc stitches evenly between those markers. The table gives the exact number of plain sc in each section: use its first number in six sections and its second number in two opposite sections. Shift the two-section pair slightly each round so the decreases do not stack into hard ridges.
Work each section as sc the listed number, sc2tog. The round is worked 8 times total; use the first listed number in six sections and the second listed number in two opposite sections.
| Size | Decrease round counts (plain sc in each section; 8 decreases each round) | End count |
|---|---|---|
| Small | Rnd 1: 6 sections of 13, 2 of 14; Rnd 2: 6 of 12, 2 of 13; Rnd 3: 6 of 11, 2 of 12; Rnd 4: 6 of 10, 2 of 11; Rnd 5: 6 of 9, 2 of 10; Rnd 6: 6 of 8, 2 of 9; Rnd 7: 6 of 7, 2 of 8; Rnd 8: 6 of 6, 2 of 7. | 58 sts |
| Medium | Rnd 1: 6 sections of 14, 2 of 13; Rnd 2: 6 of 13, 2 of 12; Rnd 3: 6 of 12, 2 of 11; Rnd 4: 6 of 11, 2 of 10; Rnd 5: 6 of 10, 2 of 9; Rnd 6: 6 of 9, 2 of 8; Rnd 7: 6 of 8, 2 of 7; Rnd 8: 6 of 7, 2 of 6. | 62 sts |
| Large | Rnd 1: 6 sections of 14, 2 of 15; Rnd 2: 6 of 13, 2 of 14; Rnd 3: 6 of 12, 2 of 13; Rnd 4: 6 of 11, 2 of 12; Rnd 5: 6 of 10, 2 of 11; Rnd 6: 6 of 9, 2 of 10; Rnd 7: 6 of 8, 2 of 9; Rnd 8: 6 of 7, 2 of 8; Rnd 9: 6 of 6, 2 of 7. | 58 sts |
For each decrease round: ch 1, work the round’s eight marked sections as described, join, and count. The table’s ending counts are after the decreases: Small goes 122 → 114 → 106 → 98 → 90 → 82 → 74 → 66 → 58; Medium goes 126 → 118 → 110 → 102 → 94 → 86 → 78 → 70 → 62; Large goes 130 → 122 → 114 → 106 → 98 → 90 → 82 → 74 → 66 → 58. Join the final round. Work 1 even round of sc with no decreases, then fasten off. The slipper should cover the toe and sides while leaving a comfortable ankle opening.
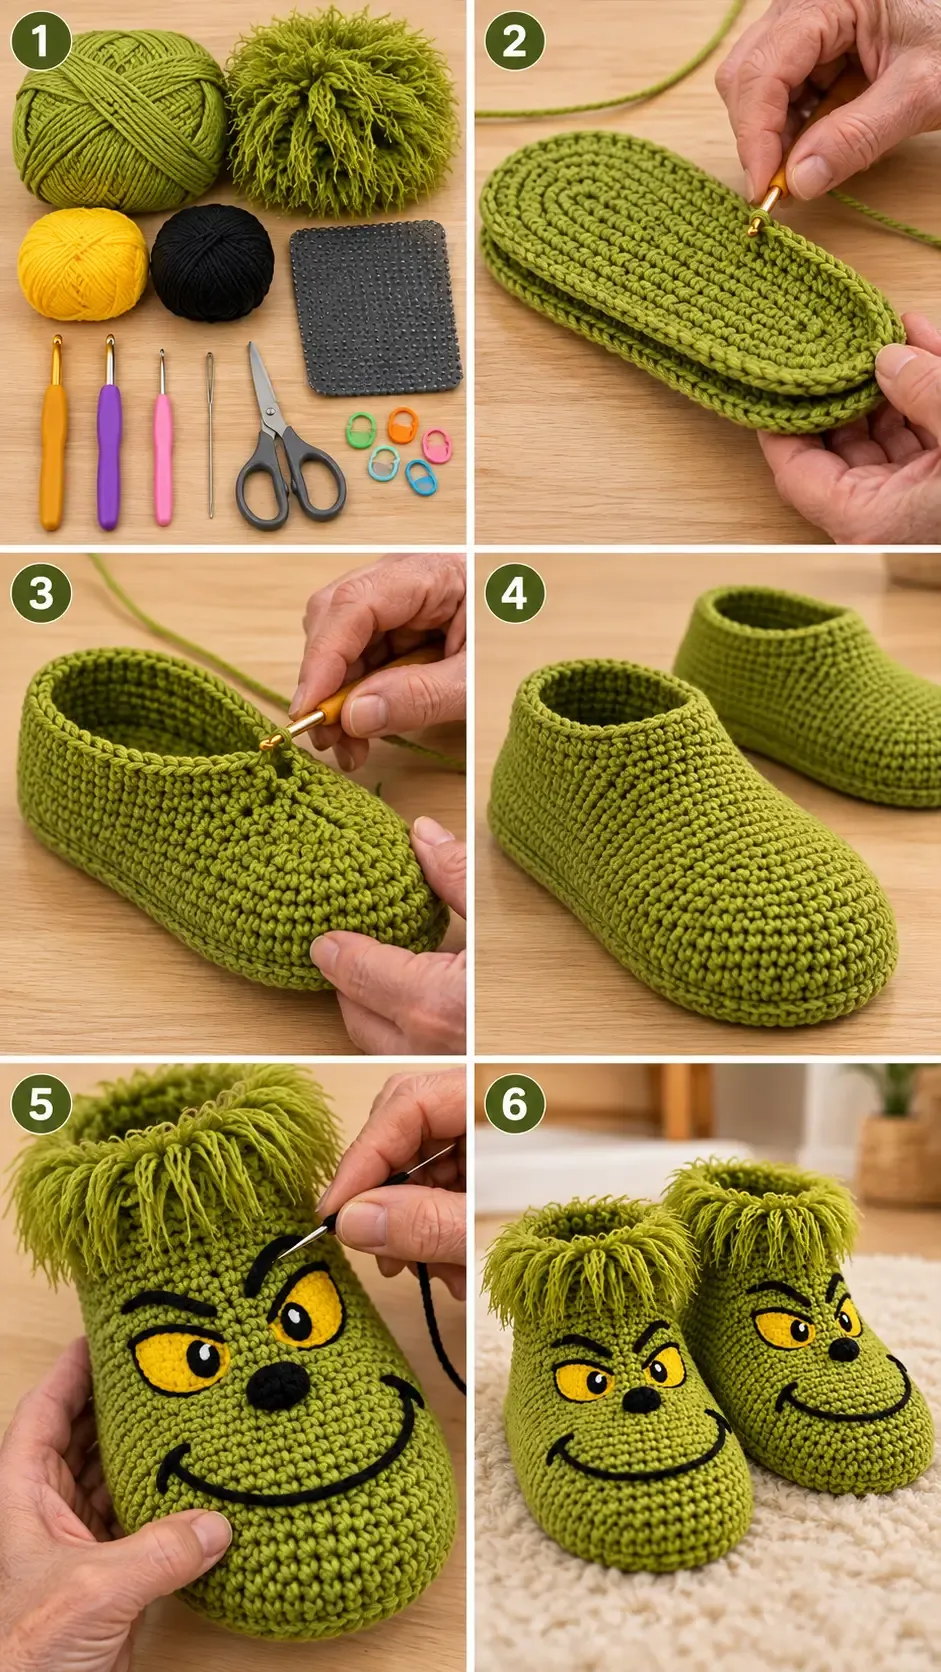
4. Add the shaggy cuff
With the 5.5 mm hook and lime novelty yarn, join at the back of the opening. Work 1–2 rounds of sc evenly around without increasing or decreasing, placing one stitch in each upper stitch. Use the yarn’s visible structure to find the stitches; if the novelty strand is difficult to see, hold it together with a strand of smooth green yarn. Keep the cuff loose enough to slide over the heel. Fasten off and secure the fuzzy tail through several stitches on the inside.
5. Embroider the monster face
Use the toe end as the front. Mark the center line and place the face on the front third of the upper, above the toe curve. On each slipper, embroider two almond-shaped golden-yellow eyes about 2.5–3 cm (1–1¼ in) apart, with their inner corners angled slightly downward for a playful expression. Outline each eye in black, add a small black pupil toward the center, and stitch a tiny white highlight. Add short angled black eyebrows above the eyes, a small padded oval nose between and just below them, and a curved smile below the nose. Use satin stitch or short backstitches, pulling the yarn snug without puckering the upper.
Place a piece of scrap card inside the slipper while embroidering so the needle cannot catch the sole or opposite side. Secure each tail by weaving it through several interior stitches. The face is embroidered directly onto the fabric; avoid buttons, beads, or glued-on eyes that could detach.
6. Finish the pair
Weave in all ends securely on the inside. Check that both slippers have matching sole lengths, upper heights, cuff fullness, and face placement. Try them on over the socks you expect to wear; if the opening feels tight, remove one cuff round or use a larger hook for the cuff. Block only if needed, following the yarn care label and keeping novelty yarn away from high heat.
Fit notes and substitutions
Measure from the back of the heel to the longest toe while standing. The sole should be about 0.5–1 cm (¼–⅜ in) longer than the foot. If you are between sizes, choose based on foot width and the thickness of socks: the double-layer sole has less stretch than the upper. To change the length beyond the listed sizes, add or remove foundation chains in pairs and make matching panels; each extra pair of chains adds four stitches to the count after Round 6. Because that changes the upper circumference too, re-space the eight decreases and stop when the opening fits comfortably rather than following a size’s final round count.
Choose a smooth, durable worsted yarn for the sole and upper. Acrylic or a washable wool blend is easy-care; cotton makes a firmer, less springy slipper. Match the yarn’s care needs across colors where possible. A substitute novelty yarn may be bulkier or less stretchy, so keep the cuff to one round if two would make the opening snug. A Gauge Calculator can help compare a measured swatch with the target gauge, but it cannot predict the fit of the shaped slipper.
Troubleshooting
- Sole cups upward: Check that the increase groups were worked at both rounded ends and that no stitches were skipped on the underside of the foundation chain.
- Sole ripples: The fabric may be too loose or there may be extra increases. Recount each round; the sole should lie flat before the panels are joined.
- Upper feels too loose: Try a smaller hook for the upper or work the decreases in a more compact tension. Do not reduce the sole length needed for the foot.
- Upper puckers at the toe: Shift the eight decreases so they are staggered instead of stacking directly above one another, and keep the sc2tog tension relaxed.
- Face embroidery pulls the fabric: Use shorter stitches, loosen the yarn slightly, and support the fabric from inside while stitching.
Optional grip and care
For extra traction, apply small dots of a product specifically labeled for fabric or slipper soles. Test on a swatch, follow the product’s instructions, and allow it to cure fully before wearing. This is optional and is not a guarantee against slipping; avoid wearing crochet slippers on wet or highly polished floors. A thin sole insert can add structure but may change washability. Follow the yarn and grip-product labels for cleaning, and check the sole seam and embroidery periodically.
For more handmade accessories, browse HookElla’s Wearables & Accessories collection or see the crochet baby high-top sneakers guide.
Helpful questions
What size do these monster slippers make?
The pattern has three adult sizes with sole lengths of about 23.5 cm (9¼ in), 24.5 cm (9⅝ in), and 25.5 cm (10 in). Measure the foot and compare it with the finished sole; choose a size with roughly 0.5–1 cm of ease.
How is the slipper sole made?
Each slipper has two matching single-crochet oval panels. They are joined around the edge with single crochet, making a cushioned double layer before the upper is worked from the seam.
Can I use a different yarn for the fuzzy cuff?
Yes. Use a compatible eyelash, loop, or brushed novelty yarn, or make the cuff in the main yarn. Novelty yarn thickness varies, so check that the opening remains comfortable and not overly tight.
How can I make the slippers less slippery?
Apply small dots of a product specifically labeled for fabric or slipper soles, following its cure-time instructions. Test it on a swatch first; crochet slippers are not safety footwear and may still slide on smooth floors.