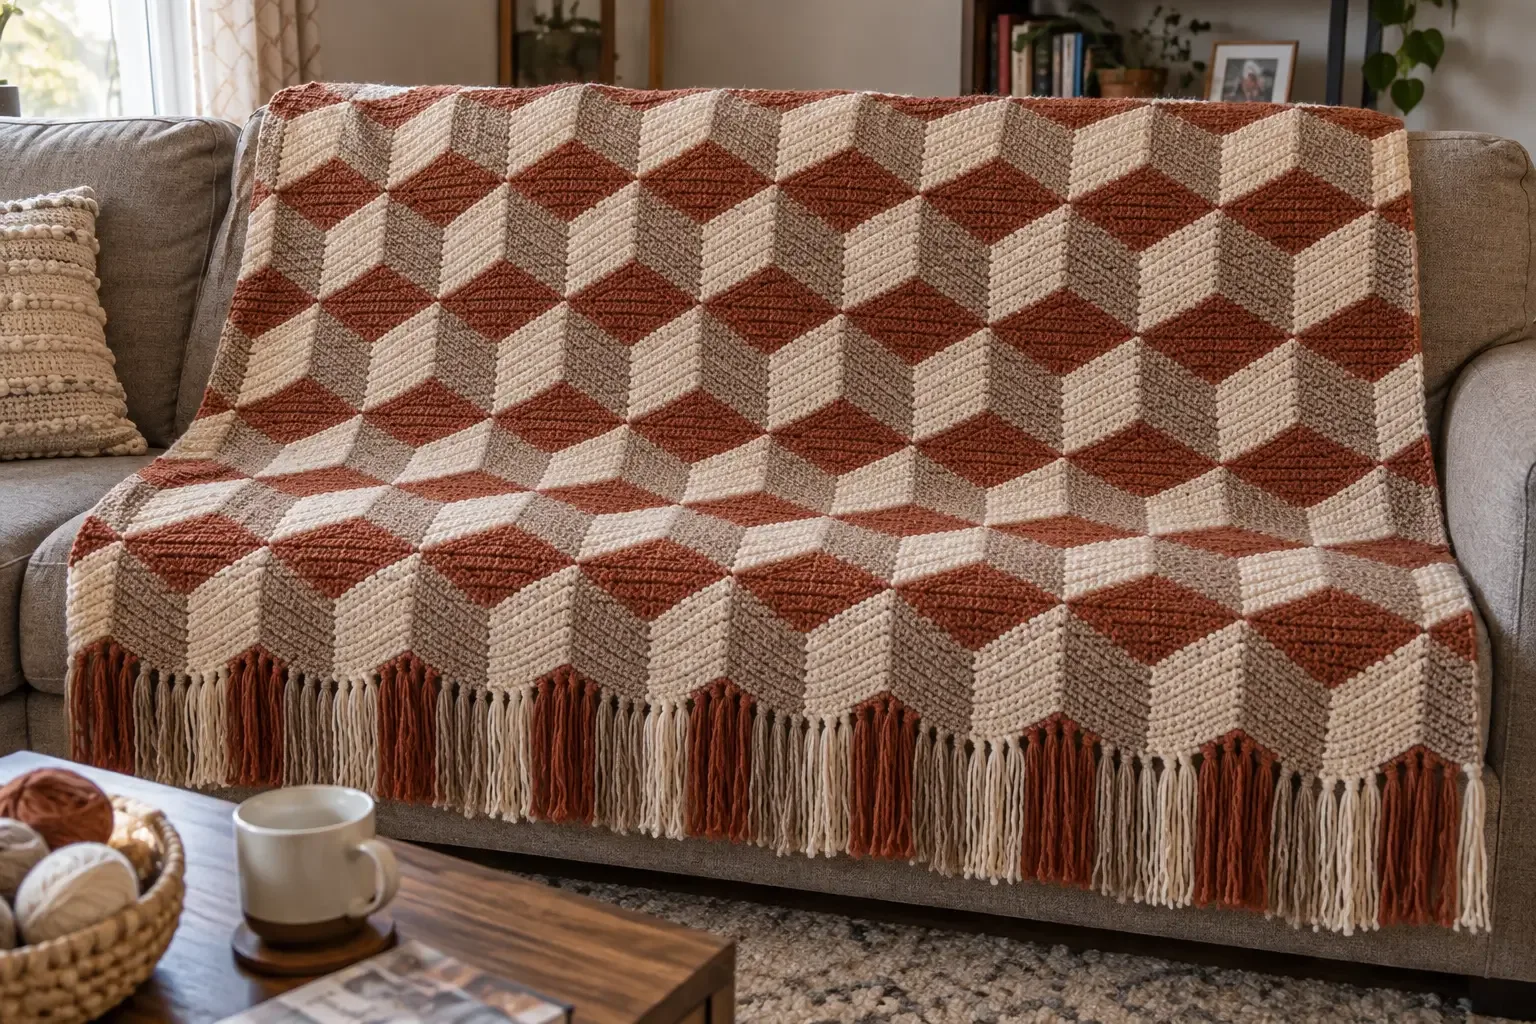
A field of rust, taupe, and ivory diamonds becomes a stack of dimensional cubes in this warm geometric throw. The illusion depends on more than color alone: every rhombus must share the same proportions, every obtuse corner must meet in the right place, and every seam must relax flat. This HookElla version gives you the stitch counts and the geometry checks that make those joins dependable.
Pattern overview
This throw is built from one repeated crochet diamond. Three congruent diamonds form each flat optical cube: rust on top, warm taupe on the left, and creamy ivory on the right. The cubes then tile in offset rows to continue the diagonal lines across the blanket. Coordinating fringe appears on the lower edge only.
The written pattern uses US crochet terminology and is suited to an intermediate crocheter who can count rows, work decreases, seam motifs, and block to measurements. The stitch counts and assembly geometry have been checked against a 60°/120° rhombus. Because yarn behavior varies, the first three-color cube is your physical gauge test before production begins.
Geometry check
A cube face is not a square turned on its point. It is a rhombus with two 60° corners and two 120° corners. Its long diagonal should be about 1.73 times its short diagonal. The cube center uses three 120° corners: 3 × 120° = 360°, so the work can lie flat.
Finished size, motif gauge, and quantities
The target throw is approximately 50 × 60 in (127 × 152 cm) after final blocking and with the lower fringe hanging naturally. Plan on roughly 30–36 complete cube units. A commonly described medium layout is about 5 cubes across × 6 cubes long, but staggered geometry changes the outer footprint: always measure a blocked paper or crochet layout before committing to all the motifs.
One blocked diamond should have four equal sloping edges measuring approximately 6–6.5 in (15–16.5 cm). For the correct cube angle, its short diagonal is also about 6–6.5 inches and its long diagonal is about 10.4–11.25 in (26.5–28.5 cm). Measure both diagonals; a single “point-to-point” measurement does not confirm the shape.
For the 18-stitch, 32-row sample below, aim after blocking for approximately:
- 18 hdc = 6–6.5 in across the short diagonal
- 32 rows = 10.4–11.25 in along the long diagonal
- a long-diagonal ÷ short-diagonal ratio close to 1.73
That is roughly 11–12 hdc and 11.5–12.5 rows per 4 in (10 cm) in turned BLO hdc, depending on whether your target is at the 6-inch or 6.5-inch end. The ratio matters as much as the absolute size. If your stitch gauge and row gauge do not produce the rhombus proportions, change yarn within the worsted/aran range or adjust your technique before making dozens of motifs.
For 30 cubes, make 30 diamonds in each color, 90 total. For 36 cubes, make 36 in each color, 108 total. Allow approximately:
- 1,200–1,500 yd (1,097–1,372 m) rust
- 1,200–1,500 yd (1,097–1,372 m) warm taupe
- 1,200–1,500 yd (1,097–1,372 m) creamy ivory
These generous amounts include motif edging, joining, finishing, fringe, swatching, and a matching dye-lot buffer. Weigh the yarn used by your first finished cube and multiply by the planned cube count for a more exact purchase.
Yarn recommendations and materials
Choose a smooth, colorfast worsted/category 4 or light aran yarn with clear stitch definition. Anti-pilling acrylic, cotton-acrylic, or a firm wool blend will preserve the ridges and sharp corners better than fuzzy, haloed yarn. Use three yarns with similar fiber content, twist, and meterage per ball so all faces block alike.
- Worsted or aran yarn in rust, warm taupe, and creamy ivory, in the quantities above
- 5.0 mm (H-8) crochet hook
- Locking stitch markers in at least two colors
- Tapestry needle suitable for seaming
- Scissors and measuring tape
- Blocking mats, rustproof pins, and a spray bottle or basin
- Cardboard fringe template, 12–14 in (30–35 cm) long
- Optional digital scale for calculating yarn use
US abbreviations
- BLO — back loop only
- ch — chain
- hdc — half double crochet
- hdc2tog — half double crochet two together
- RS / WS — right side / wrong side
- sc — single crochet
- sc2tog — single crochet two together
- sl st — slip stitch
- st(s) — stitch(es)
Why the BLO texture works
Work each half double crochet through the back loop only. The unused front loop forms a ridge across the row, giving every face the horizontal banding visible in the finished throw. Turn after every row so the ridges stack consistently. The turning chain does not count as a stitch.
The diamond is constructed along its long axis. It begins at a narrow acute point, expands gradually to the two obtuse side corners, and narrows to the opposite acute point. Alternating increase rows with even rows is deliberate: it lengthens the motif enough to approach the 60°/120° angles required for a flat cube.
Verified crochet diamond
Make all diamonds with the same instructions. Place a marker at the beginning of Row 16 and another at the end of Row 16; these mark the two obtuse side corners. Each cube will use one of these marked corners at its center.
Narrow point and increase half
- Row 1: Ch 2. Work 2 hdc in the second ch from the hook — 2 sts. Ch 1, turn.
- Row 2 (increase): In BLO, 2 hdc in the first st, hdc BLO across to the final st, 2 hdc in the final st — 4 sts. Ch 1, turn.
- Row 3 (even): Hdc BLO in every st — 4 sts. Ch 1, turn.
- Repeat the increase row followed by the even row, reaching 6, 8, 10, 12, 14, and 16 sts at the ends of Rows 4, 6, 8, 10, 12, and 14. Row 15 is even with 16 sts.
- Row 16 (final increase): 2 hdc BLO in the first st, hdc BLO across to the final st, 2 hdc BLO in the final st — 18 sts. Mark both side corners of this row. Ch 1, turn.
Center row
Row 17: Hdc BLO in every stitch — 18 sts. Ch 1, turn. Rows 16 and 17 create the centered widest section without adding another shaping step.
Decrease half
- Row 18 (decrease): Hdc2tog BLO over the first 2 sts, hdc BLO across until 2 sts remain, hdc2tog BLO over the final 2 sts — 16 sts. Ch 1, turn.
- Row 19 (even): Hdc BLO in every stitch — 16 sts. Ch 1, turn.
- Repeat the decrease row followed by the even row, reaching 14, 12, 10, 8, 6, and 4 sts at the ends of Rows 20, 22, 24, 26, 28, and 30. Rows 21, 23, 25, 27, 29, and 31 are even.
- Row 32 (final decrease): Hdc2tog BLO over the first 2 sts and hdc2tog BLO over the final 2 sts — 2 sts. Fasten off.
The stitch sequence is symmetrical: 2; 4, 4; 6, 6; …; 16, 16; 18, 18; 16, 16; …; 4, 4; 2. Do not add a final one-stitch row; keeping two stitches at both narrow ends makes the two acute tips structurally identical. The edging closes each end visually.
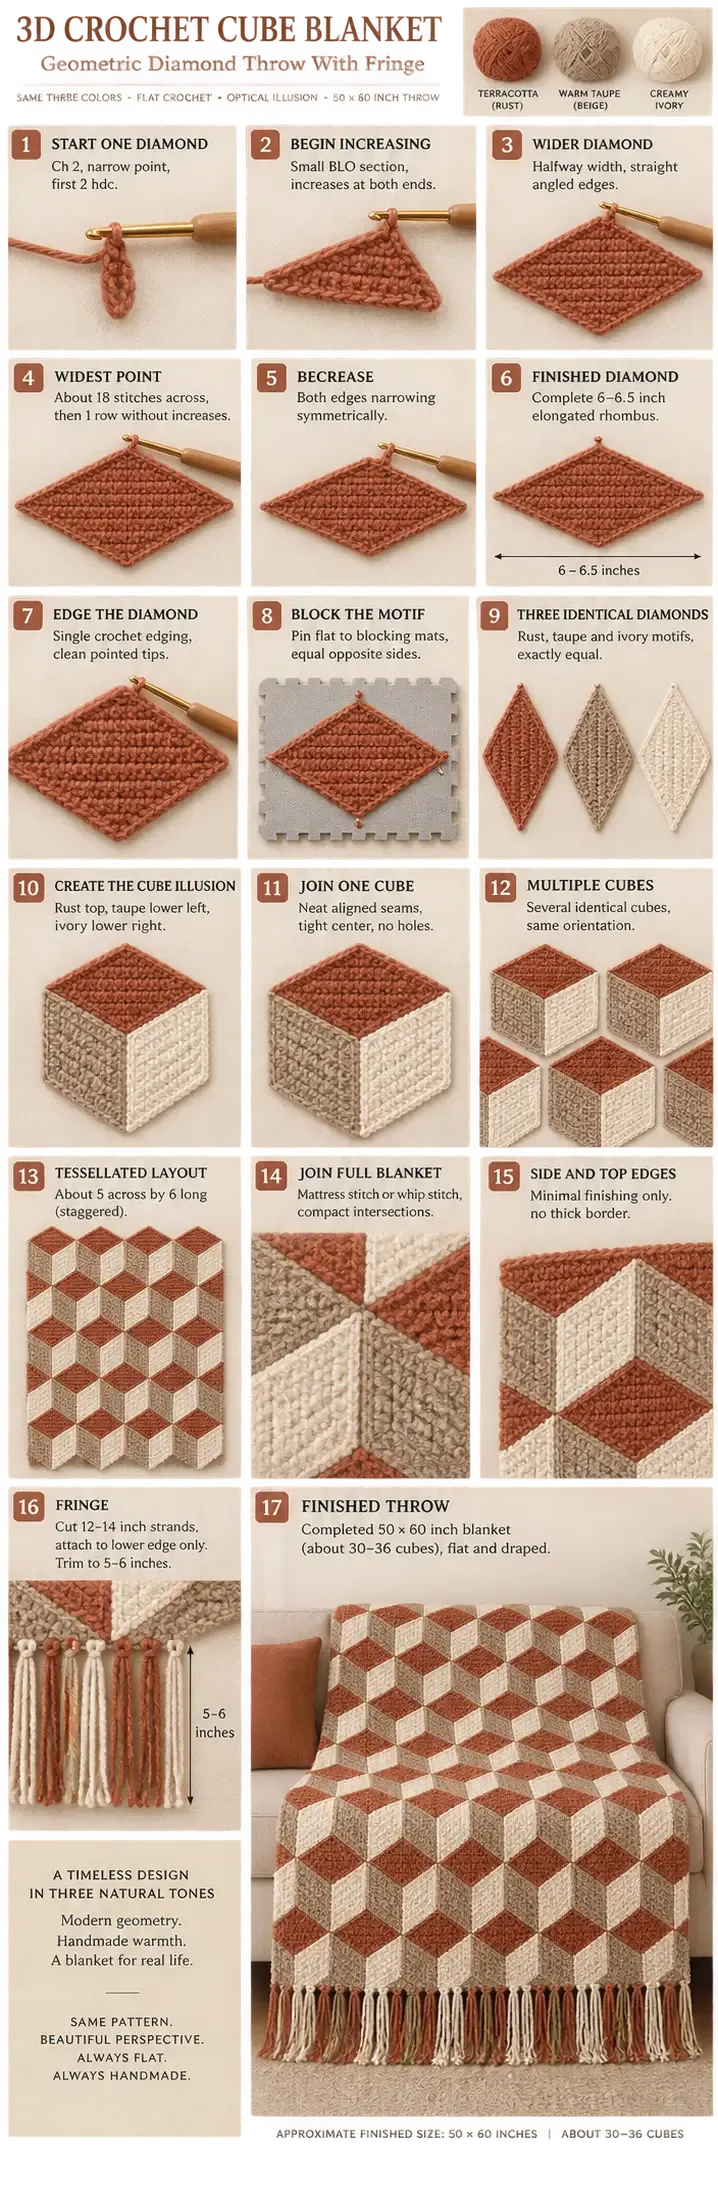
Use this construction image for color and assembly orientation. It is not a row-by-row stitch chart; the verified written shaping and edge treatment above take precedence.
Check and block the first motif
Lay the unedged diamond flat without pulling. Measure the short and long diagonals, then divide long by short. A result near 1.73 confirms the needed angle. If the ratio is too small, the motif is too squat; add one extra even row after selected shaping rows, mirrored on both halves. If the ratio is too large, omit evenly spaced paired even rows, again making the same change before and after the center.
Record every adjustment. All remaining diamonds must use that same row map.
Wet- or steam-block as permitted by the yarn label. Pin the four corners first, set the short diagonal, then set the long diagonal to approximately 1.73 times that measurement. Confirm that all four sides are equal and the motif lies flat. Make one motif in each color and check that the three blocked pieces match exactly before continuing.
A counted single-crochet motif edge
Do not “sc evenly” by eye on 90 or more motifs. A repeatable edge count is what makes corresponding seams match.
- With the blocked diamond in front of you, divide each of its four equal sides into quarters with markers.
- Join matching yarn just after an acute tip. Work one relaxed sc into each row-end space, then distribute any additional stitches evenly until the side lies flat. At the target gauge, about 18 sc per side is a useful starting point, excluding corner spaces.
- At each acute tip, work (sc, ch 1, sc) into the small end space spanning the two end stitches.
- At each marked obtuse corner, work (sc, ch 1, sc) into the midpoint row-end space. Keep the ch-1 corner open enough to accept a seam.
- Repeat the identical count on all four sides. Join with a sl st and fasten off.
The number 18 is not universal. If 18 sc causes cupping, add stitches evenly; if it ripples, remove stitches evenly. Once one edged motif lies flat, lock that side count for every motif. Never place extra stitches on only one face of a cube.
Color orientation and one cube
Make a three-color test cube before batch production. Lay the motifs with their ridges running in matching visual directions and use the following fixed map:
                 RUST
               top face
                  ▼
          TAUPE   ●   CREAM
        left face     right face

● = three marked 120° side corners meet here
The point aimed at the center on each face is one of the marked obtuse corners beside the widest rows. The narrow Row 1 and Row 32 points remain on the outside of the cube. This distinction is essential: three acute tips leave a hole because their angles do not add to 360 degrees.
With wrong sides together and right sides facing you, seam from the center outward. Mattress stitch through the horizontal bars just inside the edging for an almost invisible join, or whip stitch through corresponding back loops for a slightly outlined seam. Match stitch 1 to stitch 1 along each edge and keep the seam yarn relaxed.
- Join one edge of the rust face to the adjoining edge of the taupe face.
- Join the adjoining edge of rust to cream.
- Join the remaining inner edge of cream to taupe.
- Before closing the center, pass the yarn needle through all three center ch-1 corner spaces twice. Ease the points together, knot on the wrong side, and weave through a seam. Do not cinch hard enough to pucker the faces.
The three outside faces should form one flat six-sided cube unit with no center hole, overlap, or bowl. If it cups, recheck the 1.73 diagonal ratio, motif size, edge counts, and seam tension before proceeding.
Build the tessellated blanket
For a medium throw, prepare 30–36 cubes. Keep every unit upright: rust top, taupe left, cream right. Never rotate a cube to make it fit. Rotation changes the light-to-dark order and breaks the dimensional illusion.
Lay the cubes on a clean floor or blocking surface. Start with approximately five across and six long, offsetting neighboring rows so full outer edges meet. Continuous rust/taupe and rust/cream seams should read as unbroken diagonals. Photograph and label the layout before stacking anything for seaming.
The “5 × 6” count is a production guide, not rectangular-grid arithmetic. Offset rows extend beyond one another, and the finished footprint depends on the measured cube side. Arrange all units, include the planned 5–6-inch fringe in the length measurement, and adjust within the 30–36-cube range before joining.
Join complete cubes along matching full edges with the same stitch and tension used inside each cube. Work from one junction to the next, checking after every row of cubes that the fabric remains flat. At every multi-motif junction, pass the joining yarn through the shared corner spaces twice and weave the end back along a seam. This reinforces the point without making a hard knot on the blanket face.
Technically verified outer-edge finishing
The natural outline is faceted. One round of crochet can neaten that outline, but it cannot turn a motif-deep V into a straight line. The correct finish depends on whether you want to preserve the stepped silhouette or create a truly straight edge.
Side edges: preserve the geometric outline
Join creamy ivory at an upper side point. Work one relaxed sc in each edging stitch along the angled outline. At an outward 120° corner, work (sc, ch 1, sc) in the corner space. At an inward junction, work sc2tog across the last stitch of the first edge and the first stitch of the next edge, then place one reinforcing sc in the shared corner space only if the valley pulls open.
Repeat on the second side with the same total stitch count. Lay the blanket down every few segments. Rip back and change the local count if the edge waves or draws in; row-end gauge, not a universal stitch phrase, determines the correct distribution.
Top edge: a narrow, flat finish
Use creamy ivory and the same measured method across the top. Work sc along each diagonal run, add (sc, ch 1, sc) at outward points, and use sc2tog across inward joins. This follows and stabilizes the shallow zigzag while leaving the cube faces visible. Do not add a fixed sc, hdc, sc group in every valley: adding stitches at a concave corner encourages flare, and one hdc is far too short to fill a several-inch geometric dip.
Optional genuinely straight sides or top
If a straight rectangular edge is essential, make paper templates for each open half-rhombus or triangular valley. Crochet matching filler pieces to those measured templates, maintaining the adjacent face color and ridge direction. Block the fillers, seam them into the valleys, and only then work one even sc row across the new straight line. A filler must span the full valley depth; graded sc/hdc/dc stitches are suitable only for tiny gauge irregularities, not structural gaps.
Keep the lower edge unbordered or work one stabilizing sc row along its facets before adding fringe. Do not put fringe on the sides or top.
Three-color lower fringe
Wrap cream, taupe, and rust yarn around a 12–14 in (30–35 cm) cardboard template and cut at one end. For each group, hold 3–4 strands together, fold them in half, pull the fold through a lower-edge stitch or corner space, and draw the loose ends through the loop.
Space groups consistently across the lower edge rather than crowding every stitch. Follow the face directly above each section, or repeat balanced groups of cream, taupe, and rust. Add a group at each outer lower point so the corners do not look bare. After all groups are attached, let the blanket hang for several hours, comb the strands with your fingers, and trim them to 5–6 in (12.5–15 cm). The fringe belongs on the lower edge only.
Final blocking and finishing
Weave every tail through several same-color stitches on the wrong side, changing direction once. Spread the blanket flat and ease the diagonal seams into continuous lines. Pin the outer points without forcing the center joins. Lightly wet-block or steam according to the yarn label and allow the throw to dry completely.
Recheck the cube centers, exterior junctions, and fringe knots. The fabric should drape without ruffling, center holes, or faces twisting out of plane. Avoid aggressive stretching; distorting one face changes the optical effect across the whole field.
Troubleshooting
- The three faces leave a triangular center hole: You used acute start/end tips at the center, or the motif is too squat. Reorient to the marked obtuse corners and confirm the 1.73 diagonal ratio.
- A cube bowls upward: The motifs are not congruent, edging counts differ, or seams are too tight. Reblock to one template and reseam with relaxed tension.
- The diamond looks like a square on point: Its diagonals are too similar. Add mirrored even rows between shaping rows until the long diagonal is close to 1.73 times the short.
- The BLO ridges change direction: Mark the right side of every motif after blocking and orient all three faces from that side before seaming.
- The outside edging waves: Remove stitches at inward joins and recalibrate the sc rate along row ends. Taller stitches do not correct excess circumference.
- The top still looks zigzagged: That is the honest tessellated outline. Add blocked filler motifs if you need a straight line.
- The cube colors seem to flip: Return every unit to rust top, taupe left, cream right. Do not solve layout gaps by rotating units.
- The finished size is drifting: Stop production, block one cube, and mock up the remaining footprint with paper copies of that exact size.
Resizing the throw
Resize by complete cubes, not by adding random diamonds at the edge. First block one cube and record its full width and height. Arrange paper copies in offset rows, add 5–6 inches for the lower fringe, and count the units needed for your target. Multiply the cube count by three for total diamonds and divide evenly among the three colors.
To resize the motif itself, keep the shaping symmetrical. Add or remove a paired increase level and its matching decrease level, then add or remove even rows in mirrored positions until the long-to-short diagonal ratio returns to approximately 1.73. Block and measure again; stitch count alone cannot guarantee an isometric face.
Choosing another palette
The illusion needs value contrast more than these exact hues. Photograph your yarns together in black and white: the rust replacement should read medium-dark on top, the taupe replacement should be a distinct middle value on the left, and the cream replacement should be the lightest on the right. Keep all three yarns in the same weight and repeat that orientation without exception.
For more dimensional texture, try the Cream Basketweave Crochet Baby Blanket. The Lost in Time Crochet Shawl explores another layered geometric look, and the Blankets & Home collection has more practical projects for your space.
Once the first accurate cube lies flat, the rest of this throw becomes a calm production rhythm: one diamond, one color position, and one clean seam at a time.
Helpful questions
Why does this diamond alternate shaping rows with even rows?
Three cube faces can meet flat only when each diamond is close to a 60°/120° rhombus. With the stated BLO half-double-crochet gauge, increasing on every row makes the motif too short and wide at the center. Alternating shaping and even rows produces the required long-to-short diagonal ratio.
Which diamond corner belongs at the center of a cube?
Use an obtuse side corner at the widest part of the diamond. Do not place the narrow starting or finishing point at the cube center; three acute points cannot fill 360 degrees without a gap.
Will sc, hdc, sc straighten every inward valley?
No. A motif-deep valley cannot be made straight by one short stitch group. Follow the geometric outline with a calibrated single-crochet finish, or insert measured half-diamond fillers before adding a truly straight edge.
How many diamonds do I need?
Each cube uses three diamonds. Make 90 diamonds for 30 cubes or 108 diamonds for 36 cubes, divided equally among rust, taupe, and creamy ivory.
How do I make the blanket exactly 50 × 60 inches?
Block one complete cube, lay out paper templates, and measure the staggered footprint before making every motif. The 5-by-6 source layout is a planning estimate, not a substitute for gauge; fringe adds about 5–6 inches to the hanging length.
Can I substitute different colors?
Yes. Use one medium-dark top color, a middle-value left color, and the lightest color on the right. Keep those value positions identical in every cube.
Is the construction image a stitch chart?
No. It is an orientation overview. Use the written HookElla row counts, corner labels, measured edging, and finishing instructions for construction.