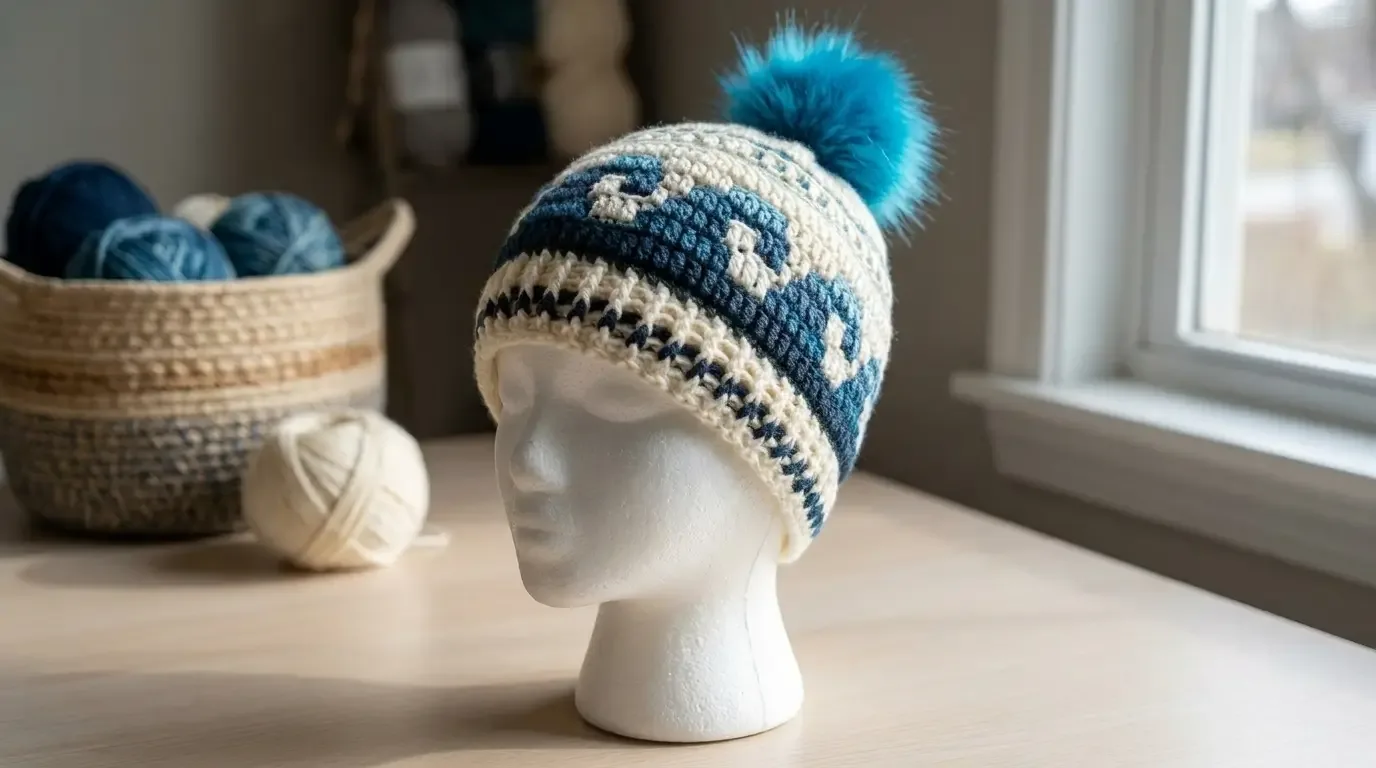
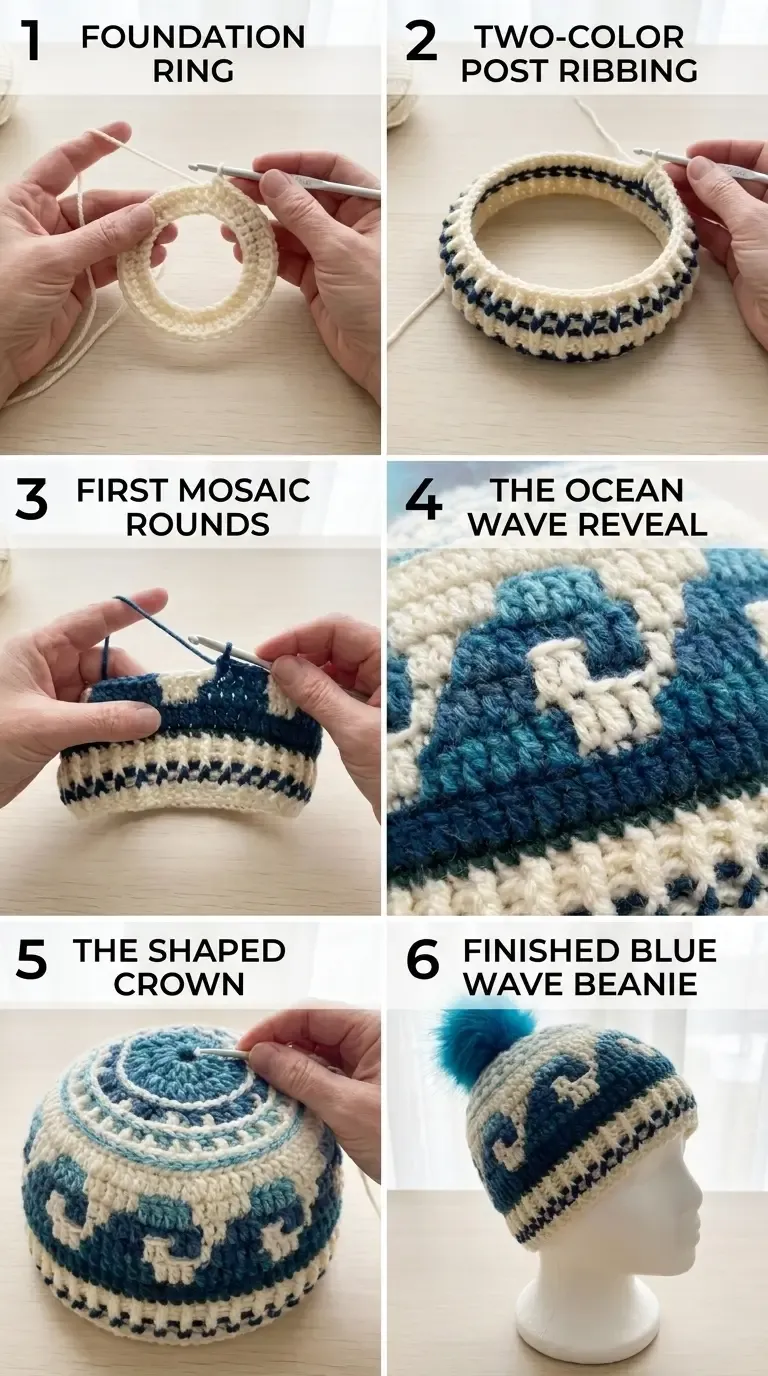
Cream-colored waves curl across deep ocean-blue bands in this bottom-up mosaic beanie. The ribbed brim, one-color-per-round overlay technique, and softly shaped crown create a warm hat with a crisp graphic pattern.
About this pattern
This seamless beanie is worked from the lower edge upward. A stretchy post-stitch brim gives way to a two-color overlay mosaic body, where cream stitches appear to travel in curling waves across ocean-blue bands. The crown uses gradual decreases for a smooth dome rather than a gathered top or separate crown panel.
The instructions are written in US crochet terms. Choose one size before beginning and keep the matching stitch count throughout. The four sizes share the same wave repeat; only the number of repeats and two brim rounds differ.
Materials
- DK-weight (#3) yarn in two contrasting colors: Color A, cream; Color B, ocean blue. A subtly variegated blue is also suitable if the contrast remains clear.
- Approximately the following amounts, including a little extra for swatching: XS, A 110 yd (100 m) and B 66 yd (60 m); S, A 115 yd (105 m) and B 73 yd (66 m); M, A 124 yd (112 m) and B 82 yd (75 m); L, A 137 yd (125 m) and B 91 yd (83 m).
- 3.5 mm and 4 mm crochet hooks, or sizes needed to meet gauge.
- Tapestry needle, scissors, stitch marker (optional), flexible tape measure.
- Optional pom-pom and a secure removable pom-pom button or snap.
The photographed sample used smooth DK acrylic yarn. For a softer or warmer result, choose a yarn with a similar DK thickness and clear stitch definition; changing fiber or loft may change the gauge, drape, and yardage.
Finished size and fit
Choose by the wearer’s head measurement. The finished hat is designed with about 1–2 inches (2.5–5 cm) of negative ease so the brim sits snugly.
| Size | Head circumference | Typical wearer | Finished hat circumference | Finished height |
|---|---|---|---|---|
| XS | 17–18 in (43–46 cm) | Child | 16 in (41 cm) | 7.25 in (18 cm) |
| S | 19–20 in (48–51 cm) | Teen / small adult | 18 in (46 cm) | 7.25 in (18 cm) |
| M | 21–22 in (53–56 cm) | Medium adult | 20 in (51 cm) | 7.5 in (19 cm) |
| L | 23–24 in (58.5–61 cm) | Large adult | 22 in (56 cm) | 7.5 in (19 cm) |
The sample shown in the PDF’s measurement photographs is size M. These are finished-hat measurements, not head measurements.
Gauge and sizing check
With the 4 mm hook in the mosaic body, 18 mosaic double crochet stitches and 9 rounds should measure 4 × 4 in (10 × 10 cm). In the post-stitch ribbing with the 3.5 mm hook, 18 post stitches should measure 4 in (10 cm) along the round.
Make a small mosaic swatch before starting. If it is too wide or too tall, adjust the hook and swatch again. Gauge controls the circumference and height; check the ribbing separately because it needs to stretch comfortably. If your head measurement falls between sizes, choose based on the amount of negative ease you prefer and try the brim on before continuing.
Abbreviations (US terms)
- ch: chain
- sl st: slip stitch
- sc: single crochet
- hdc: half double crochet
- f-hdc: foundation half double crochet (or use the chain-and-hdc setup given in Round 1)
- dc: double crochet
- fpdc: front post double crochet
- bpdc: back post double crochet
- blo: back loop only
- flo: front loop only
- st(s): stitch(es)
- yo: yarn over
- sc2tog: single crochet two together
- dc2tog: double crochet two together
- Mdc: mosaic double crochet
- Mdc2tog: mosaic double crochet two together
- a-sc: anchored single crochet
Special stitches and construction notes
Front post double crochet (fpdc): Yo, insert the hook from front to back to front around the post of the indicated stitch, yo and pull up a loop, then complete a double crochet in two pull-throughs.
Back post double crochet (bpdc): Yo, insert the hook from back to front to back around the post of the indicated stitch, yo and pull up a loop, then complete a double crochet in two pull-throughs.
Mosaic double crochet (Mdc): Yo and work a double crochet into the front loop of a stitch two rounds below, using the same-color stitch. Skip the stitch directly behind the long stitch on the current round; this keeps the stitch count even and lets the long stitch cover the other color.
Mosaic double crochet two together (Mdc2tog): Begin an Mdc in each of the next two eligible front loops two rounds below. After each partial double crochet, work through its first two loops, leaving two loops after the first leg and three after the second. Yo and draw through the final three loops to join the legs into one decrease. Skip the two current-round stitches directly behind those legs.
Anchored single crochet (a-sc, optional): Insert the hook through the back loop of the mosaic double crochet in the previous round, then through the back loop of the single crochet directly behind it on the inside, one round lower. Yo, pull through both layers, yo, and pull through both loops. Use a regular blo sc instead if you prefer.
Each mosaic round uses one color only. At the end of the round, join and change to the next color; do not cut either yarn. Carry the idle color loosely inside the hat, without pulling the fabric tight. Begin each mosaic round with ch 1; it does not count as a stitch. From Mosaic Round 2 onward, work regular sc in blo unless a direction specifically says otherwise. For the same wave orientation as the sample, right-handed crocheters follow the main sequence below; left-handed crocheters use the alternate sequences noted in the left-handed section.
Pattern instructions
Numbers in parentheses are listed in XS, S, M, L order. Brackets enclose a repeat worked around the round. Join each round with a sl st unless noted. Keep the join at the same side of the hat.
Part 1: Post-stitch ribbed brim
Use the 3.5 mm hook and Color A. Select the count for your size: XS 72, S 81, M 90, L 99.
- Round 1: Make 72 (81, 90, 99) foundation half-double crochet stitches (f-hdc), join the first and last stitches with a sl st to make a ring, taking care not to twist. 72 (81, 90, 99) sts.
If you do not use foundation hdc, ch 72 (81, 90, 99), join without twisting, ch 2 (counts as first hdc), then hdc once in each chain around, working into the back bumps. Join at the top of the beginning ch-2. 72 (81, 90, 99) sts.
- Round 2 (Color A): Ch 2, counting as the first stitch. Around the remaining posts, alternate fpdc and bpdc, beginning with fpdc. For XS and M the final post stitch is fpdc; for S and L it is bpdc. Join to the top of the beginning ch-2 and change to Color B. 72 (81, 90, 99) sts.
- Round 3 (Color B): Ch 2, counting as the first stitch. Work alternating fpdc and bpdc around, placing fpdc over fpdc and bpdc over bpdc. Join to the top of the beginning ch-2 and change to Color A. 72 (81, 90, 99) sts.
- Round 4 (Color A): Ch 2, counting as the first stitch. Continue alternating fpdc and bpdc around, maintaining the post alignment. Join to the top of the beginning ch-2. 72 (81, 90, 99) sts.
Repeat Round 4 one more time for XS and S, or two more times for M and L. There are 4 (4, 5, 5) post-ribbing rounds total. At the end of the last round, change to Color B but do not cut Color A. Try the brim on now; it should be snug but not uncomfortable. Switch to the 4 mm hook.
Part 2: Overlay mosaic body
Round 1 (Color B): Ch 1, sc in both loops of every stitch around. Join and change to Color A. 72 (81, 90, 99) sts.
From this point on, work all regular sc in blo. The sequences in the right-handed list are repeated continuously around the round, beginning after ch 1. Counts stay unchanged except at the four decrease rounds.
Right-handed sequence
- Round 2 (Color A): [sc in blo around]. Join and change to B. 72 (81, 90, 99) sts.
- Round 3 (Color B): [Mdc around]. Join and change to A. 72 (81, 90, 99) sts.
- Round 4 (Color A): [4 sc in blo, 1 a-sc, 4 sc in blo]. Join and change to B. 72 (81, 90, 99) sts.
- Round 5 (Color B): [1 Mdc, 3 sc in blo, 5 Mdc]. Join and change to A. 72 (81, 90, 99) sts.
- Round 6 (Color A): [1 sc in blo, 3 Mdc, 5 sc in blo]. Join and change to B. 72 (81, 90, 99) sts.
- Round 7 (Color B): [5 sc in blo, 4 Mdc]. Join and change to A. 72 (81, 90, 99) sts.
- Round 8 (Color A): [1 Mdc, 2 sc in blo, 2 Mdc, 4 sc in blo]. Join and change to B. 72 (81, 90, 99) sts.
- Round 9 (Color B): [1 sc in blo, 2 Mdc, 2 sc in blo, 3 Mdc, 1 sc in blo]. Join and change to A. 72 (81, 90, 99) sts.
- Round 10 (Color A): [1 Mdc, 7 sc in blo, 1 Mdc]. Join and change to B. 72 (81, 90, 99) sts.
- Round 11 (Color B): [2 sc in blo, 4 Mdc, 3 sc in blo]. Join and change to A. 72 (81, 90, 99) sts.
- Round 12 (Color A): [2 Mdc, 4 sc in blo, 3 Mdc]. Join and change to B. 72 (81, 90, 99) sts.
- Round 13 (Color B): [sc in blo around]. Join and change to A. 72 (81, 90, 99) sts.
- Round 14 (Color A): [Mdc around]. Join and change to B. 72 (81, 90, 99) sts.
- Round 15 (Color B): [4 sc in blo, 1 a-sc, 4 sc in blo]. Join and change to A. 72 (81, 90, 99) sts.
- Round 16 (Color A): [sc in blo around]. Join and change to B. 72 (81, 90, 99) sts.
- Round 17 (Color B): [sc in blo around]. Join and change to A. 72 (81, 90, 99) sts.
- Round 18 (Color A, decrease): [1 sc in blo, 1 Mdc, 1 sc in blo, 1 Mdc, 1 sc in blo, 1 Mdc, 1 sc in blo, 1 Mdc2tog] around. Join and change to B. 64 (72, 80, 88) sts.
- Round 19 (Color B): [sc in blo around]. Join and change to A. 64 (72, 80, 88) sts.
- Round 20 (Color A): [sc in blo around]. Join and change to B. 64 (72, 80, 88) sts.
- Round 21 (Color B): [sc in blo around]. Join and change to A. 64 (72, 80, 88) sts.
- Round 22 (Color A, decrease): [6 Mdc, 1 Mdc2tog] around. Join and change to B. 56 (63, 70, 77) sts.
- Round 23 (Color B): [3 sc in blo, 1 a-sc, 3 sc in blo] around. Join and change to A. 56 (63, 70, 77) sts.
- Round 24 (Color A): [sc in blo around]. Join and change to B. 56 (63, 70, 77) sts.
- Round 25 (Color B, decrease): [1 Mdc, 1 Mdc2tog, 1 Mdc2tog, 1 Mdc, 1 sc in blo] around. Join and change to A. 40 (45, 50, 55) sts.
- Round 26 (Color A): [4 sc in blo, 1 Mdc] around. Join and change to B. 40 (45, 50, 55) sts.
- Round 27 (Color B, decrease): [1 Mdc2tog, 1 Mdc2tog, 1 sc in blo] around. Join, fasten off Color B, and switch to the 3.5 mm hook. 24 (27, 30, 33) sts.
- Round 28 (Color A): [2 sc in blo, 1 Mdc] around. Join. 24 (27, 30, 33) sts.
Left-handed sequence for the same wave direction
Left-handed crocheters use the same setup and counts. Rounds 1–4 are the same as above. For Rounds 5–12, 18, 22, 25–28, use these mirrored working-order repeats. Rounds not listed here (13–17 and 19–21) are the same as in the right-handed sequence.
- Round 5 (Color B): [5 Mdc, 3 sc in blo, 1 Mdc]. 72 (81, 90, 99) sts.
- Round 6 (Color A): [5 sc in blo, 3 Mdc, 1 sc in blo]. 72 (81, 90, 99) sts.
- Round 7 (Color B): [4 Mdc, 5 sc in blo]. 72 (81, 90, 99) sts.
- Round 8 (Color A): [4 sc in blo, 2 Mdc, 2 sc in blo, 1 Mdc]. 72 (81, 90, 99) sts.
- Round 9 (Color B): [1 sc in blo, 3 Mdc, 2 sc in blo, 2 Mdc, 1 sc in blo]. 72 (81, 90, 99) sts.
- Round 10 (Color A): [1 Mdc, 7 sc in blo, 1 Mdc]. 72 (81, 90, 99) sts.
- Round 11 (Color B): [3 sc in blo, 4 Mdc, 2 sc in blo]. 72 (81, 90, 99) sts.
- Round 12 (Color A): [3 Mdc, 4 sc in blo, 2 Mdc]. 72 (81, 90, 99) sts.
- Round 18 (Color A, decrease): [1 Mdc2tog, 1 sc in blo, 1 Mdc, 1 sc in blo, 1 Mdc, 1 sc in blo, 1 Mdc, 1 sc in blo] around. 64 (72, 80, 88) sts.
- Round 22 (Color A, decrease): [1 Mdc2tog, 6 Mdc] around. 56 (63, 70, 77) sts.
- Round 25 (Color B, decrease): [1 sc in blo, 1 Mdc, 1 Mdc2tog, 1 Mdc2tog, 1 Mdc] around. 40 (45, 50, 55) sts.
- Round 26 (Color A): [1 Mdc, 4 sc in blo] around. 40 (45, 50, 55) sts.
- Round 27 (Color B, decrease): [1 sc in blo, 1 Mdc2tog, 1 Mdc2tog] around. Fasten off Color B and switch to the 3.5 mm hook. 24 (27, 30, 33) sts.
- Round 28 (Color A): [1 Mdc, 2 sc in blo] around. 24 (27, 30, 33) sts.
Join and change color after each mosaic round through Round 27. In Round 28, work in Color A only. The repeated sequences are designed for the stitch count of the selected size; do not add or remove stitches at the round join.
Part 3: Shape the crown
Use Color A and the 3.5 mm hook. Work regular double crochet stitches into both top loops. For each dc2tog, begin a dc in each of the next two stitches, leaving the last loop of each unfinished dc on the hook; yarn over and draw through all loops to complete one decrease. The beginning ch 2 counts as one dc.
- Round 29 (XS): Ch 2, dc2tog 11 times, dc in the final stitch, join to beginning ch-2. 13 sts.
- Round 29 (S): Ch 2, dc2tog 13 times, join to beginning ch-2. 14 sts.
- Round 29 (M): Ch 2, dc2tog 14 times, dc in the final stitch, join to beginning ch-2. 16 sts.
- Round 29 (L): Ch 2, dc2tog 16 times, join to beginning ch-2. 17 sts.
- Round 30 (XS): Ch 2, dc2tog 6 times, join to beginning ch-2. 7 sts.
- Round 30 (S): Ch 2, dc2tog 6 times, dc in the final stitch, join to beginning ch-2. 8 sts.
- Round 30 (M): Ch 2, dc2tog 7 times, dc in the final stitch, join to beginning ch-2. 9 sts.
- Round 30 (L): Ch 2, dc2tog 8 times, join to beginning ch-2. 9 sts.
Fasten off, leaving a tail long enough to close the crown.
Assembly, finishing, and care
Turn the hat inside out. With a tapestry needle, weave the crown tail in and out through the top two loops of each remaining stitch. Draw the opening closed evenly; pass through the stitches a second time if desired, then secure and weave in the tail. Use the brim’s starting tail to close any small gap at the foundation join. Weave in the remaining ends on the inside without pulling the mosaic fabric out of shape.
Attach an optional pom-pom using a secure pom-pom button or snap so it can be removed for washing. Follow the yarn label for care and dry flat if recommended. To troubleshoot a wavy brim, check that the foundation ring is not twisted and that the join has not added an extra stitch. If the motif drifts at the seam, count each repeat before joining and keep the carried yarn relaxed.
Fit adjustments and troubleshooting
Use the four included size stitch counts rather than adding arbitrary stitches to a mosaic round. If the hat is too tight or loose, check the swatch and try a different hook before altering the crown sequence. Confirm the foundation ring is not twisted and count the selected round totals at each decrease checkpoint.
Frequently asked questions
Can I change the colors?
Yes. Keep a light/dark contrast so the overlay waves remain legible, and keep the same color assignment for each written round.
Is a pom-pom required?
No. The crown is complete without one; if you add a pom-pom, secure it so it can be removed for laundering.
Pattern credit
This pattern is designed by Cozy Crafts by Kati and is reproduced here with permission. The colorway shown here uses cream and ocean blue with an optional bright-blue pom-pom. The designer’s charts and PDF illustrations are not included. For the designer’s pattern listing and support, visit the Blue Wave Overlay Mosaic Hat on Ravelry.
More HookElla wearables
Find more projects in Wearables & Accessories, including the Cloudridge 3D Beanie and Wheat Stitch autumn beanie guide. The keyword WAVELLA helps readers find this mosaic hat in HookElla’s social and site search.
Helpful questions
What crochet technique creates the wave design?
Overlay mosaic crochet alternates one yarn color per round. Longer double crochet stitches are worked into front loops two rounds below to cover selected stitches and form the wave motif.
Is the pom-pom required?
No. The pom-pom is optional; the hat is complete once the crown is decreased, closed, and the ends are woven in.
Has this HookElla article been physically test-crocheted?
No physical test crochet is claimed. The stitch and repeat arithmetic was checked against the listed size counts, but that is not a substitute for a physical sample.