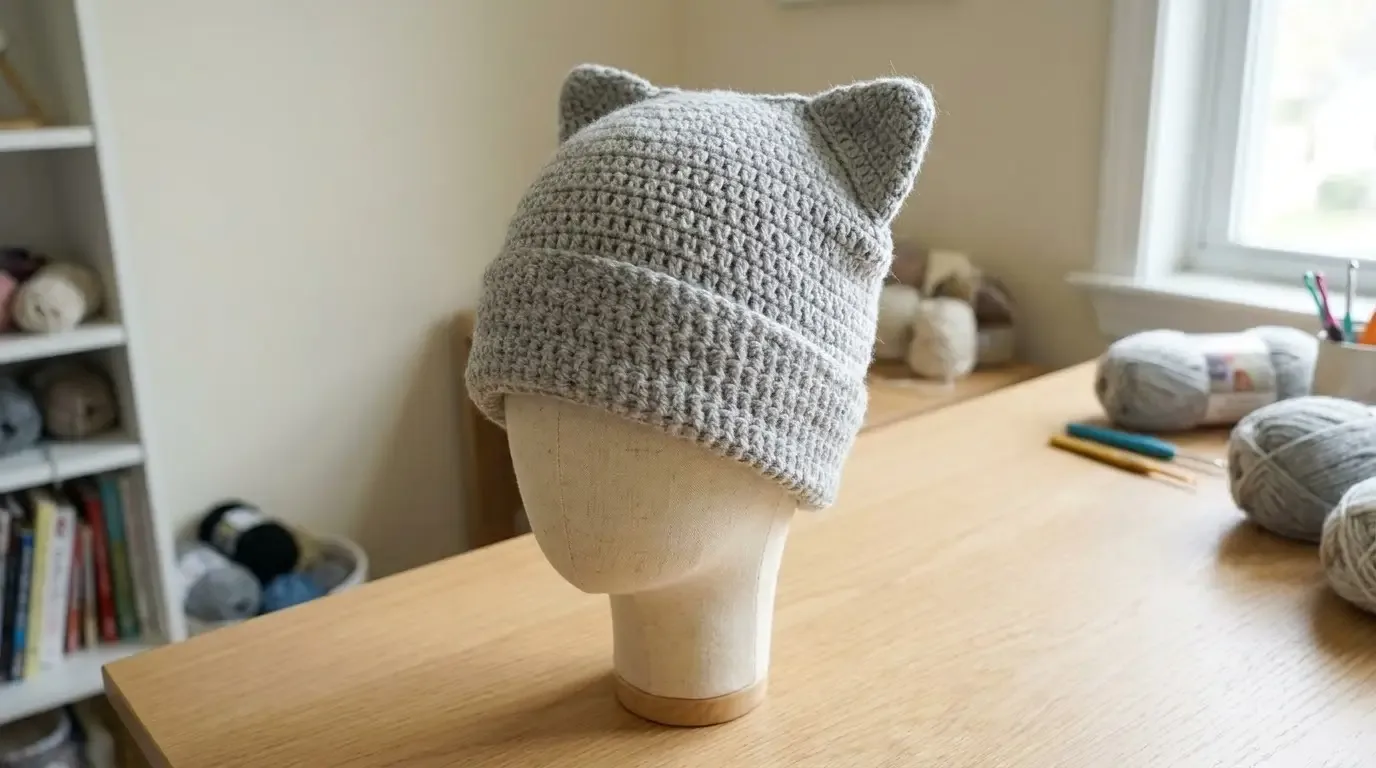
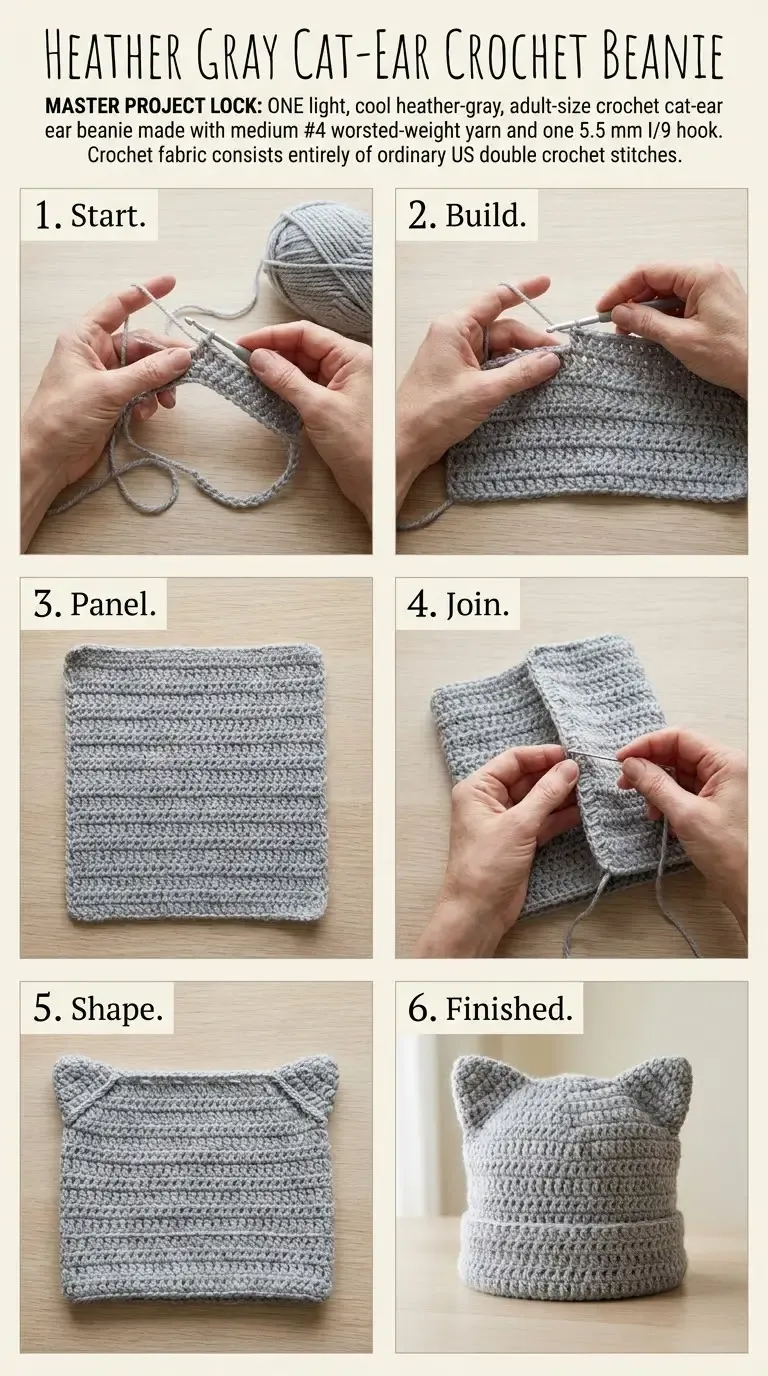
This original HookElla cat-ear beanie starts as one simple rectangle in ordinary double crochet. A long edge seam forms the tube, a straight top seam closes the crown, and two small diagonal seams shape the soft ears—no separately attached pieces needed.
About this pattern
The Heather Gray Cat-Ear Beanie is a simple adult hat with an everyday folded cuff and two softly pointed ears. It uses ordinary US double crochet throughout the fabric. Rather than crocheting separate ears, you make one flat rectangle, sew it into a tube, close the top, and add two diagonal seams through the upper corners.
The stitch counts below are complete for one adult size. Gauge-based measurements, ease, and yarn quantity are estimates only; this pattern has not been physically sample-tested.
Materials
- Approximately 180–240 yd (165–220 m) of medium / worsted-weight #4 yarn in light heather gray. Keep the full amount available; yarn use varies with fiber, loft, and tension.
- 5.5 mm (I/9) crochet hook, or the size needed to approach the target gauge.
- Tapestry needle, scissors, tape measure, and a few stitch markers.
Finished size and fit
One adult size is written. Using the gauge target below, the rectangle is estimated at 11.4 × 20.4 in (29 × 52 cm) before assembly. The long, row-count direction becomes the circumference, giving an estimated relaxed circumference of 20.4 in (52 cm). The 40-stitch direction becomes the hat’s height, approximately 11.4 in (29 cm) before folding. Folding the bottom edge upward about 1.75 in (4.4 cm) leaves an estimated exposed depth of 9.7 in (24.6 cm), including the softly pointed upper corners.
The 20.4-inch relaxed circumference is intended to stretch over an adult head around 21–22 in (53–56 cm). That is approximately 3–7% negative ease, so the fit depends on your fabric’s stretch. These figures are projections, not measured results. Check your swatch and try the tube on before closing the crown if possible.
Gauge and size check
Use 14 double-crochet stitches × 9 rows = 4 in (10 cm) as the target gauge, measured after the swatch has rested flat. This is a published reference gauge used here as a planning target, not a measured HookElla sample gauge. Because the rows wrap around the head, row gauge controls circumference; stitch gauge controls hat depth.
Make a swatch at least 20 stitches wide and 12 rows tall in double crochet. Measure a centered 14-stitch span and 9-row span. If the swatch is too large, try a smaller hook; if too small, try a larger hook. You can use Yarnivo’s crochet gauge calculator to convert your measured swatch counts, but it cannot test fabric stretch or guarantee fit.
Estimated dimensions
- Circumference: 46 rows × 4 ÷ 9 = 20.44 in (51.9 cm) relaxed.
- Flat panel depth: 40 stitches × 4 ÷ 14 = 11.43 in (29.0 cm).
- Depth after a 1.75-inch fold: 11.43 − 1.75 = 9.68 in (24.6 cm).
The rectangles’ orientation matters: rows become the circumference around the head, while the 40 stitches in each row run from lower edge to crown. The estimates do not account for individual yarn stretch or blocking.
Abbreviations (US terms)
- ch — chain
- dc — double crochet
- rep — repeat
- st(s) — stitch(es)
The turning chain 2 does not count as a stitch. Each row has exactly 40 dc.
Special stitches and construction notes
Double crochet (dc): Yarn over, insert the hook in the indicated chain or stitch, yarn over and pull up a loop (3 loops on hook), yarn over and pull through 2 loops, yarn over and pull through the last 2 loops.
Work flat and turn after each row. Place the first dc of every new row into the first actual stitch after the turning chain, and work the final dc into the last actual stitch. The beginning ch-2 is only for height. Counting 40 stitches on every row keeps both long edges straight.
Complete pattern instructions
Make the rectangle
Chain 42 loosely. The first two chains create turning height and are skipped for Row 1; the remaining 40 chains provide the 40 working positions.
- Row 1: Dc in the third chain from the hook, then dc in each remaining chain across. 40 sts. (40 dc.) Ch 2 and turn.
- Row 2: Dc in the first stitch and each stitch across. 40 sts. (40 dc.) Ch 2 and turn.
- Row 3: Repeat Row 2. 40 sts. (40 dc.) Ch 2 and turn.
- Row 4: Repeat Row 2. 40 sts. (40 dc.) Ch 2 and turn.
- Row 5: Repeat Row 2. 40 sts. (40 dc.) Ch 2 and turn.
- Rows 6–45: Repeat Rows 2–5 ten times. 40 sts in every row. (40 dc.) Ch 2 and turn after each row.
- Row 46: Repeat Row 2. 40 sts. (40 dc.) Do not chain or turn; fasten off, leaving a long tail for seaming.
This exact schedule contains Row 1, four individually numbered repeat rows (2–5), ten repeats of those four rows (6–45), and one final repeat (Row 46). There are no increases, decreases, or skipped stitches. Total: 46 rows × 40 dc per row. At target gauge, the panel is estimated to measure 11.4 inches across each row and 20.4 inches from Row 1 through Row 46.
Assembly: seam the panel into a tube
Lay the rectangle flat with its right side facing up. The 46 rows are the long direction and will wrap around the head. Bring the foundation-chain edge (the base of Row 1) to the outer edge of Row 46, matching the 40 positions stitch for stitch. Use the long tail and a mattress stitch or neat whipstitch to join these edges from one corner to the other. This seam runs from the lower edge to the crown; the opposite side remains smooth. The joined panel is now a tube with the row direction around its circumference.
Close the top and shape the ears
- Turn the tube so the seam is on the inside. Lay it flat with the side seam centered at the back and the upper opening aligned evenly.
- Using a separate yarn length, sew straight across the upper opening through both layers, from one folded side edge to the other. This closes the crown with a straight center seam. Secure the yarn firmly and weave in the tail.
- At each upper corner, mark one point about 1.75 in (4.4 cm) inward along the top seam and another about 1.75 in (4.4 cm) down the adjacent outside edge. Join those two marks with a short diagonal seam through both layers. Repeat at the other corner, keeping the two diagonals equal. These small corner seams define the ears; they do not add separate pieces.
Finishing
Turn the beanie right side out and gently shape the crown and ears. Fold the lower edge upward by about 1.75 in (4.4 cm) to make the modest cuff. The cuff is formed from the same rectangle, not sewn on separately. Weave in all remaining ends on the inside. Follow the yarn label for washing and drying; reshape gently while damp only if the fiber permits. Do not stretch the crown seams while blocking.
Fit adjustments and troubleshooting
- Circumference: Each added or removed row changes the estimated circumference by 4 ÷ 9 = 0.44 in (1.13 cm) at target row gauge. For example, 48 rows project to 21.33 inches and 50 rows to 22.22 inches. These are arithmetic alternatives, not additional tested sizes. Keep the 40 stitches per row and use the same row throughout; recheck the actual fit before closing the crown.
- Depth: Each stitch changes estimated depth by 4 ÷ 14 = 0.29 in (0.73 cm). To adjust height, change the foundation’s working-chain count while preserving the two skipped turning chains; the stitch count and finished dimensions will change accordingly. This adjustment is not a separately graded size.
- Panel edges bow inward or flare: Count 40 dc and make sure the first and last stitches are not missed or worked twice. The turning chain is never included in the count.
- Fabric feels too stiff or loose: Recheck both stitch and row gauge after the swatch rests. A different hook changes both measurements, so recalculate before finishing the full panel.
- Ears look uneven: Reflatten the hat with the back seam centered, measure both diagonal placements from the same reference points, and resew to equal lengths.
- Fit feels tight: Before sewing the crown, compare the tube’s relaxed circumference with your head measurement and gently stretch the fabric to confirm it recovers without strain. Add complete rows if needed using the row-gauge formula above.
Frequently asked questions
The FAQ metadata at the end of this article covers tube orientation, the estimated adult fit, cuff depth, and the untested-sample status.
More crochet hats
For another simple wearable, see HookElla’s Ribbed Crochet Beanie or browse the Wearables & Accessories collection. The keyword MEOWCAP can also be used to find this cat-ear beanie in HookElla search.
Helpful questions
How is the beanie made from a rectangle?
The 46 rows travel around the head. Join the foundation-chain edge (the base of Row 1) to the far edge of Row 46 to make a tube; the 40 stitches across each row set the hat's vertical depth. Close the upper opening flat, then sew two diagonal lines through the corners to shape the ears.
Will the 20.4-inch estimate fit a 21–22-inch head?
It may, if your double-crochet fabric stretches comfortably by about 3–7 percent. The stated dimensions are gauge calculations, not tested measurements. Check your own swatch and adjust the row count if needed.
Can I make the folded cuff deeper?
Yes. Fold up more or less of the lower edge to change the visible depth. A deeper fold shortens the hat's exposed height by the same amount.
Has this pattern been sample-tested?
No. The stitch counts are mathematically checked and the dimensions are estimates based on the stated gauge target; no physical sample has been crocheted.
Inspiration credit
This is an independently written HookElla pattern using standard double-crochet panel construction and original counts. The broad cat-ear beanie concept is credited to Melissa Hassler; these instructions are not a transcription or republication of her pattern. Cat Ear Beanie by Melissa Hassler.