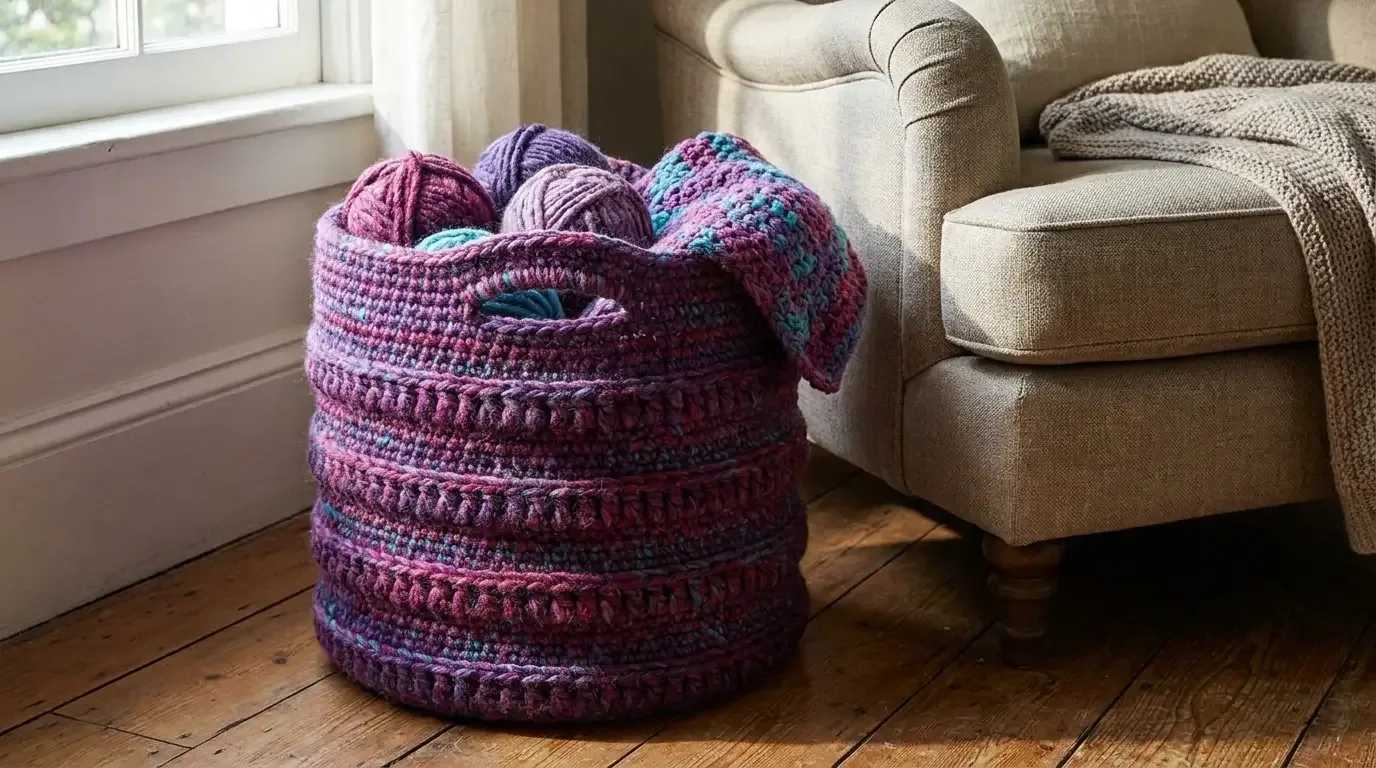
A deep basket, a flat circular base, and a few bold ridges turn variegated chunky yarn into practical storage. This original HookElla pattern is sized for an approximately 11-inch basket with a 12-inch body height and reinforced handles.
A practical basket with graphic texture
The Chunky Ridge Crochet Storage Basket is designed for the useful middle ground between a soft yarn bowl and a rigid bin. A round single-crochet base keeps the bottom stable, while alternating stitch paths create raised bands that make variegated yarn look intentional. Two integrated hand openings let the basket move from a craft room to a living room without adding separate straps.
This is an original HookElla pattern. The discontinued Chunky Basket listing by Elizabeth Pardue on Ravelry is background inspiration only; it is unavailable and is not being reconstructed here.
Finished measurements and materials
The finished basket measures approximately 11 in (28 cm) in diameter and 12 in (30.5 cm) tall. The construction guide shows the base growing through roughly 4-inch and 8-inch checkpoints before reaching the full 11-inch circle.
You will need:
- 300–350 yd chunky or bulky #5 yarn;
- a 6.5 mm (K–10.5) hook;
- stitch marker for continuous rounds;
- yarn needle and scissors;
- measuring tape.
Use a firm, springy yarn. Super-soft roving yarn can look beautiful but may collapse when the basket is filled. If your yarn is thinner than #5, hold two strands together and test the fabric before starting.
Abbreviations (US terms)
MR magic ring, ch chain, sc single crochet, sl st slip stitch, st stitch, BLO back loop only, rep repeat.
Gauge and fabric test
Gauge is measured by dimensions rather than a strict stitch count. Crochet a small circle for five or six rounds and check that it lies flat and measures close to 4 inches across. Your single crochet should feel firm enough that a finger does not show through the fabric.
If the circle cups, your increases are too few or your tension is tight. If it ruffles, there are too many increases or your tension is loose. Adjust the next round rather than forcing a wavy base to straighten later.
Pattern instructions
1. Make the flat circular base
- With chunky yarn, make an MR and crochet 6 sc into the ring. Place a marker in the first stitch.
- Work continuous increase rounds, adding 6 sc evenly around each round: 12, 18, 24, 30, and so on.
- Continue until the base measures about 11 inches across when laid flat. Depending on yarn and tension, this is usually around 10–12 increase rounds.
- Smooth the circle on a table. If the edge ripples, remove the last increase round and space the increases farther apart.
Do not join rounds with a slip stitch; the basket is worked in a spiral for a clean, nearly invisible side seam. Move the stitch marker at the end of every round.
2. Turn the walls upward
To create a defined bottom edge, work one round of sc in BLO without increasing. The unused front loops form a subtle horizontal line and encourage the next stitches to stand vertically.
Continue in continuous sc rounds until the wall is about 3 inches high. Keep the basket on a flat surface while checking that the opening remains circular.
3. Add the raised ridge repeat
Use this four-round texture repeat for the body:
- Rounds A–C: sc in BLO around.
- Round D: sc in both loops around.
Round D sits slightly forward against the BLO fabric and forms a raised ridge. Repeat A–D until the basket reaches approximately 9½–10 inches tall, leaving room for the upper rim and handles. Change colour at the end of a round if desired; carry only short transitions and weave tails inside the dense fabric.
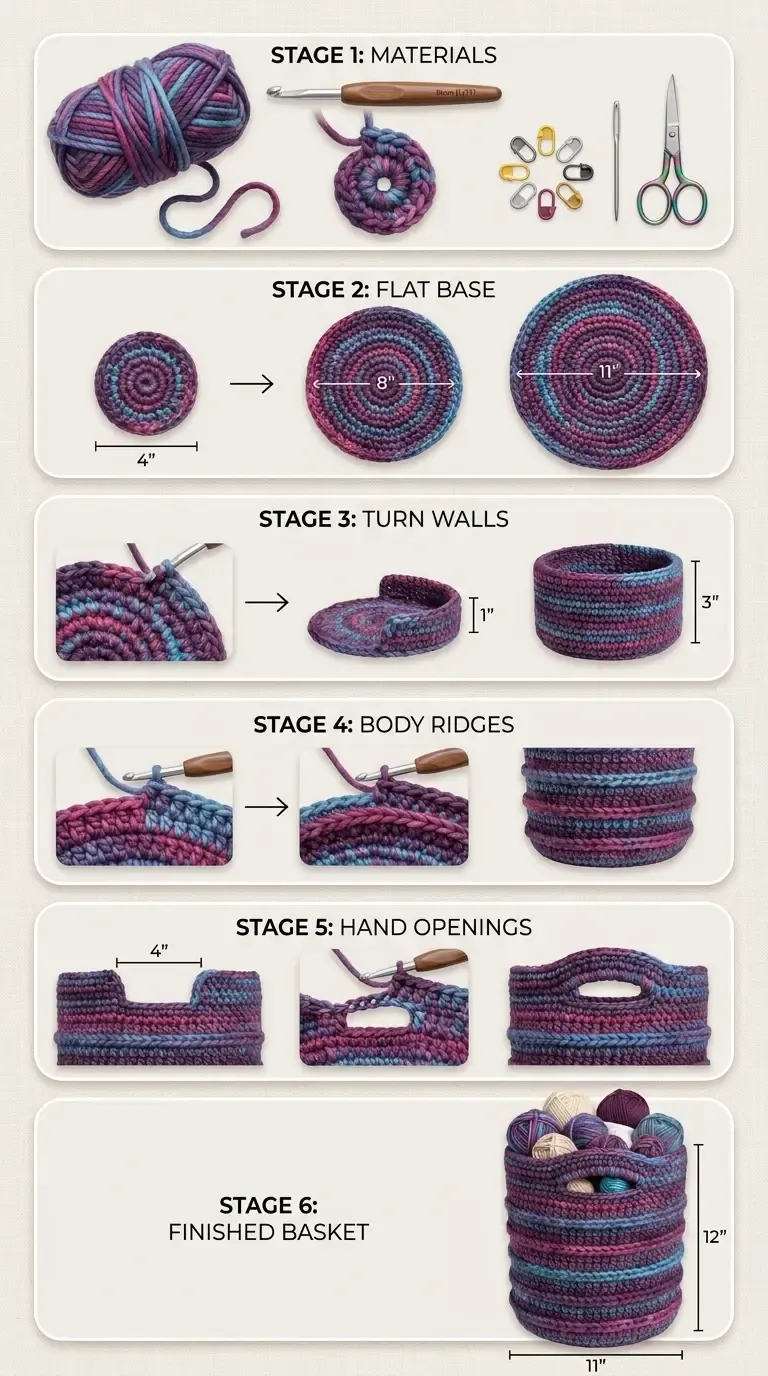
The construction image is a visual guide to the original HookElla dimensions and stages.
4. Form the integrated hand openings
Mark the centre of each long side, opposite one another. On the next round:
- Crochet to the first marker.
- Ch 9, skip the next 7 stitches, and sc in the following stitch to create an opening close to 4 inches wide.
- Continue around the basket and repeat the same chain-and-skip over the opposite marker.
- On the following round, work 9 sc over each chain space. Keep the stitches snug but not tight.
- Work one or two additional sc rounds, placing an extra sc at each side of the opening if the handle edge feels soft.
If your gauge makes the opening wider or narrower than 4 inches, change the chain and skipped-stitch count together. The opening should be centred and large enough for four fingers, but not so large that the upper rim stretches.
5. Finish the rim
Work one final round of sc in both loops. At each handle edge, place two sc in the first and last stitch over the opening to round the corners. Fasten off with a needle join, weave the tail through several inner stitches, and trim only after the end is secure.
Colour planning
Self-striping or marled yarn makes the ridges especially visible because each band catches a slightly different colour. For a planned palette, alternate plum, teal, dusty pink, and blue in the ridge rounds while keeping the base and rim in one neutral shade. Carrying yarn for only a few stitches is fine; for longer colour blocks, cut and rejoin to avoid a heavy float inside the basket.
Shaping, care, and safe use
Lightly steam or damp-block the empty basket over a towel, then let it dry completely. Do not stretch the handle openings while wet. Spot-clean whenever possible; if the yarn label permits washing, reshape the basket while damp and dry it upside down.
Use the basket for yarn, folded throws, soft toys, craft fabric, or seasonal accessories. Keep heavy books, sharp tools, and wet laundry elsewhere. This is household storage, not a toy, crib accessory, or load-bearing container.
Troubleshooting
- Base cups: add one more evenly spaced increase round.
- Base ruffles: remove the last increase round or use a smaller hook.
- Walls flare outward: an increase slipped into the body; undo to the last ridge and restore an even stitch count.
- Ridges disappear: use a clear BLO round followed by a full-loop round and keep the BLO tension relaxed.
- Handles pull upward: reinforce the first and last stitches of each opening and check that both openings are exactly opposite.
- Basket slumps: choose a firmer yarn, tighten the single crochet slightly, or add a removable canvas liner.
Make a different size
For a shorter catchall, stop the walls at 6–8 inches and keep the 11-inch base. For a taller laundry or blanket basket, continue the four-round ridge repeat before adding the handles. To change the diameter, stop the increase rounds at the width you want, then work one BLO turning round before building the sides.
The key is to measure the base and handle spacing rather than copy a fixed round count. Chunky yarns vary widely, and a flat, even circle will always produce a better basket than a number copied from a different yarn.
For another useful home project, try HookElla’s Scrap Yarn Crochet Storage Basket or browse the Blankets & Home collection.
With its sturdy base, tactile ridges, and built-in handles, this original HookElla basket is a satisfying weekend project that makes everyday storage look handmade and considered.
Helpful questions
Is this the discontinued Elizabeth Pardue pattern?
No. This is an original HookElla pattern created from the supplied measurements and images. The discontinued Ravelry listing is mentioned only as background inspiration and is not reproduced.
What size is the finished basket?
The target is approximately 11 inches across and 12 inches tall. Yarn thickness and tension can shift the final size, so measure the base before beginning the walls.
What yarn works best?
Choose a sturdy chunky or bulky
How are the ridges made?
Work three rounds of single crochet through the back loop, then one round of regular single crochet through both loops. The change in stitch path creates a raised horizontal band without cutting the yarn.
Can I make the handles smaller?
Yes. Replace the nine-chain opening with fewer chains, skip the same number of stitches, and reinforce the two ends of the opening with extra single crochet stitches.
What can the basket hold?
It is suited to yarn, blankets, soft toys, scarves, and other lightweight household items. Do not use it for sharp tools, very heavy loads, or as a child or infant product.