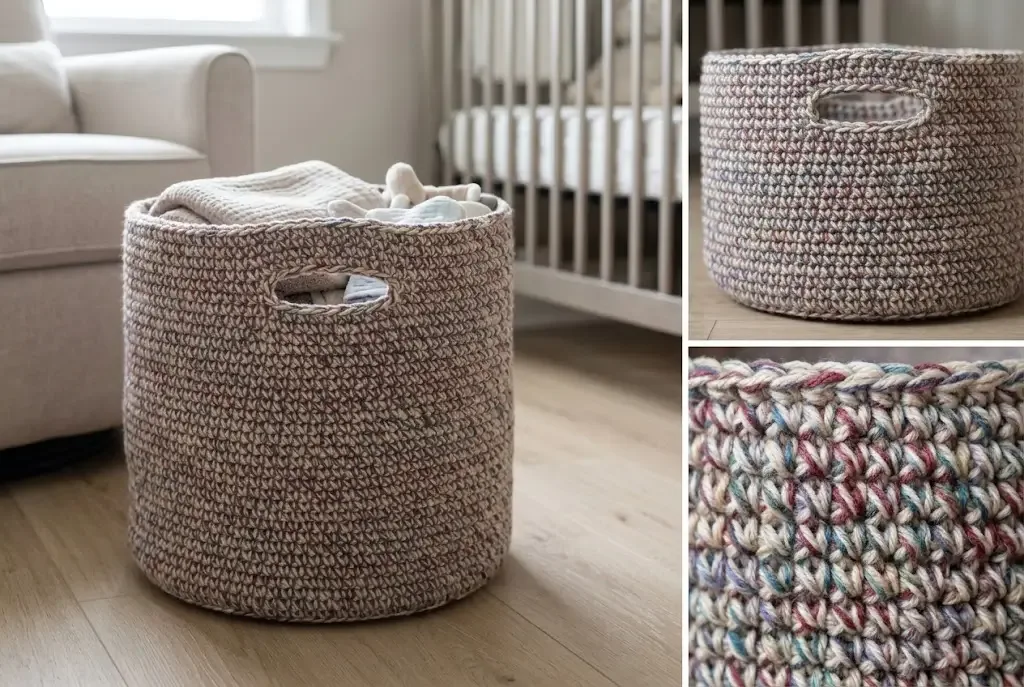
Gather the odd balls, short lengths, and less-loved colors hiding in your yarn stash. Held together as one thick strand, they become a wonderfully speckled and practical storage basket with dense walls, comfortable handle openings, and room for blankets, toys, or another collection of yarn.
A useful home for leftover yarn
This roomy basket turns mismatched scraps into a deliberate marled fabric. Several yarns travel together through every stitch, so a color that feels awkward on its own becomes one small fleck in a balanced surface. Single crochet provides the density, a large hook makes the thick bundle manageable, and two openings are formed directly into the upper wall—no separate handles to sew on.
The project uses US crochet terminology and is suitable for a confident beginner who can make a magic ring, work single crochet in a continuous spiral, increase a flat circle, and count stitches around a large round.
About the original project
The technical reference for this basket is the Scrap Yarn Crochet Basket tutorial by Cintia at My Poppet Makes. This HookElla edition presents the method in fresh wording, adds count and shaping checkpoints, and uses only the supplied HookElla images. Visit the original My Poppet scrap-yarn basket tutorial for the creator’s project story and presentation.
Finished size and gauge
The finished basket is approximately:
- 13.5 in (35 cm) across at the base and opening
- 12 in (30 cm) tall after the handle rounds
- About 10 in (25 cm) of plain wall before the handles begin
Aim for approximately 9.5 single crochet stitches × 10 rounds = 4 in (10 cm). Gauge does not have to be exact, but the fabric must be firm and closely stitched. The basket should support itself when empty rather than collapsing immediately.
Because mixed scraps vary, treat the tape measure and fabric feel as the primary controls. Change the number of strands or hook size if your bundle produces loose holes or an uncomfortably rigid fabric.
Materials
- A generous quantity of scrap yarn in assorted weights, fibers, and colors
- 9.0 mm (M/N-13) crochet hook, or size needed for dense fabric
- Six removable stitch markers or safety pins
- Scissors
- Measuring tape
- Optional large yarn needle for securing the final tail
The source sample holds approximately four or five strands of DK / 8-ply yarn together. There is no reliable fixed yardage because five fine acrylic strands consume yarn differently from a bundle containing wool, cotton, and bulky scraps. This large basket uses a substantial amount, so prepare more material than the project appears to need.
Build a balanced multi-strand yarn
Hold enough scraps together to approximate a super-bulky strand:
- Use around 4–5 DK strands for the reference fabric.
- Use 5–6 strands when most yarns are fingering or sport weight.
- Use 2–3 strands when several yarns are worsted, bulky, or heavily textured.
- Mix thin and thick strands until the complete bundle moves comfortably through the 9 mm hook.
Wind compatible scraps into several multi-strand balls before beginning, or feed from separate balls as you crochet. When one strand runs out, overlap or knot in a replacement while the other strands continue. Move visible knots to the inside of the basket and stagger changes so several strands do not end in the same stitch.
For a calm speckled palette like the HookElla basket, anchor the mix with cream, oatmeal, taupe, and grey, then add small amounts of dusty rose, muted teal, moss, charcoal, and lavender. Change only one strand at a time to blend colors gradually.
US abbreviations
- ch — chain
- inc — work 2 sc in the same stitch
- MR — magic ring
- rep — repeat
- rnd — round
- sc — single crochet
- sl st — slip stitch
- st(s) — stitch(es)
Pattern notes
- The base and walls are worked in a continuous spiral. Do not join rounds unless instructed at the finish.
- Place a marker in the first stitch and move it upward after every round.
- The base adds six increases on an increase round.
- Stagger increase locations when practical so the base remains circular instead of developing six points.
- Measure the base often. The final stitch count is less important than a flat 13.5-inch circle.
- Position joins and knots toward the basket interior.
- Keep the same number of stitches throughout the wall rounds.
Crochet the flat circular base
With the combined scrap-yarn bundle, make an MR.
Base Round 1
Work 6 sc into the ring — 6 sts. Place the marker in the first stitch and pull the ring firmly closed.
Base Round 2
Inc in every stitch — 12 sts.
Base Round 3
Repeat sc in the next stitch, inc in the next stitch around — 18 sts.
Base Round 4
Repeat sc in the next 2 stitches, inc in the next stitch around — 24 sts.
Continue the increase sequence
On every standard increase round, add one more ordinary sc between increases:
- Round 5: sc in the next 3, inc — 30 sts
- Round 6: sc in the next 4, inc — 36 sts
- Round 7: sc in the next 5, inc — 42 sts
Continue adding 6 stitches per increase round until the base measures approximately 13.5 in (35 cm) across. At the reference gauge this is usually close to 17 rounds and 102 stitches, but do not force that count if your mixed yarn behaves differently.
Stagger the increases
Repeatedly stacking an increase above the previous increase can make a hexagon. To distribute the shaping, shift the increase points on alternate rounds. For example, instead of beginning a round with six ordinary stitches before every increase, work three sc, inc, then repeat six sc and inc around, finishing with the remaining three sc.
The rule is simple: keep six increases evenly spaced, but do not align them in vertical columns.
Keep the base flat
Lay the circle down every two or three rounds.
- If it ruffles: Undo the latest round and work one full round of sc with no increases. Resume six evenly spaced increases on a later round only if needed.
- If it cups before reaching 13.5 inches: Add the next six increases sooner, loosen the stitch tension slightly, or use a larger hook.
- If large holes appear: Add another yarn strand or use a smaller hook.
The completed base should be flat, dense, and close to the target diameter before the walls begin.
Build the spiral walls
Continue from the base without fastening off. Work 1 sc in every stitch around with no increases. The edge will begin to curl upward naturally.
Keep working in a continuous spiral until the wall measures approximately 10 in (25 cm) from the outer edge of the base, usually about 25 wall rounds at the stated gauge. The first 3–4 inches may flare or lean while the turn develops; shape the basket with your hands and continue keeping the stitch count unchanged.
Count at least every few rounds. A missed stitch narrows the basket, while an accidental increase creates a bulge. The top edge should remain level when the basket is set upright.
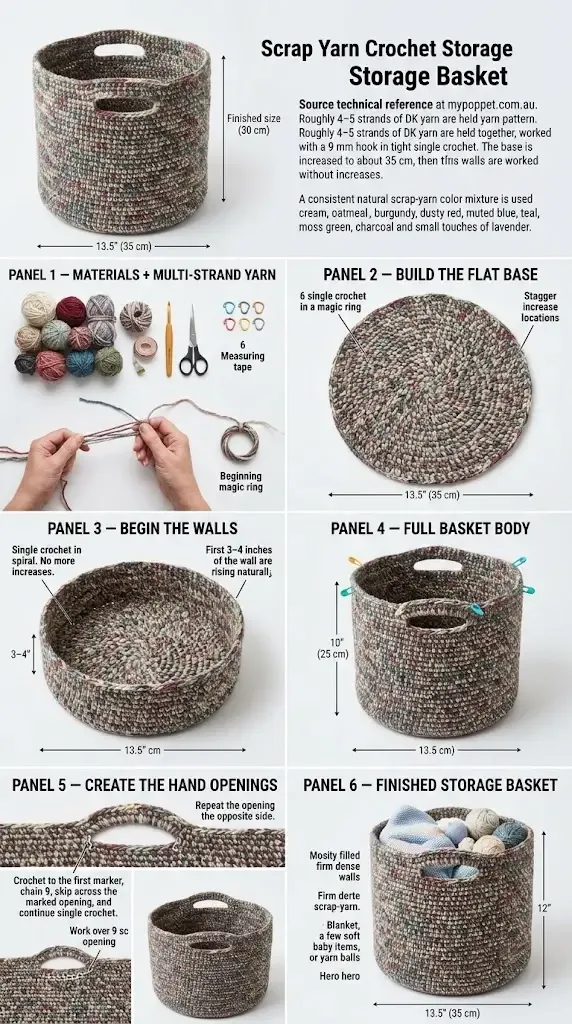
The HookElla construction image shows the overall sequence. Let the measured diameter and wall height control the project when mixed-yarn gauge differs.
Mark two centered handles
Keep the working loop secure while positioning the markers.
- Flatten the basket so the top front and back edges align.
- Mark the center stitch of the front edge.
- Mark the center stitch directly opposite it on the back edge.
- From each center marker, count 5 stitches to the left and 5 stitches to the right. Place a marker in each endpoint stitch.
You now have six markers: two temporary center markers and four handle endpoints. Confirm that the stitch count from the end of one opening to the beginning of the opposite opening is the same on both sides. Remove the two center markers once the four endpoints are verified.
Each pair of endpoint markers has 9 unworked stitches between the marked stitches. This matches the ch-9 bridge in the next round.
Create the integrated handle openings
Handle Round 1
Sc to and through the first marked endpoint stitch. Ch 9, skip the 9 stitches between the markers, and sc in the second marked endpoint stitch.
Continue sc around to the opposite handle. Repeat the same ch-9 opening between its two marked endpoints, then sc in every remaining stitch to the round marker.
Check that the two openings are centered, equal, and level before continuing. If one handle is offset, undo this round and correct the markers now.
Handle Round 2
Sc in each stitch to the first ch-9 bridge. Work 9 sc around the entire chain and into the opening, rather than tightening into the individual chain loops. Continue sc across the solid section and repeat 9 sc over the second bridge. Sc in every remaining stitch.
Working around the bridge gives the opening a smooth inner edge and makes it easier to distribute the nine stitches evenly.
Handle Rounds 3–4
Work 1 sc in every stitch for 2 more complete spiral rounds. These rounds reinforce the fabric above the openings and bring the finished height close to 12 inches.
Finish the rim invisibly
After the final handle round, work a sl st in each of the next 3–4 stitches, making each slip stitch slightly shorter than the last. Cut all working strands together, pull the bundle through the final loop, and secure the tails on the inside.
Separate the strands and weave or knot them into different nearby stitches so one bulky knot does not distort the rim. Trim only after checking that the finish is secure.
Shaping, care, and use
Shape the empty basket by hand, pressing the base flat and smoothing the cylindrical wall. Mixed fibers may react differently to water, so spot clean unless every strand shares compatible washing instructions. If washing is safe, reshape the basket while damp and let it dry fully supported.
Use the basket for blankets, yarn, soft toys, clothing, or lightweight nursery supplies. Do not use the crochet handles to carry very heavy objects. For a plant cover, place the pot inside a waterproof container and tray so the yarn never contacts water or wet soil.
Troubleshooting
- The base looks hexagonal: Stagger the six increase locations instead of stacking them in straight lines.
- The base ruffles: There are too many increases for the current yarn and tension. Replace the last increase round with an even round.
- The base cups: Add six evenly spaced increases, loosen the fabric, or move up a hook size.
- The wall flares outward: An increase has probably been added accidentally. Count the round and return to the final base stitch count.
- The basket collapses when empty: Add one more yarn strand, use a smaller hook, or tighten the single crochet fabric.
- The hook is difficult to insert: Remove one strand or use a larger hook; the fabric should be firm without causing hand strain.
- The handles are uneven: Reflatten the basket and confirm both center points and the number of stitches between endpoint markers.
- A handle opening stretches: Work the bridge-covering stitches firmly and add one extra plain reinforcement round above the handles.
- Color changes form a harsh patch: Replace only one held strand at a time so the new color mixes gradually with the existing bundle.
Resizing the basket
For a different diameter, stop the base when the circle reaches the desired width. Then work without increases for the walls. The circumference will be approximately diameter × 3.14, so a wider basket needs significantly more yarn.
For another height, add or remove plain wall rounds before marking the handles. Keep enough room for the handle round, its covering round, and at least two reinforcing rounds above the openings.
For smaller handles, place markers four stitches to either side of each center, skip seven stitches, and ch 7. For larger handles, place them farther apart and make a matching chain, but keep plenty of solid fabric between the two openings so the rim remains strong.
For more crochet storage, try the Chunky Crochet Hanging Basket or the smaller Crochet Acorn Storage Basket. Explore the Blankets & Home collection for more practical projects.
The pleasure of this basket is that no two versions can be identical. The measurements and construction stay dependable while the yarn stash chooses the surface—one useful, sturdy stitch at a time.
Helpful questions
Who created the original Scrap Yarn Crochet Basket tutorial?
The original project and technical method are by Cintia at My Poppet Makes. This HookElla article uses original wording and HookElla images while preserving the multi-strand method, measurements, base, walls, and integrated handle construction.
How many yarn strands should I hold together?
About four or five DK-weight strands usually produce the required super-bulky bundle. Use fewer strands if some scraps are thick or more if they are fine, always judging the combined strand and finished fabric rather than the number alone.
How much scrap yarn does the basket require?
There is no fixed yardage because strand weights and fiber densities vary greatly. This is a large, yarn-hungry basket, so assemble a generous stash and distribute limited colors through several bundles rather than using them all at once.
Does the base need exactly 17 rounds or 102 stitches?
No. Seventeen rounds and about 102 stitches are useful estimates at the stated gauge, but the real target is a flat 13.5-inch circle. Skip an increase round if the base ruffles and stop when the diameter is correct.
Can different fibers be combined?
Yes for general dry storage. Cotton, acrylic, wool, and blends can be mixed, but they may shrink or stretch differently when washed. Spot cleaning is the safest care method unless every strand has compatible care instructions.
Why are the walls worked without increases?
Keeping the base stitch count unchanged makes the fabric turn upward naturally. Additional increases would flare the basket instead of forming firm cylindrical walls.
How do I make both handles level?
Flatten the basket, mark the front and back centers, then place endpoint markers five stitches to either side of each center. Count the same number of stitches between openings before crocheting the handle round.
Can the basket hold a plant?
It can be used as a decorative pot cover only when the plant and wet soil are contained in a waterproof inner pot and tray. Do not let water contact the crochet basket.