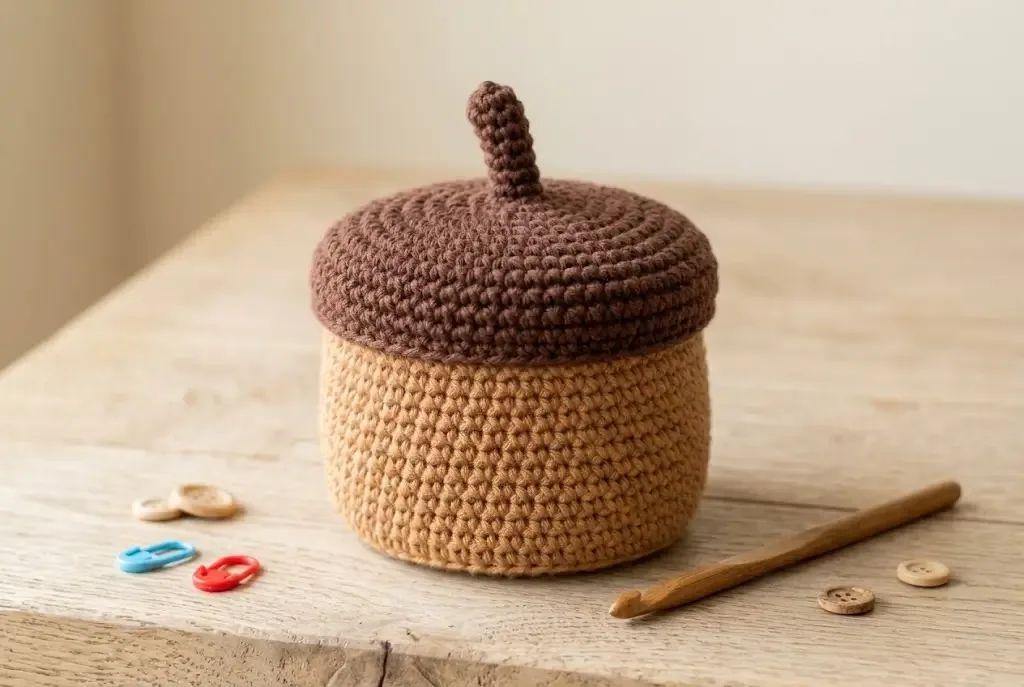
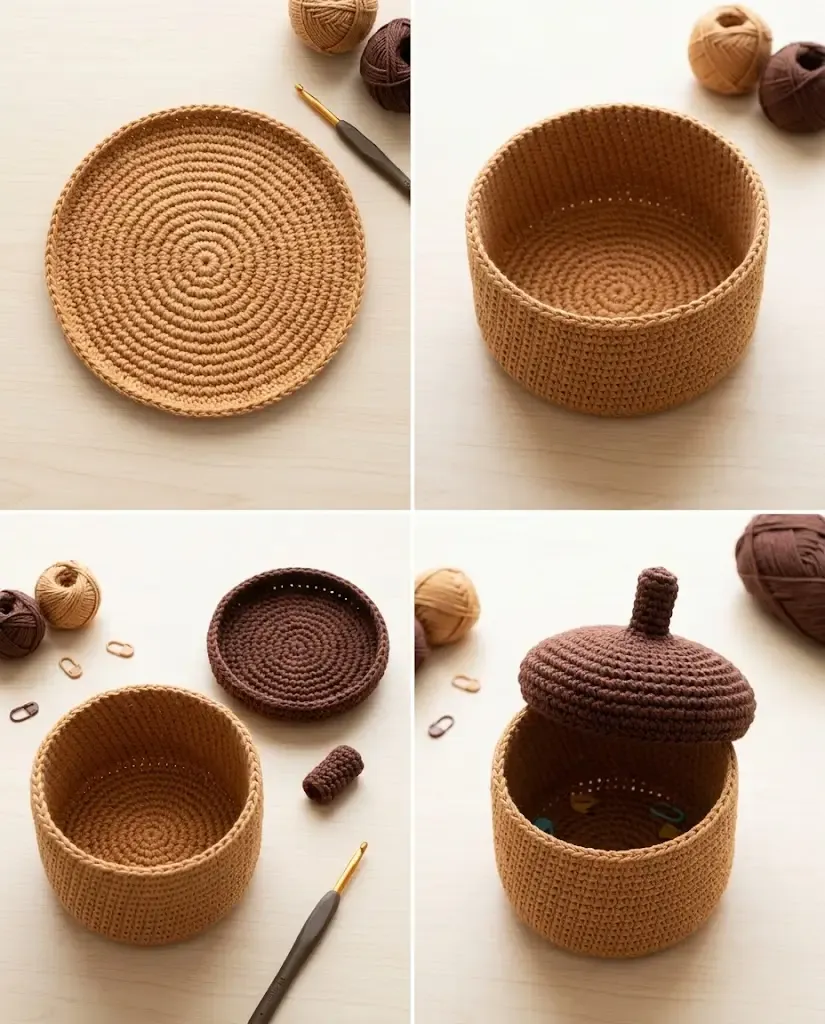
This crochet acorn is both seasonal decor and a useful catch-all. A firm single-crochet basket forms the nut, while a separate brown lid and short stem turn it into an acorn-shaped container for stitch markers, wrapped treats, jewelry, or other small items.
About this pattern
This acorn-shaped container is worked in three simple parts: a tan basket body, a brown lid, and a small stem. The body begins with a flat, increasing circle and continues in single crochet rounds to create the sides. The lid uses the same circle method, then adds a short brim so it rests over the basket opening.
The instructions are an original HookElla interpretation of the supplied finished and construction images. They use US crochet terminology and have not been physically tested, so compare your measurements as you work and adjust hook size for a firm fabric.
Materials
- Worsted-weight (category 4) yarn: approximately 120 yd (110 m) tan or acorn-gold
- Approximately 70 yd (64 m) brown yarn for the lid and stem
- 5 mm (H-8) crochet hook, or size needed for a firm fabric
- Polyester fiberfill, a small amount for the stem
- Tapestry needle, scissors, stitch marker, and optional felt for the base
Finished size and gauge
The assembled acorn measures approximately 6.5 in (16.5 cm) across and 4.5–5 in (11.5–12.5 cm) tall including the stem. Gauge is flexible for a storage basket; aim for about 4 single crochet stitches and 4 rounds per inch (16 stitches and 16 rounds per 4 in / 10 cm). The lid and body should be made at the same gauge.
Abbreviations
- ch — chain
- sc — single crochet
- sc BLO — single crochet through the back loop only
- sl st — slip stitch
- st(s) — stitch(es)
- inc — 2 sc in the same stitch
Pattern notes
- Join each round with a slip stitch to the first sc; the ch 1 at the start of a round does not count as a stitch.
- Place a marker in the first stitch and move it up each round.
- Work increases evenly so the circles stay flat. If the circle ripples, use a smaller hook; if it cups, loosen your tension or add an extra increase round.
- The body is worked in tan and the lid in brown, but any two contrasting fall colors work.
Instructions
Basket base and body
With tan yarn, make a magic ring. If you prefer, ch 2 and work Round 1 into the second chain.
- Round 1: 6 sc in the ring — 6 sts. Join.
- Round 2: Ch 1, inc in each stitch around — 12 sts. Join.
- Round 3: Ch 1, sc in the next st, inc in the next st; repeat around — 18 sts. Join.
- Round 4: Ch 1, sc in the next 2 sts, inc in the next st; repeat around — 24 sts. Join.
- Round 5: Ch 1, sc in the next 3 sts, inc in the next st; repeat around — 30 sts. Join.
- Round 6: Ch 1, sc in the next 4 sts, inc in the next st; repeat around — 36 sts. Join.
- Round 7: Ch 1, sc in the next 5 sts, inc in the next st; repeat around — 42 sts. Join.
- Round 8: Ch 1, sc in the next 6 sts, inc in the next st; repeat around — 48 sts. Join.
- Rounds 9–18: Ch 1, sc BLO around — 48 sts. Join after every round.
- Round 19: Ch 1, sc through both loops around — 48 sts. Join. Fasten off and weave in the end.
The base should be close to 6–6.5 in (15–16.5 cm) across and the sides about 3.5–4 in (9–10 cm) tall. Add plain sc BLO rounds if you want a taller container.
Brown lid
With brown yarn, make a magic ring or ch 2 and work into the second chain.
- Round 1: 6 sc in the ring — 6 sts. Join.
- Round 2: Inc in each stitch around — 12 sts. Join.
- Round 3: Sc in the next st, inc in the next st around — 18 sts. Join.
- Round 4: Sc in the next 2 sts, inc in the next st around — 24 sts. Join.
- Round 5: Sc in the next 3 sts, inc in the next st around — 30 sts. Join.
- Round 6: Sc in the next 4 sts, inc in the next st around — 36 sts. Join.
- Round 7: Sc in the next 5 sts, inc in the next st around — 42 sts. Join.
- Round 8: Sc in the next 6 sts, inc in the next st around — 48 sts. Join.
- Rounds 9–11: Ch 1, sc BLO around — 48 sts. Join. These rounds create the domed cap.
- Round 12 (brim): Ch 1, sc in the next 7 sts, inc in the next st around — 54 sts. Join.
- Round 13: Ch 1, sc through both loops around — 54 sts. Join, fasten off, and leave a sewing tail.
Test the lid on the basket. It should overlap the tan rim slightly without stretching. If it is too tight, work Round 13 with one sc in each stitch and use gentle blocking rather than adding more increases.
Stem
With brown yarn, ch 8.
- Row 1: Sc in the second chain from the hook and across — 7 sc.
- Rows 2–6: Ch 1, sc across — 7 sc.
Fasten off, leaving a long tail. Roll the strip into a narrow tube, add a pinch of fiberfill, and stitch the long edge closed. Sew the stem to the center of the lid, passing the needle through several stitches on the underside for a secure attachment.
Assembly and finishing
Place the lid on the basket and check that the brim sits evenly. Weave in all remaining ends on the inside. For a firmer base, trace the bottom onto felt, cut a circle slightly smaller than the crochet base, and place it inside. Keep the finished acorn dry and follow the yarn label for spot cleaning.
Helpful tips
- Count the base after every increase round: 6, 12, 18, 24, 30, 36, 42, then 48 stitches.
- Keep the lid and body tension identical so the brim fits without forcing it.
- If your lid edge waves after the brim increase, lightly steam-block it from the wrong side rather than adding more stitches.
- Use the basket for lightweight dry items; do not overload the sides or pull on the stem.
Helpful questions
What can I store in the acorn basket?
Use it for dry, lightweight items such as stitch markers, hair clips, wrapped sweets, jewelry, or keys. It is not intended for food that will be eaten directly from the yarn.
Can I make the basket taller?
Yes. Add plain body rounds before making the rim. Keep the lid diameter unchanged so it still fits the opening.
How do I keep the basket firm?
Use a dense single-crochet fabric and a hook that is slightly smaller than the yarn label suggests. A felt or plastic circle placed inside the base can add extra stability.
Does the lid need to be attached?
No. The separate lid is designed to lift off. If you want a hinged decoration, sew a short yarn hinge at the back after checking that the lid opens freely.