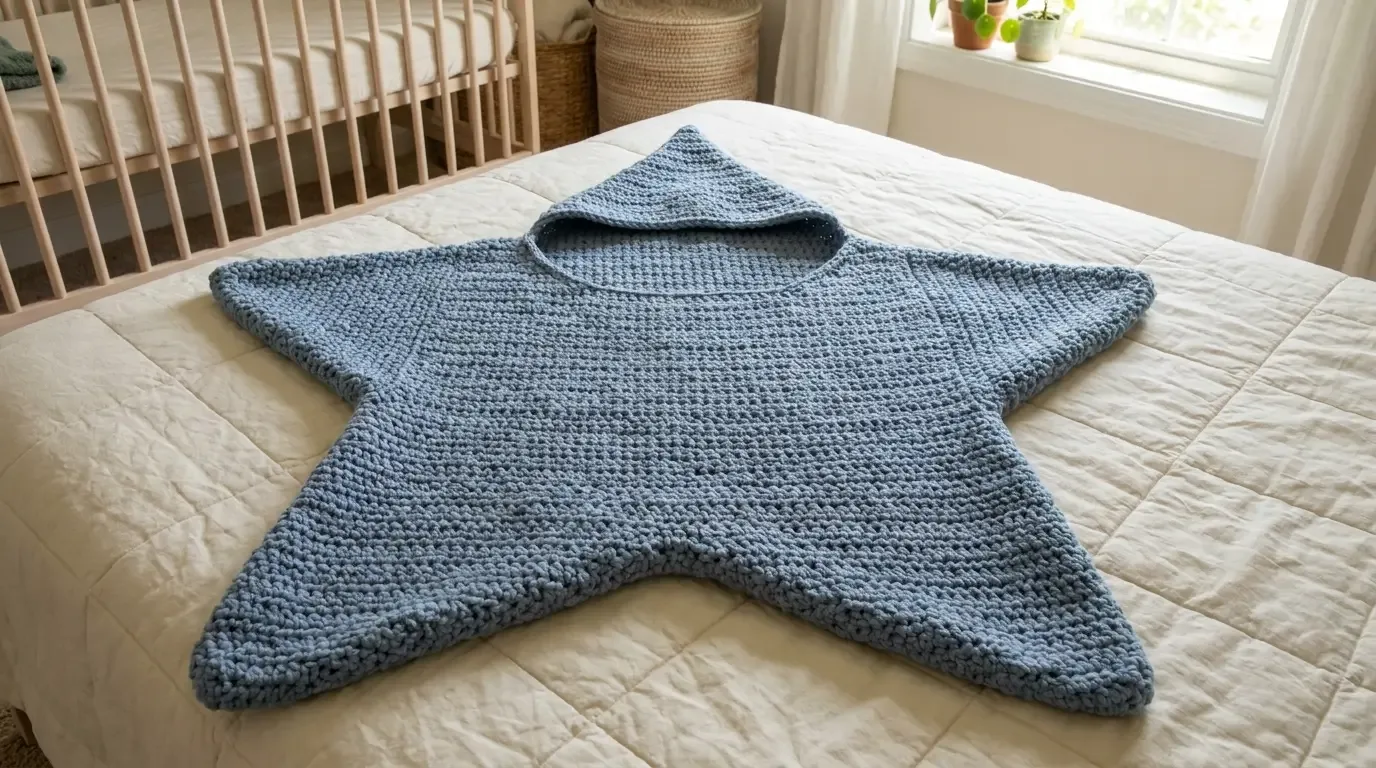
A five-point silhouette makes this baby cocoon feel like a little star blanket with a hood. Two matching panels give it gentle structure, while the wide points wrap around a small baby for supervised cuddles, keepsake photographs, or a cosy stroller moment.
A star-shaped layer for supervised moments
The Five-Point Star Baby Cocoon is designed as a keepsake wrap rather than ordinary rectangular babywear. Five soft points fan out around a small body, and the hood echoes the top point without requiring complicated colourwork. It is lovely for an awake cuddle, a carefully supervised photo session, or a warm layer in a stroller when an adult is present.
This is an original HookElla pattern. The supplied image and construction guide are visual references for the shape and stages; the instructions below are written from that HookElla construction.
Important safety note: This cocoon is for supervised cuddle and photo use only. It is not a sleep sack, swaddle, car-seat accessory, or unsupervised infant product. Never leave a baby unattended in it, and remove it immediately if the baby is warm, rolls, or shows any sign of discomfort.
Finished size and materials
The 0–3 month sample is approximately 22 in (56 cm) around the chest and 24 in (61 cm) from neckline to bottom point when laid flat. The five points extend the width to roughly 30–32 inches from outer tip to outer tip.
You will need:
- 700–850 yd soft, washable worsted/#4 yarn;
- a 5.0 mm (H/8) crochet hook;
- stitch markers, yarn needle, scissors, and measuring tape;
- optional removable markers for the five corner points.
Use a smooth yarn that will not shed into a baby’s face. Work a small swatch and wash it before beginning; some acrylic and cotton blends relax substantially after washing.
Abbreviations (US terms)
MR magic ring, ch chain, sc single crochet, hdc half double crochet, sl st slip stitch, st stitch, inc 2 hdc in one stitch, hdc2tog half double crochet two together, BLO back loop only, rep repeat.
Gauge and fit check
Aim for approximately 14 hdc × 10 rows = 4 in (10 cm) after washing and light blocking. Gauge is more important than the exact round count because a tight fabric makes the points stiff and a loose fabric can stretch around the neck.
Measure the centre after Round 5. It should be close to 6½–7 inches across. If yours is smaller, use a larger hook; if larger, use a smaller hook. Never solve a fit problem by tightening the neckline.
Make one star panel
You will make two identical panels: one front and one back. Work the centre in joined rounds so the five sections are easy to see, then work each point separately.
1. Five-section centre
- Make an MR, ch 2, and work 5 hdc into the ring. Join with a sl st.
- Round 2: ch 2, 2 hdc in each stitch around; join — 10 hdc.
- Round 3: (hdc in next stitch, 2 hdc in next) around; join — 15 hdc.
- Round 4: (hdc in next 2 stitches, 2 hdc in next) around; join — 20 hdc.
- Round 5: (hdc in next 3 stitches, 2 hdc in next) around; join — 25 hdc.
Place a marker in every fifth-stitch increase. These five marked spaces are the centres of the future points. If your centre puckers, spread the five increases across the round rather than adding extra stitches.
2. Extend the five points
Work one triangular wedge at a time. Join yarn at the marked centre stitch and use the adjacent side stitches as the wedge base.
For each point:
- Row 1: ch 2, 3 hdc across the marked section, turn.
- Row 2: ch 2, 2 hdc in the first stitch, hdc across, 2 hdc in the last stitch, turn.
- Repeat Row 2 until the wedge is about 4 inches high from the centre edge.
- Work the tip: ch 2, hdc2tog across the first two stitches, hdc across to the final two stitches, hdc2tog, turn. Repeat until 3 stitches remain; hdc2tog, fasten off.
Move clockwise to the next marked section and repeat. The five wedges should meet with no gaps. The paired increases widen the point smoothly; the paired decreases create a centred tip.
If your five wedges are uneven, count rows rather than relying on appearance. Every point must have the same number of increase rows and decrease rows.
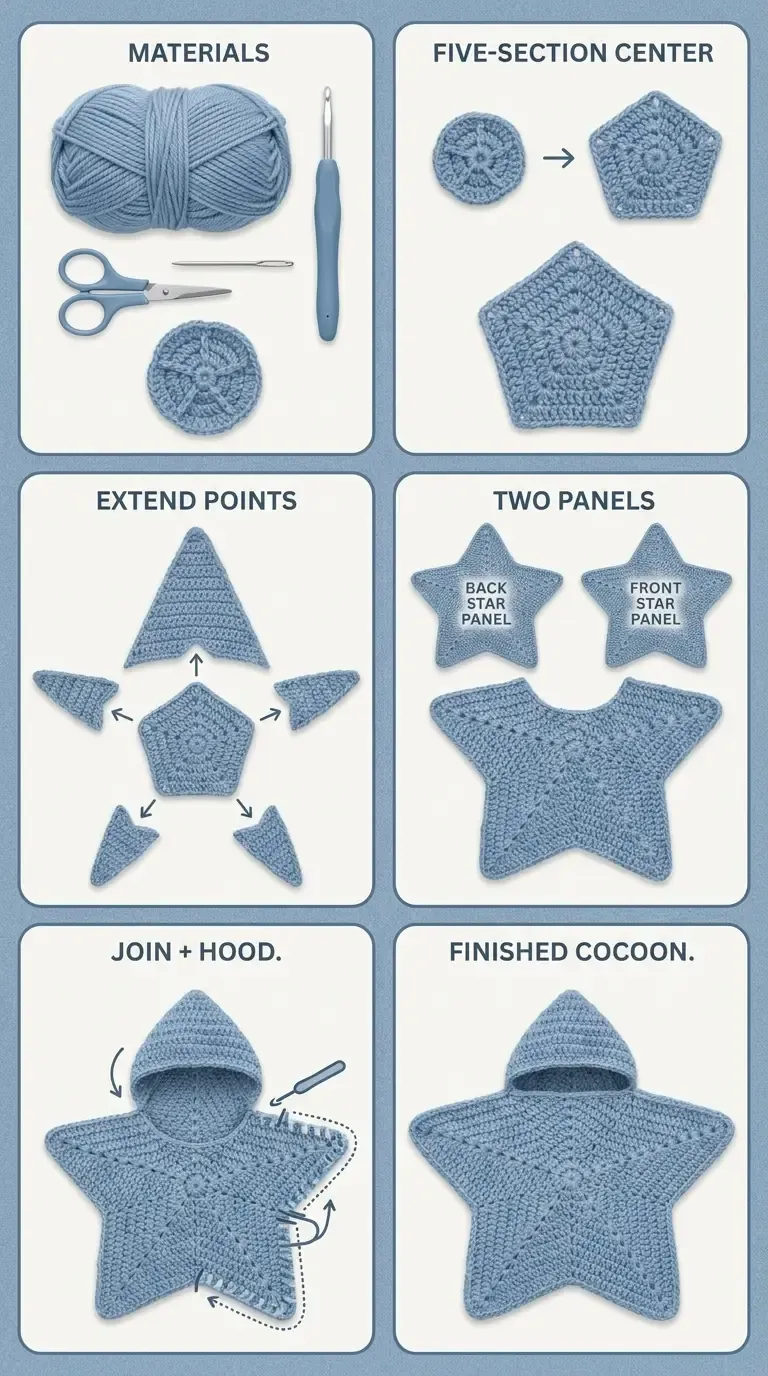
The construction image shows the original HookElla panel sequence and proportions.
Shape the neckline
Choose one point as the top point. On both panels, mark a centred neckline opening measuring about 6 inches across. The opening should sit between the two upper side points, not through the top point itself.
For a smooth curve, work hdc along one shoulder edge, hdc2tog at the first neckline corner, hdc evenly across the marked opening, hdc2tog at the second corner, and continue along the other shoulder. Work one return row even. The neckline should lie flat without pulling the star points inward.
If you prefer a wider opening for an older 3-month baby, increase the opening by ½–1 inch before adding the hood.
Join the two panels
Place the panels with wrong sides together and align all five tips. Join with a neat slip-stitch seam or mattress stitch through the outer loops:
- join the lower side sections first;
- join upward along both sides, stopping at the arm opening;
- join the shoulder sections, leaving the neckline open;
- leave the top point and upper side points free enough for the hood to sit naturally.
Try the cocoon over a folded towel before closing the final seam. It should have room for a baby’s shoulders without compressing the chest.
Crochet the hood
With the right side facing, join yarn at one neckline corner. Work hdc evenly around the back half of the opening, turning at the opposite corner. Continue in rows until the hood measures about 7 inches high.
To shape the crown, work hdc2tog at the first and last two stitches of every other row. When 10–12 stitches remain, fold the hood in half and slip stitch or mattress stitch the top seam. Turn it right side out and weave in the ends.
The hood should sit loosely behind the head. Do not add cords, ties, buttons, pompoms, or other detachable decorations near the face.
Edging and finishing
Work one round of sc around the neckline and hood opening. At each star tip, work (sc, ch 1, sc) in the point stitch to keep the edge from pulling. Along the side seams, space sc evenly and avoid crowding the valleys between points.
For a firmer edge, work a second round of sc in BLO. Fasten off with a needle join, weave all ends deeply into the wrong side, and trim securely.
Wash according to the yarn label and dry flat. Lightly block the five tips into matching lengths. Never use high heat around a baby item, and inspect the seams after washing.
Troubleshooting
- Centre cups: the five increases are too close together or tension is tight; adjust spacing or hook size.
- Points twist: mark the same centre stitch for every wedge and work equal row counts.
- Valleys flare: the join has too many stitches; undo the last seam section and ease the edge evenly.
- Neckline stretches: reinforce the corner decreases with a second sc edging round.
- Hood stands away: reduce more gradually at the crown and check that the neckline is not too wide.
- Fabric feels stiff: use a larger hook or a softer yarn; a baby cocoon should drape gently around the body.
Resize the cocoon
To make a preemie or smaller newborn version, stop the centre at Round 4 and shorten each point by one or two increase rows. For a larger 3–6 month wrap, add one centre round before dividing the points and extend each wedge by one increase row. Add the same number of rows to both panels.
Measure the baby’s shoulder width, chest circumference, and shoulder-to-heel length. The finished cocoon should be roomy without excess fabric near the face. Keep the neckline at least as wide as the baby’s head and remove the cocoon whenever the baby is unattended.
For more handmade baby gifts, explore HookElla’s Even Moss Baby Sweater Showcase or browse the Baby Crochet collection.
The finished star is soft, photogenic, and full of handmade charm—but its safest use is always an awake, closely supervised moment in an adult’s arms.
Helpful questions
Is this cocoon safe for overnight sleep?
No. It is intended only for supervised cuddles, awake use, and photography. Never use a crochet cocoon as unsupervised infant sleepwear or leave a baby unattended in it.
What size baby does this fit?
The written target is approximately 0–3 months, with about 22 inches of chest circumference and 24 inches of length. Check the baby’s measurements and use the resizing notes before making it.
How is the star shape made?
Each panel begins as a five-section centre. Five triangular point wedges are then extended one at a time with paired increases and decreases so the points stay balanced.
Are there two separate star panels?
Yes. Make a front star and a back star, join the side and shoulder sections, and leave the neckline open for the hood and head.
Can I make it without a hood?
Yes. Finish the neckline with the edging round instead of adding the hood, or work a narrow collar of even stitches.
What yarn is best for a baby project?
Choose a soft, washable yarn with a smooth surface and no shedding halo. Avoid loose fibres, scratchy wool, long ties, and detachable decorations.