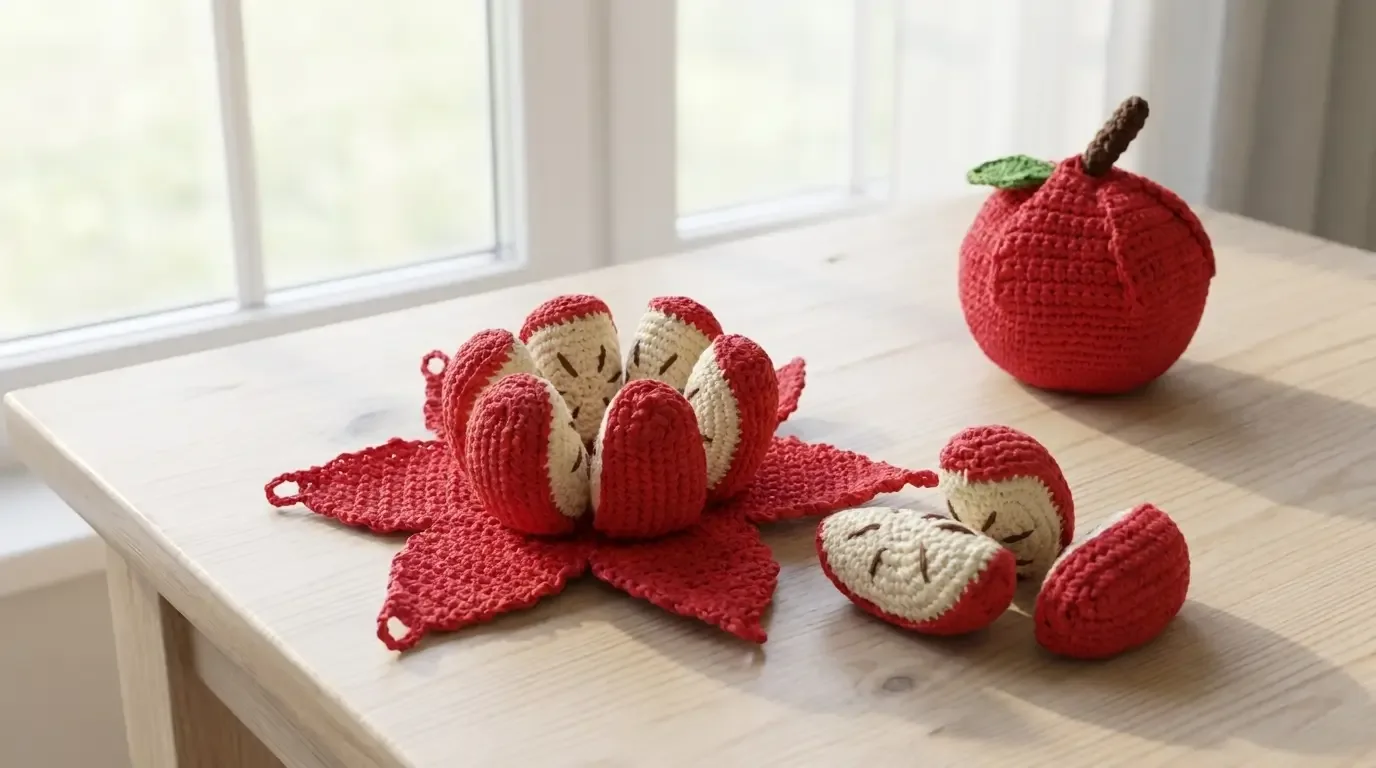
This playful apple opens like a flower: six little fruit wedges lift from a red peel with six attached flaps, then tuck back inside to close. Fine cotton, embroidered seeds, and a small stem and leaf keep the finished piece neat and giftable.
About this pattern
The Six-Piece Crochet Apple is a small play-food keepsake with a useful surprise inside. A rounded red apple opens into six removable wedges, each with a cream cut face, red skin, and tiny embroidered seeds. The outer peel is one connected piece: a shallow red cup supports the wedges, while six tapered flaps fold around the fruit and meet beneath the short stem.
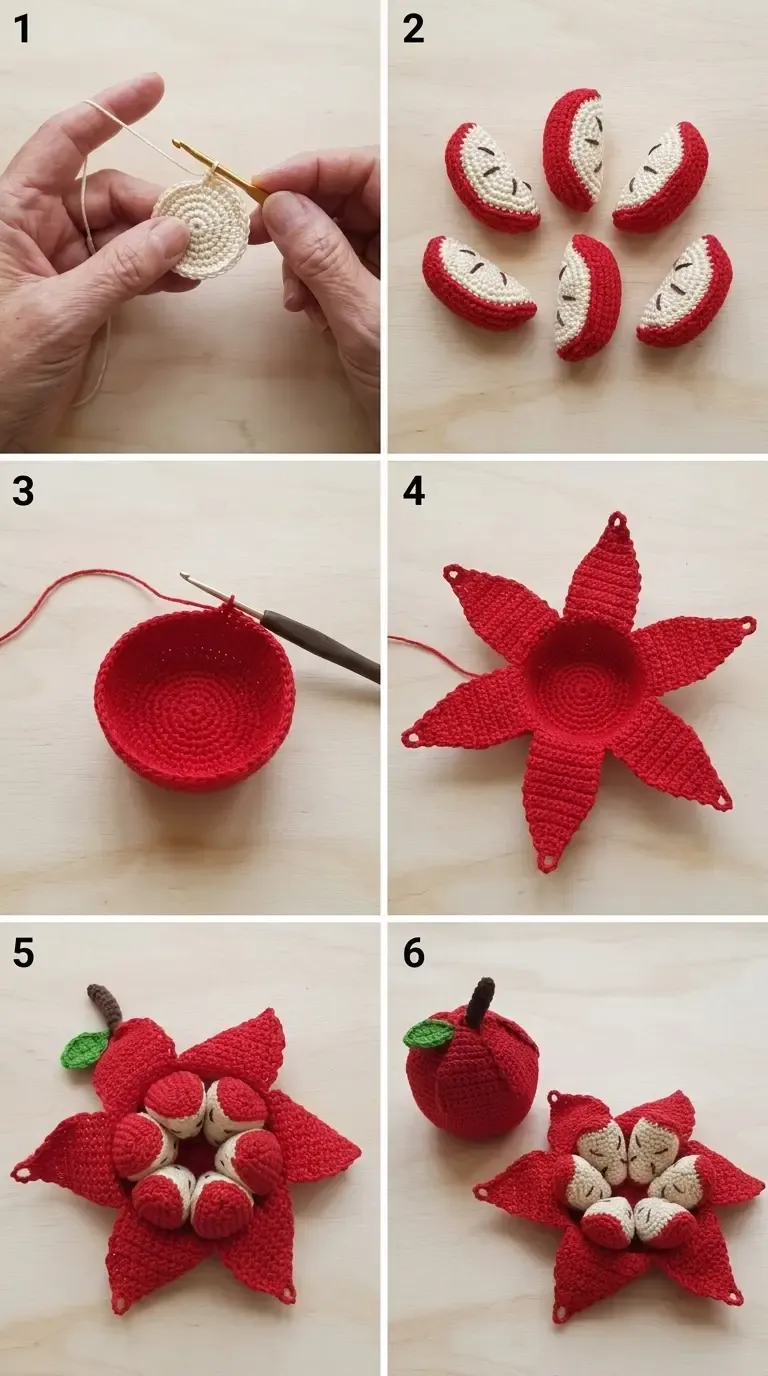
This pattern uses US crochet terms and is worked in fine cotton with a firm, even tension. It is an independently developed HookElla construction. The exact supplied HookElla images are used below: the horizontal finished image is the featured photograph, and the vertical six-stage image shows the construction sequence.
Materials
- Fine cotton yarn, such as 8/4 cotton, in red (about 35–45 g), cream (about 12–18 g), brown (a few grams), and green (a few grams). These are planning estimates; tension and stuffing affect use.
- 2.5 mm crochet hook for the wedge panels and peel.
- 3 mm crochet hook for the stem and leaf.
- A small amount of washable toy stuffing (about 10–15 g).
- Tapestry needle, scissors, six stitch markers, and a row counter.
Choose a smooth, durable cotton. Use a hook small enough to make a firm fabric with no visible stuffing through the stitches. The smaller hook is used for the body so the removable wedges and peel hold their shape; the 3 mm hook gives the tiny stem and leaf a little more flexibility.
Finished size and gauge
The closed apple is designed to measure approximately 9 cm tall including the stem and 22 cm around at its widest point. The peel cup is about 7 cm across at the stated gauge, and the six wedges are sized to sit together inside it. Small differences are normal with cotton and hand tension.
With the 2.5 mm hook, make a small single-crochet swatch in joined rounds. Aim for 22 sc and 29 rounds = 10 cm. The peel’s 48-stitch rim then measures about 21.8 cm around (48 ÷ 22 × 10), close to the target circumference. This is a calculated sizing check, not a physical sample test. If your swatch is looser, try a smaller hook; if it is tighter, try a slightly larger hook and recheck the fabric for gaps.
For help measuring a swatch, use the Yarnivo Gauge Calculator. The calculator can project measurements from your swatch, but it does not test the apple’s fit or replace the stitch counts below.
Abbreviations (US terms)
- ch — chain
- sc — single crochet
- sl st — slip stitch
- inc — work 2 sc in the same stitch
- dec — single-crochet decrease over the next 2 stitches (sc2tog)
- st(s) — stitch(es)
- MR — adjustable magic ring
- BLO — back loop only
- RS — right side
The turning chain on the peel flaps does not count as a stitch. Wedge ovals are worked continuously around both sides of a foundation chain; use a marker for the first stitch of each round. Do not join those oval rounds. Join peel rounds with a slip stitch to the first sc and move the marker up each round.
Pattern notes
- Make six identical wedge units. Each unit has one cream oval face and one red oval back, joined with a little stuffing between them.
- Each oval round is worked around the chain. The first half travels along the top loops; the return half uses the unused loops on the underside.
- Embroider the seeds on the cream face before joining the panels.
- The peel is one continuous component: a 48-stitch cup with six flaps, each worked from one marked group of 8 rim stitches.
- Keep the six wedges removable. Do not sew them to the peel or to one another.
- Weave in ends securely; short-cut tails are not enough for pieces that are opened and handled.
Special stitches
Single-crochet decrease (sc2tog): Insert the hook in the next stitch and pull up a loop; insert it in the following stitch and pull up another loop; yarn over and draw through all three loops. This uses two stitches and makes one stitch. The pattern’s dec instruction means this decrease.
Pattern instructions
1. Make six cream oval wedge faces
With cream yarn and the 2.5 mm hook, ch 5.
-
Round 1: Sc in the 2nd ch from hook and next 2 ch, work 3 sc in the last ch. Turn the chain and work 1 sc in each of the next 2 unused loops, then 2 sc in the first chain — 10 sts. Place a marker in the first sc; do not join.
-
Round 2: Sc in the next 3 sts, inc in each of the next 3 sts, sc in the next 2 sts, inc in each of the last 2 sts — 15 sts.
-
Round 3: Sc in the next 3 sts, (sc in next st, inc in next st) 3 times, sc in next 2 sts, (sc in next st, inc in next st) 2 times — 20 sts.
-
Round 4: Sc in the next 3 sts, (sc in next 2 sts, inc in next st) 3 times, sc in next 2 sts, (sc in next 2 sts, inc in next st) 2 times — 25 sts. Join with a sl st to the first sc and fasten off, leaving a long sewing tail.
Repeat until you have 6 cream ovals, each with 25 stitches around. With brown yarn, embroider two short seed marks on the center of each oval. Use small, snug stitches and knot the embroidery tails between the panels.
2. Make six red oval backs and assemble the wedges
With red and the 2.5 mm hook, make a second oval for each wedge using the same ch 5 and Rounds 1–4 above: 10, 15, 20, and 25 sts. Fasten off with a long sewing tail.
Place one red oval behind one cream face, wrong sides together. With the red sewing tail and a tapestry needle, sew through corresponding edge stitches around the 25-stitch perimeter. Stop with an opening about 2 cm wide. Add a small tuft of stuffing, spreading it toward the edges; the wedge should be softly padded, not firm. Finish sewing the opening closed. Repeat for all six wedges.
To give each slice a slight tapered end, use red yarn to take two small stitches through the paired layers at one short end of each oval and draw them in just enough to form a shallow pinch. Secure on the red side. Leave the opposite end rounded. These six units remain separate from the peel.
3. Crochet the red peel cup
With red and the 2.5 mm hook, make an MR.
-
Round 1: 8 sc in MR — 8 sts. Tighten the ring and join.
-
Round 2: Inc in each st around — 16 sts. Join.
-
Round 3: (Sc in next st, inc in next st) around — 24 sts. Join.
-
Round 4: (Sc in next 2 sts, inc in next st) around — 32 sts. Join.
-
Round 5: (Sc in next 3 sts, inc in next st) around — 40 sts. Join.
-
Round 6: (Sc in next 4 sts, inc in next st) around — 48 sts. Join.
-
Round 7: Ch 1, sc in BLO around — 48 sts. Join. This round creates the turn from the flat base into the cup wall.
-
Round 8: Ch 1, sc in both loops of every st around — 48 sts. Join and fasten off. Mark the rim into six equal groups of 8 sts; place one marker after every eighth stitch.
4. Add the six connected tapered flaps
Each flap is worked back and forth directly across one marked group of 8 rim stitches. Do not cut the peel base or sew the flaps on separately. Begin with red at the first 8-stitch group; work the rows outward from the cup. Turn after every row.
For Flap 1, join red with a sl st in the first stitch of a marked group. Ch 1; this does not count as a stitch.
-
Row 1: Sc in the same st and each of the next 7 sts — 8 sts. Turn.
-
Row 2: Ch 1, 2 sc in first st, sc in next 6 sts, 2 sc in last st — 10 sts. Turn.
-
Row 3: Ch 1, 2 sc in first st, sc in next 8 sts, 2 sc in last st — 12 sts. Turn.
-
Rows 4–6: Ch 1, sc across — 12 sts each row. Turn after each row.
-
Row 7: Ch 1, dec, sc in next 8 sts, dec — 10 sts. Turn.
-
Row 8: Ch 1, sc across — 10 sts. Turn.
-
Row 9: Ch 1, dec, sc in next 6 sts, dec — 8 sts. Turn.
-
Row 10: Ch 1, sc across — 8 sts. Turn.
-
Row 11: Ch 1, dec, sc in next 4 sts, dec — 6 sts. Turn.
-
Row 12: Ch 1, sc across — 6 sts. Turn.
-
Row 13: Ch 1, dec, sc in next 2 sts, dec — 4 sts. Turn.
-
Row 14: Ch 1, sc across — 4 sts. Turn.
-
Row 15: Ch 1, dec twice — 2 sts. Turn.
-
Row 16: Ch 1, sc in both sts — 2 sts. Ch 6, sl st in the same last sc to form a small tip loop. Fasten off.
Repeat Rows 1–16 for each of the other five 8-stitch rim sections. At the start of every flap, attach yarn to the first stitch of the next marked section. The six flaps share the circular rim and remain connected at their bases; their side edges and tips are not sewn together. The tip loops are used to close the apple.
5. Make the stem and leaf
Stem: With brown and the 3 mm hook, make an MR and work 4 sc into it. Tighten the ring. Work 4 rounds of 4 sc in a spiral, marking the first stitch — 4 sts in every round. Fasten off with a long tail. This makes a short, narrow tube; lightly pinch it flat at the base for sewing.
Leaf: With green and the 3 mm hook, ch 7. Work along one side of the chain: sl st in 2nd ch, sc in next ch, hdc in next ch, dc in next ch, hdc in next ch, then 3 sc in last ch. Turn and work on the underside: hdc in next ch, dc in next ch, hdc in next ch, sc in next ch, sl st in last available loop. Fasten off with a sewing tail. The leaf forms a small pointed oval with a rounded end.
Sew the stem securely at the tip of one designated flap (Flap 1), just below its loop. Sew the leaf beside the stem base. The stem is part of the peel closure, not an extra removable component.
6. Assemble, open, and close the apple
- Set the peel cup upright. Arrange the six stuffed wedges side by side inside the cup, with their pinched ends pointing upward and their cream faces visible from the opening. Keep the wedges loose so they can be removed.
- Bring the six peel flaps up around the outside of the wedges. Adjust their overlap evenly; the six red flaps form the apple skin.
- Bring the flap tips together at the top. Flap 1 already carries the stem. Slip the other five tip loops over the stem, one at a time, so the loops sit at the stem base and hold the cover closed. Do not pull so tightly that the flap tips distort.
- To open the apple, lift the five loops back over the stem, spread the six connected flaps outward, and lift out the six individual wedges. To close it, return the wedges to the cup and repeat the loop-over-stem closure.
- Check that all six wedges fit without crushing the stuffing. If the cover feels tight, use less stuffing in the wedges; do not stretch the peel loops.
Finishing, care, and safety
Weave in all ends on the red side of the wedges and inside the peel. Secure the stem and leaf with several passes through their bases. Trim tails only after checking that the seam and embroidery cannot loosen when the pieces are removed and replaced.
Hand wash gently in cool water with mild soap, press in a towel, and reshape the peel and wedges while damp. Dry completely before storing. Avoid hot dryers, which can shrink cotton and distort the flap loops.
This is decorative play food with six removable pieces, small loops, and embroidered details. It is not suitable for children under three and should be used with adult supervision. Inspect seams, seed embroidery, leaf, stem, and flap-loop attachments regularly; repair loose stitching before play. Do not use buttons, beads, safety eyes, or glue.
Troubleshooting and fit adjustments
- The fabric shows stuffing: Use a smaller hook or tighten your tension slightly, then remake one wedge and compare its size before making all six.
- The peel rim is too small or large: Recheck gauge first. At 22 sc per 10 cm, 48 rim stitches calculate to about 21.8 cm. Changing the count affects how the six 8-stitch flap sections align, so do not add stitches to the rim without repartitioning all six flaps evenly.
- The apple closes with a gap: Redistribute the wedges around the cup, check that all flap tips reach the center, and reduce excess stuffing. The loops should rest at the stem base without stretching.
- The apple looks lumpy: Keep each wedge lightly and evenly stuffed; add small tufts rather than one dense clump. Make sure all six wedges face the same direction in the peel.
- One flap twists: Confirm that its first row spans exactly one marked 8-stitch section and that all flaps begin in the same direction around the rim.
Frequently asked questions
Can the six wedges be sewn into the apple?
No. They are intentionally removable so the apple can open and close as shown.
Is this suitable for a young child?
It is decorative play food with small removable pieces and should not be given to children under three; supervise play and inspect all seams regularly.
More HookElla crochet projects
Browse more HookElla amigurumi patterns or try the Spiral Rainbow Ball for another small, shaped crochet project. Use APPELLA when sharing this apple so it is easy to find in HookElla’s search workflow.
Design credit
The playful idea of an apple opening into fruit sections acknowledges Thilde Errebo, designer of Karla’s Apple. The stitch counts, oval wedge construction, six-section peel, flap shaping, and written instructions on this page were developed independently for HookElla; this is not a reproduction of her pattern.
Helpful questions
Does the apple really open?
Yes. Six stuffed wedges sit in a shallow red peel cup. Six connected flaps fold around them, and their tip loops gather over the short stem to hold the apple closed.
Are the six wedges attached to one another?
No. Each wedge is a separate stuffed piece, so all six can be lifted out when the peel is opened.
Is this a tested pattern?
The stitch and repeat counts have been checked mathematically, but this sample has not been physically test-crocheted by HookElla. Make and measure the gauge swatch before beginning.
Is the apple suitable for a baby or toddler?
It is a small handmade object with removable pieces and embroidered details. It is not intended for children under three; supervise play and inspect seams and embroidery regularly.