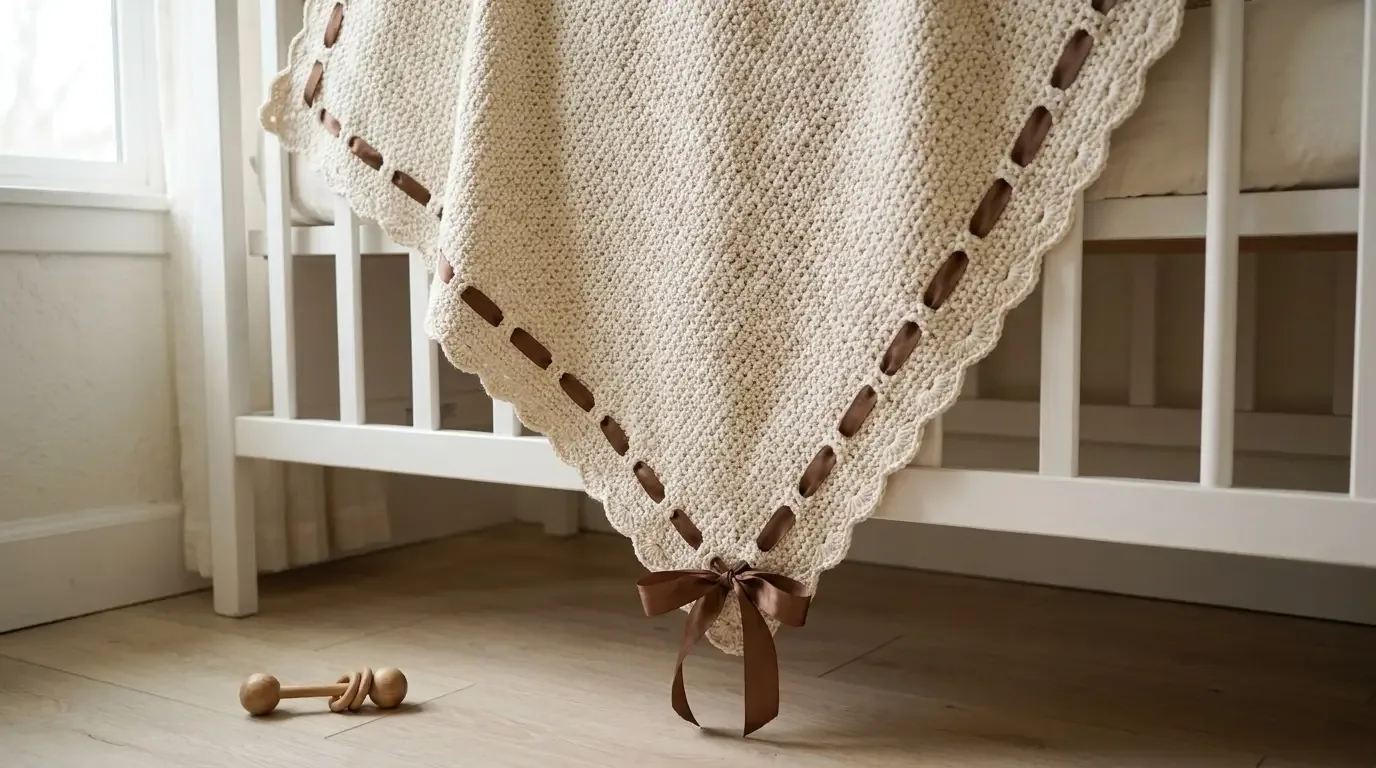
The Tiramisu Baby Blanket pairs a quietly textured cream square with a delicate finish. A compact border opens just enough for chocolate-brown silk ribbon to weave around the perimeter, ending in one soft bow at the corner.
A classic cream square with a chocolate-ribbon finish
The Tiramisu Baby Blanket is all about the finishing details. Its warm ivory cotton body has a dense, repeated texture that feels substantial without looking busy. Around the square, a three-stage perimeter treatment adds an airy passage for ribbon, then resolves into a soft scalloped edge. One chocolate-brown bow at the corner completes the keepsake look.
The blanket is worked flat as a single square. The body grows to approximately 30 inches, then the border expands the finished piece to about 32 × 32 inches. There are no separate motifs or sewn panels, so the textured field stays smooth and continuous beneath the decorative edge.
Materials and color story
- 7 skeins Blue Sky Alpacas Organic Cotton in Bone (80);
- size I crochet hook;
- 5 yards of 1/2-inch chocolate-brown silk ribbon;
- yarn needle, scissors, tape measure, rustproof pins, and a flat blocking surface.
The original palette is intentionally restrained: one warm ivory yarn and one rich brown ribbon. Smooth cotton makes the compact texture easy to see and gives the scalloped border enough body to hold its shape after washing.
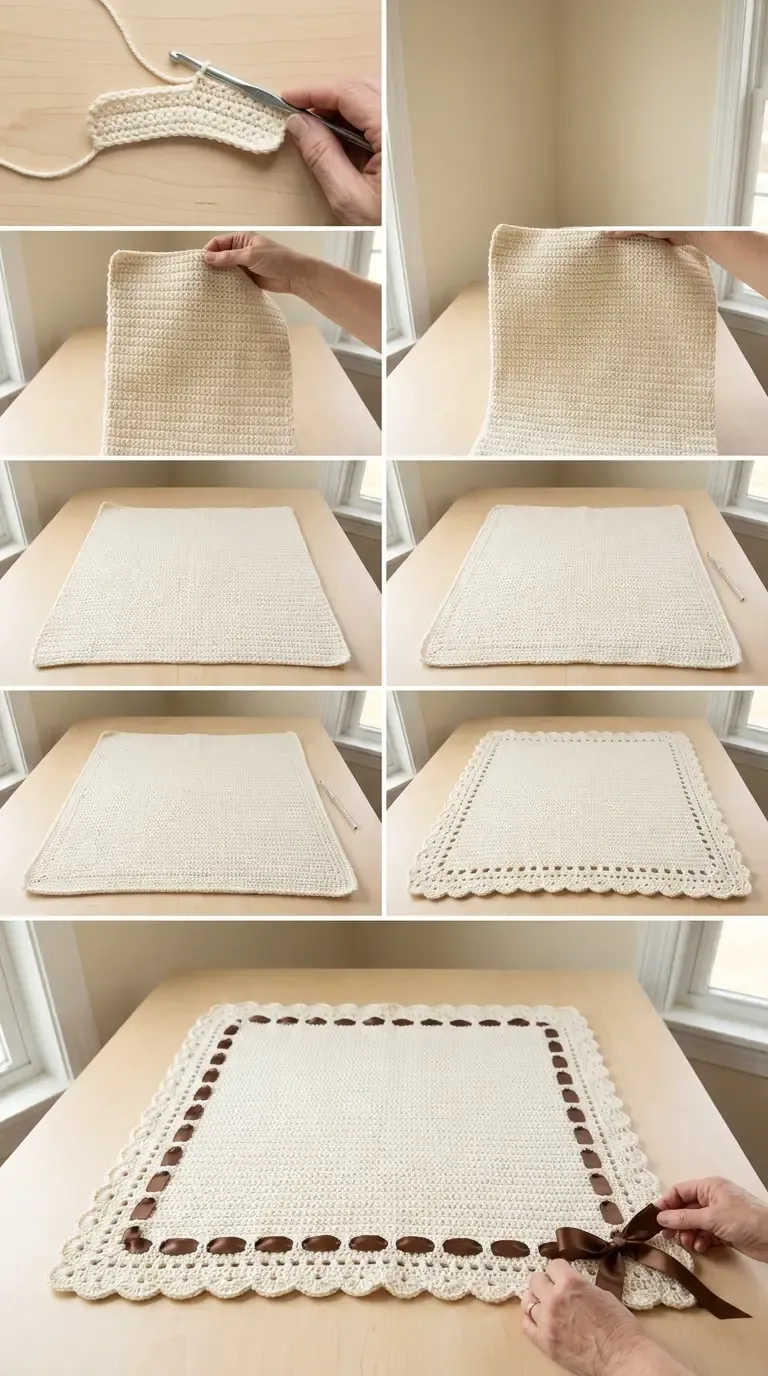
The HookElla construction image follows the blanket from its first textured rows through the ribbon-ready edge and corner bow.
Size and gauge checkpoints
Aim for a 32 × 32-inch finished square. Measure the body after it reaches approximately 30 inches in both directions; the remaining two inches come from the three border stages. A compact, even fabric is more important than forcing a particular stitch count, because a loose body can make the ribbon edge stretch unevenly.
Work a small swatch, wash it as you plan to wash the blanket, and compare the texture before beginning. If the fabric feels board-like, loosen your tension or try the next hook size. If the stitches look open and the square grows too quickly, use a smaller hook while keeping the fabric soft enough to drape.
Construction roadmap
- Build the textured square. With Bone cotton, work the repeating texture back and forth in rows. Keep the first and last stitches aligned and turn consistently so the side edges stay straight.
- Check the body measurement. Continue until the relaxed piece is approximately 30 inches square. Block the body lightly if the edges need coaxing into a true right angle.
- Add the stabilizing border stage. Work the first perimeter round evenly around all four sides, placing the same corner treatment at each turn. This anchors the edge before it becomes decorative.
- Open the ribbon passage. The second border stage introduces the evenly spaced openings that will carry the silk ribbon. Keep the spaces identical along the sides and mirror the placement across opposite edges.
- Finish with shells and scallops. Work the final border stage so the outer edge resolves into a soft decorative shell/scallop rhythm. Shape the corners gradually; the points should remain gentle rather than sharp.
- Block the finished square. Pin the four corners and then the scallops, keeping the ribbon openings aligned. Let the blanket dry completely before threading the ribbon.
- Weave and tie. Thread the 5 yards of 1/2-inch chocolate-brown silk ribbon through the open border, following the perimeter without pulling it tight. Bring both ends to one corner and tie a single relaxed bow.
The border should lie flat throughout. If it begins to ruffle, ease the yarn across the next side rather than adding extra fullness. If it cups, check the corner spacing and gently stretch the edge while damp-blocking.
Ribbon placement and care
Cut or seal the ribbon ends cleanly before weaving. A blunt tapestry needle or a small safety pin can guide the ribbon through the border openings without snagging the cotton. Leave enough slack for the blanket to drape; a tight ribbon can draw the square inward and distort the scallops.
Keep the bow low-profile and secure, with the tails trimmed evenly. For a baby-safe presentation, treat the ribbon as removable décor: remove it before unsupervised sleep or whenever the blanket will be used by a child who could pull or mouth the bow.
Blocking and gifting
Dampen the completed blanket, shape it to a true square, and pin each scallop. Use a ruler or measuring tape to check that the opposite sides match before leaving it to dry. Blocking helps the texture relax, opens the ribbon passage, and gives the final edge its soft repeat.
Fold the blanket with the bow visible on top and add a simple care card for the cotton. The ivory-and-chocolate palette suits a neutral nursery, a christening gift, or a photo prop when the ribbon is secured and supervised.
Resizing notes
For a smaller lovey, stop the textured body earlier and keep the same three-stage border proportions. For a larger blanket, extend the body in both directions before beginning the edging. The border works best when the body remains square and the ribbon openings are spaced evenly along every side, so measure after each expansion instead of relying on a fixed row total.
Keep the warm ivory body and the final shell edge if you change the accent ribbon. A dusty rose, sage, or navy silk can shift the mood while preserving the signature Tiramisu finish.
Helpful questions
What size is the finished blanket?
The finished square is approximately 32 × 32 inches, with the main textured body grown to about 30 inches before the border is added.
What yarn and hook are used?
Use seven skeins of Blue Sky Alpacas Organic Cotton in Bone (80) with a size I crochet hook.
How is the blanket constructed?
The dense cream body is worked flat as a square. After the body reaches its checkpoint measurement, three border stages are worked around all four sides.
How is the ribbon attached?
Five yards of 1/2-inch chocolate-brown silk ribbon are woven through the open border and finished in one bow at a corner.
What makes the edge distinctive?
The border builds gradually from a stable perimeter into open ribbon-ready spaces and finishes with a decorative shell and scallop round.