Soft velvet yarn makes every raised diamond feel extra plush in this compact baby blanket. Daisy Farm Crafts’ design combines a 14-plus-3 stitch repeat with front-post and back-post double crochet, creating a geometric surface that looks intricate while staying wonderfully tactile.
Velvet texture with a clean geometric rhythm
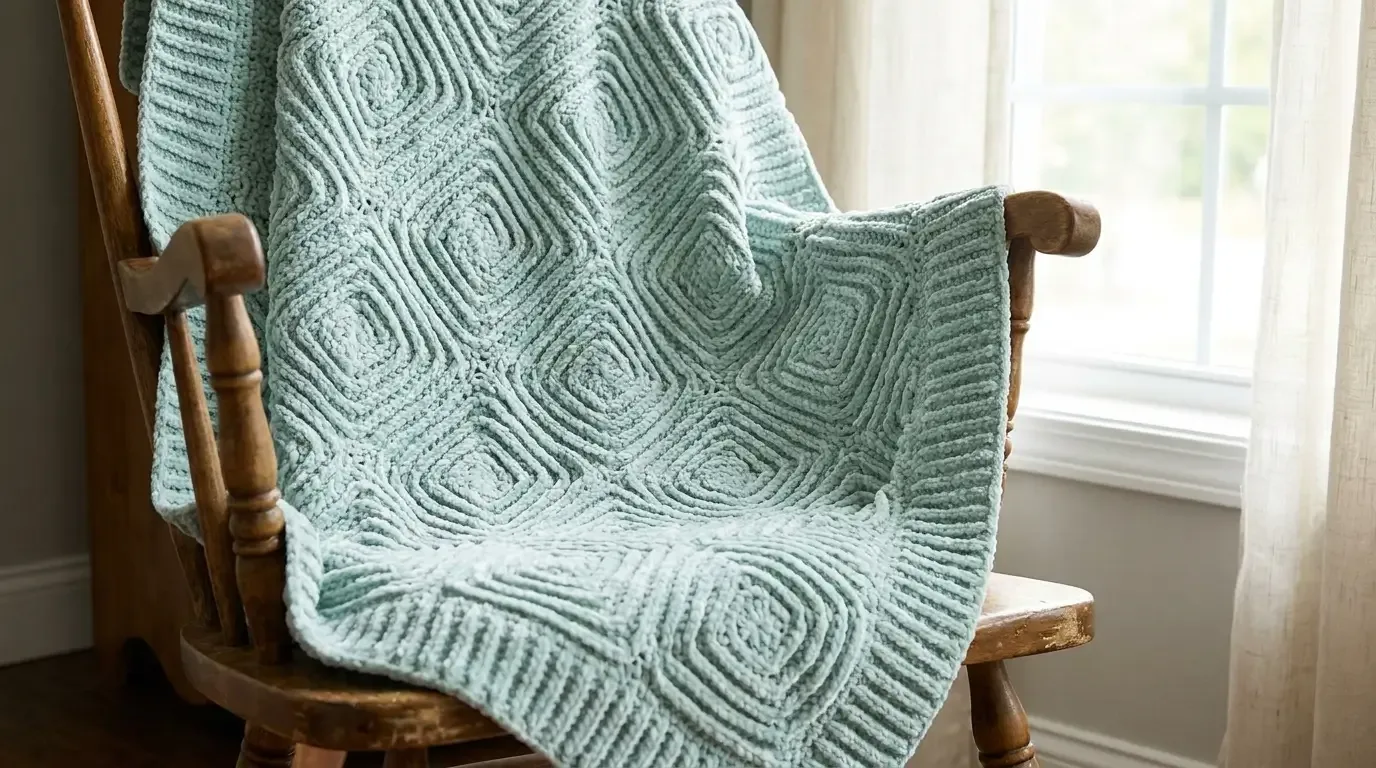
The Crochet Ribbed Diamond Baby Blanket is a lovely example of how post stitches can turn a simple square into a dimensional textile. Bernat Baby Velvet gives the seafoam sample a cloud-soft hand, while the alternating raised and recessed columns create diamonds that catch the light from every angle.
The original design is credited to Daisy Farm Crafts. The source link remains for attribution; the chain, repeat, post-stitch, border, and resizing instructions below are HookElla’s own wording and sequence.
Verified project details
The documented blanket finishes at approximately 34 × 34 inches. It uses three skeins of Bernat Baby Velvet in Seafoam, a 5 mm hook, and a chain-115 foundation. The stitch architecture is built around a 14 + 3 repeat, with approximately seven full diamond sets visible in the main field and a four-round ribbed border.
The square proportions make this a practical baby blanket, stroller layer, or lap-sized comfort piece. Velvet yarn is especially forgiving visually because the plush fibres soften small tension differences, but counting the post-stitch repeat is still essential for straight edges.
Materials and gauge planning
Gather:
- 3 skeins Bernat Baby Velvet in Seafoam, or comparable plush yarn;
- a 5.0 mm crochet hook;
- scissors, yarn needle, stitch markers, and measuring tape;
- rustproof pins and a large blocking surface.
Work a swatch in the post-stitch pattern before committing to the full chain. The goal is to match the source’s finished size and keep the post columns elastic enough to lie flat. Velvet yarn can be difficult to unpick, so count the foundation chain and mark every repeat before the first texture row.
Foundation and repeat logic
Begin with chain 115. The count is chosen so the row divides into complete 14 + 3 repeat units while leaving the intended edge stitches. Do not casually add or remove a few chains: an incomplete repeat will shift the diamond edges and make the border harder to square.
The first rows establish a stable base fabric. The geometric texture then alternates front-post double crochet (FPDC) and back-post double crochet (BPDC). A front-post stitch pushes a column toward the viewer; a back-post stitch recesses it. By moving where those post stitches sit within each 14-stitch unit, the columns angle toward a centre and then away again, outlining a diamond.
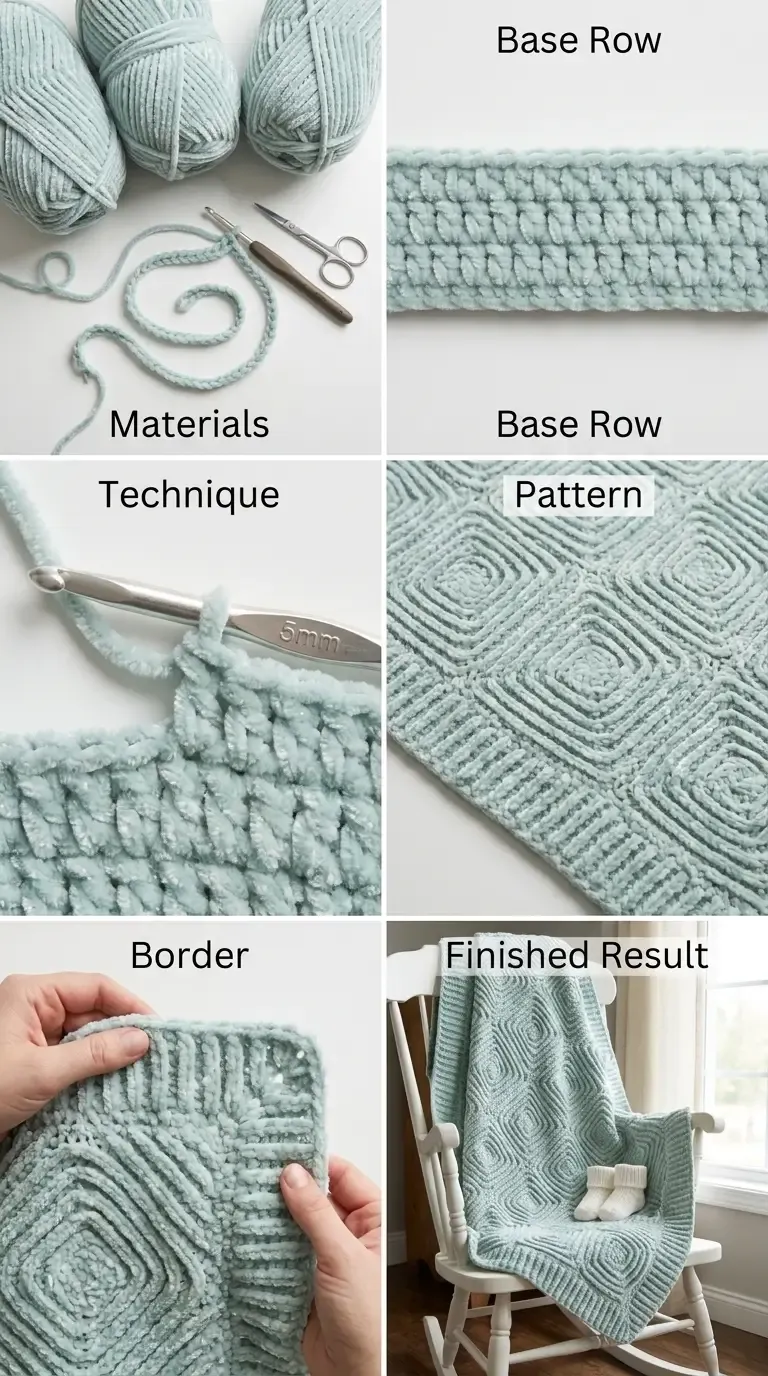
The HookElla image accompanies the post-stitch instructions below.
Building the diamond field
Work the main body in the same colour, maintaining the 14 + 3 repeat across every row. At the beginning of each texture row, identify the first complete repeat and use a marker or removable strand to separate it from the next.
The repeat has four practical phases:
- Base columns: establish the alternating front/back post texture without changing the edge count.
- Outward movement: place the raised columns one stitch farther from the centre on successive rows.
- Inward movement: mirror the placement so the columns travel back toward the centre and close the diamond.
- Reset: return to the base arrangement before beginning the next diamond set.
Repeat the full vertical sequence until the blanket shows approximately seven complete diamond sets. Keep the first and last three stitches consistent; those edge stitches are what allow the border to turn neatly around the square.
If the fabric starts to lean, stop at the end of a row and compare the post columns with the previous repeat. A missed post stitch changes the visual angle immediately, even when the overall stitch count appears correct.
The four-round ribbed border
After the final diamond row, work the source’s four-round ribbed border around all four sides. The border echoes the blanket’s raised lines and gives the velvet edge a more stable finish.
Keep each corner square. Work evenly along the side edges, placing the corner treatment in the same location on every round. If the border begins to ruffle, reduce the number of edge stitches slightly; if it pulls, add an extra stitch at the next corner rather than forcing the turn.
The finished border should lie flat and frame the last row of diamonds without covering the texture. Lightly block the blanket to 34 inches square, easing the corners into shape with pins.
Resizing with the 14 + 3 repeat
To make the blanket wider, add complete 14-stitch units while preserving the three-stitch edge allowance. To make it longer, add complete vertical diamond sequences before beginning the border. Avoid stopping halfway through a diamond: a full motif will keep the edge rhythm balanced.
Velvet yardage changes quickly with size. Add one skein at a time after calculating the extra width and height, and make a small post-stitch swatch to confirm the hook still produces a soft, stable fabric.
Yarn substitutions and care
Bernat Baby Velvet gives the original its plush surface, but a smooth chenille or soft acrylic can also show the post-stitch relief. Choose a yarn labelled washable and baby appropriate, and test colourfastness before soaking the finished piece.
Wash according to the yarn label, reshape while damp, and dry flat. Never leave a loose yarn tail or decorative attachment near a baby’s face. This blanket is intended as a supervised cover or cuddle layer, not a fitted sleep product.
Troubleshooting
- The repeat does not fit: recount the chain and confirm the 14 + 3 structure before starting texture rows.
- Diamonds slant unevenly: compare the FPDC/BPDC placement in each phase and correct at the next reset.
- Edges wave: keep the three edge stitches consistent and avoid adding stitches between repeats.
- Border pulls: add ease at corners or use a slightly larger hook for the edge rounds.
- Velvet stitches are hard to see: work in bright light and feel for the post with the hook tip before yarning over.
For another soft baby project, explore HookElla’s Evelyn Baby Blanket or browse the Baby Crochet collection.
With its quiet seafoam colour, plush hand, and clearly mapped post-stitch geometry, this blanket is a rewarding lesson in texture. Count the repeat, let each diamond build slowly, and allow the four-round ribbed border to finish the square cleanly.
Helpful questions
Who designed the original Ribbed Diamond Blanket?
Daisy Farm Crafts is credited for the original design. HookElla gives a complete, independently worded construction recipe in this article.
What size does the source blanket finish?
The documented blanket measures approximately 34 by 34 inches.
What yarn and hook are used?
The source uses three skeins of Bernat Baby Velvet in Seafoam with a 5 mm crochet hook.
How does the diamond texture form?
Front-post and back-post double crochet stitches shift across a 14 + 3 repeat. The raised and recessed columns angle inward and outward to outline each diamond.
How many diamond sets are visible?
The finished sample shows approximately seven full diamond sets across the main field, depending on how the border and edge repeats are counted.
Can I make the blanket wider or longer?
Yes. Keep the foundation stitch count aligned to the 14 + 3 repeat and add complete vertical repeat sections before working the border.