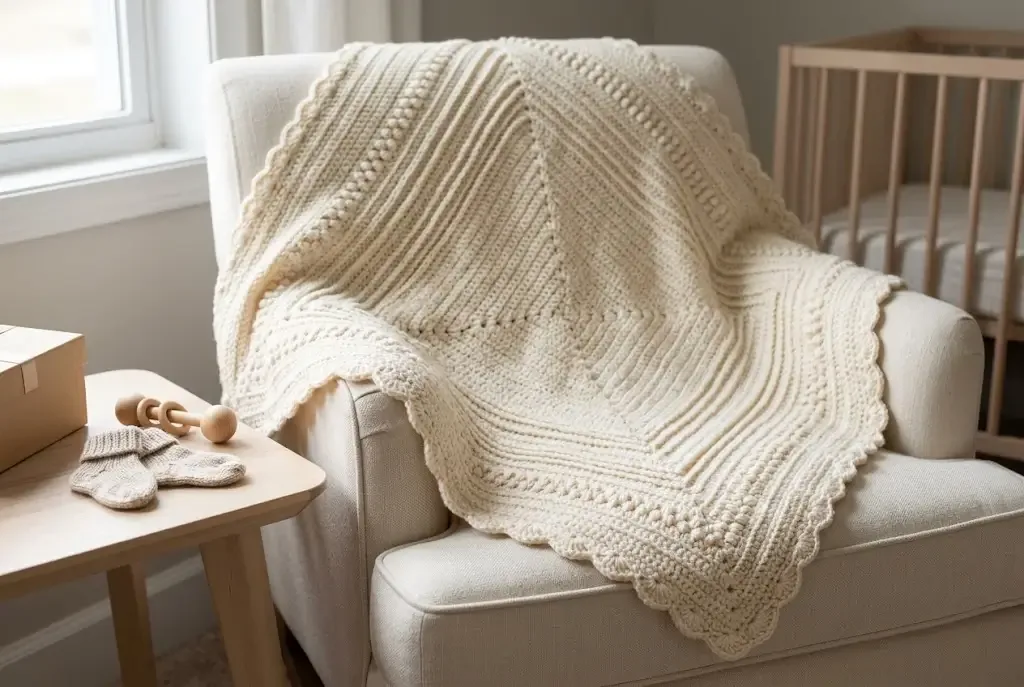
The Evelyn Blanket turns one creamy shade into a whole landscape of texture. Quiet half-double-crochet rows alternate with raised ridges, clustered bands, crossed post details, and a softly scalloped edge, creating a warm baby blanket that feels intricate without relying on color changes.
About the Evelyn Blanket
The Evelyn Blanket is an original design from That Crochet Life, where it is presented as a textured baby blanket that can be made in one color. This HookElla edition preserves the project’s published construction and stitch logic while explaining it in fresh wording and using only HookElla imagery. You can also visit the original Evelyn Blanket pattern at That Crochet Life for the designer’s version.
The body is worked flat in an eight-row cycle. Plain half double crochet provides calm sections between bands of front-post half double crochet, grouped stitches, third-loop ridges, and small crossed-post details. A three-round border finishes the square with single crochet, a back-loop ridge, and five-double-crochet shells.
The pattern uses US crochet terminology. It suits an adventurous advanced beginner or intermediate crocheter who is comfortable recognizing stitch tops, working around stitch posts, maintaining a fixed stitch count, and placing border stitches evenly along row ends.
Finished size and gauge planning
The completed baby blanket measures approximately 30 × 30 in (76 × 76 cm), including the border. The source does not set a mandatory gauge; consistency and the finished measurement are the practical checkpoints.
Before beginning, work the complete eight-row sequence over a multiple-of-six foundation wide enough to measure. Wash and dry the swatch as the finished blanket will be treated. Confirm that the fabric lies flat, the raised stitches are visible, and the chosen hook produces a soft drape rather than a rigid mat.
The pattern begins with Chain 126 and creates 125 working stitches. Keep 125 stitches in every body row. Place one marker in the first stitch and one in the last; move them upward as you work.
Materials
- Approximately 950 yd (869 m) DK / category 3 yarn in cream, ivory, or your chosen color
- 4.0 mm (G-6) crochet hook, or the size needed for comfortable fabric
- Two removable stitch markers
- Tapestry needle and scissors
- Tape measure
- Optional blocking mats and rustproof pins
For a baby gift, choose smooth, washable yarn that remains soft after laundering. A solid or lightly heathered shade makes the changing textures easiest to see. Avoid a strong halo that hides the post work, and check the care label before giving the finished blanket.
US abbreviations
- BLO — back loop only
- ch — chain
- dc — double crochet
- fpdc — front-post double crochet
- fphdc — front-post half double crochet
- hdc — half double crochet
- sc — single crochet
- sk — skip
- sl st — slip stitch
- st(s) — stitch(es)
- TLO — third loop only
Special stitches and techniques
Front-post half double crochet (fphdc)
Yarn over, insert the hook from front to back and back to front around the post of the indicated stitch, yarn over and draw up a loop, then yarn over and pull through all three loops. Working around the post pushes the stitch forward into a raised ridge.
Front-post double crochet (fpdc)
Yarn over, insert the hook from front to back and back to front around the indicated stitch post, yarn over and draw up a loop, then complete a double crochet. This taller post stitch forms the crossed texture in Pattern Row 8.
Half double crochet in the third loop (hdc TLO)
Look behind the usual top “V” of the stitch for the horizontal bar just below it. Insert the hook under that rear bar and complete the hdc. The unused top loops roll forward, creating a slim ridge across the right side.
Crossed post pair
Skip one stitch, work an fpdc around the post of the following stitch, then reach back and work an hdc into the top loops of the skipped stitch. These two stitches cross while still using two foundation stitches and producing two new stitches.
Shell
Work 5 dc into one stitch. Shells form the final scalloped border round.
Pattern notes
- Turn after every body row.
- Do not chain before beginning a new body row. Place the first stitch directly into the first stitch from the previous row.
- Keep 125 stitches throughout the body.
- Mark the first and last stitch of every row. The last stitch often hides beside the turning edge.
- Instructions inside asterisks are repeated across the row.
- The right side is the face on which the post stitches and third-loop ridges appear most prominent.
- Chain 126 is an odd multiple of 3 plus 3. For resizing, the clearer equivalent is any multiple of 6.
Evelyn Blanket body
Loosely ch 126. If your foundation chain tends to tighten, make it with a hook one size larger, then return to the 4.0 mm hook for the body.
Pattern Row 1: establish the fabric
Hdc in the second chain from the hook and in every chain across — 125 hdc. Mark the first and last stitch. Turn.
Pattern Row 2: plain hdc
Hdc in every stitch across — 125 hdc. Turn.
Pattern Row 3: raised post ridge
Skip the first stitch. Work fphdc around each stitch post across until only the final stitch remains. Work 2 hdc in the final stitch — 125 stitches. Turn.
Skipping the first stitch and doubling the last keeps the total unchanged while allowing the raised band to settle evenly across the fabric.
Pattern Row 4: reset row
Hdc in every stitch across — 125 hdc. Turn.
Pattern Row 5: grouped texture
Hdc in the first stitch. Skip the next 2 stitches, work 3 hdc in the following stitch. Repeat across until one stitch remains. Hdc in the final stitch — 125 stitches. Turn.
The 123 interior stitches divide into 41 groups of three. Each group consumes three stitches and returns three, so the blanket width remains stable.
Pattern Row 6: reset row
Hdc in every stitch across — 125 hdc. Turn.
Pattern Row 7: third-loop ridge
Hdc in the first stitch. Work hdc TLO across until one stitch remains. Hdc normally in the final stitch — 125 hdc. Turn.
Keep the two edge stitches in their regular top loops; this makes them easier to find when the border is added.
Pattern Row 8: crossed post texture
Hdc in the first stitch. Skip the next stitch, fpdc around the post of the following stitch, then hdc into the top of the skipped stitch. Repeat until 2 stitches remain. Work fphdc around the next stitch and hdc in the final stitch — 125 stitches. Turn.
The single fphdc near the end closes the odd interior sequence while preserving the edge stitch and the 125-stitch total.
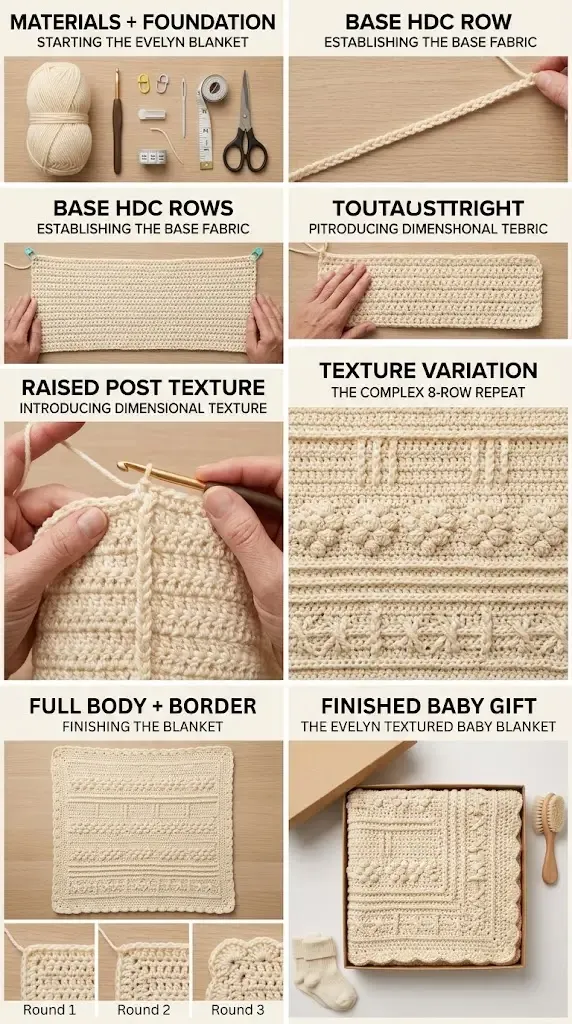
Use this HookElla image to visualize the construction stages. The written stitch counts and instructions above control the pattern.
Repeat the texture sequence
Repeat Pattern Rows 1–8 in order until the body reaches the desired length before the border. For the square baby blanket, stop when the body is approximately 28–29 inches tall or when adding the planned border will bring the finished piece close to 30 inches.
Ending after Pattern Row 8 gives the repeat a complete visual rhythm, but finished proportion matters more than forcing an extra cycle. Record completed repeats and count 125 stitches at least once per cycle.
Fasten off after the final body row and weave the tail into the wrong side, or keep the yarn attached if it ends at a convenient corner for the border.
Three-round border
The border is worked in joined rounds. Place a marker in the center stitch of each three-stitch corner and move it upward each round. Along the two row-end sides, distribute stitches consistently and stop often to lay the blanket flat. Too many stitches cause ruffling; too few pull the edge inward.
Border Round 1: single-crochet foundation
Join yarn in any corner or continue from the body. Ch 1; this does not count as a stitch. Work sc evenly around all four sides. Place 3 sc in each corner, marking the middle stitch of every group. Join with a sl st to the first sc.
Across the top and bottom, work into each body stitch. Along the sides, begin with approximately one sc per hdc row end, then adjust the spacing if the fabric does not lie flat.
Border Round 2: BLO ridge
Ch 1. Work hdc BLO in each stitch around. At each marked corner, work 3 hdc BLO in the center corner stitch and move the marker to the middle of the new group. Join with a sl st to the first hdc.
The unused front loops form a narrow frame before the scallops.
Border Round 3: shell scallops
Ch 1. Skip 1 stitch, work a shell of 5 dc in the next stitch. Repeat around, spacing the shells as evenly as possible. Center a shell in each marked corner when the stitch count allows, adjusting the interval just before the corner rather than forcing the fabric.
If the final spacing is off by one stitch, skip 2 stitches once instead of 1. If a section begins to ruffle, use a 4-dc shell once or increase the gap between two shells. Mirror any visible adjustment on the opposite side when possible. Join with a sl st, fasten off, and secure the tail.
Blocking and finishing
Weave every end through several stitches on the wrong side, reverse direction once, and trim only after gently stretching the area. Wash or dampen the blanket according to the yarn label. Lay it flat, square the corners, align the raised texture bands, and shape the shell border into even scallops.
Allow the blanket to dry completely before measuring. The finished target is approximately 30 × 30 inches, but a small difference is normal when substituting yarn or changing tension.
For gifting, include a card with the fiber content and laundering instructions. Pair the cream blanket with HookElla’s Teddy-Ear Crochet Baby Hat showcase or Crochet Even Moss Baby Sweater inspiration for a coordinated neutral set.
Resizing the Evelyn Blanket
For another width, begin with a chain that is a multiple of 6. Work one hdc into the second chain and every chain across; the resulting stitch count will always be one less than the foundation chain. Confirm that Row 5 leaves two edge stitches around an interior count divisible by 3.
Add or remove complete eight-row repeats for length. Before buying yarn, estimate the new requirement by area:
Estimated yardage = 950 × (new width × new length ÷ 900)
Add at least 10% for swatching, the border, and personal tension. A larger blanket has proportionally less border per square inch, while a small blanket may use a greater share of its yarn around the edge.
Troubleshooting the texture
- The sides are narrowing: The last stitch is probably being missed. Keep both edge markers visible and restore the row to 125 stitches before continuing.
- The raised post line is on the wrong face: Check where the hook enters around the post. A front-post stitch should push the post toward you on the right side.
- The grouped row has the wrong count: There must be one ordinary hdc at each edge and 41 three-stitch groups between them.
- The third-loop ridge is faint: Make sure the hook enters the horizontal bar behind the top V, not the ordinary back loop.
- The crossed stitches lean inconsistently: Always skip forward, work around the next post, then return to the skipped stitch in the same direction.
- The border waves: Remove side-edge pickup stitches or increase one shell gap. Blocking cannot permanently correct a border with too much circumference.
- The border cups inward: Add side-edge stitches in Round 1 or reduce one gap between shells.
For another one-color texture project, try the Cream Basketweave Crochet Baby Blanket. Browse the Baby Crochet collection for more handmade gift ideas, or explore Blankets & Home for larger decorative projects.
The Evelyn Blanket is satisfying because every eight-row cycle changes the rhythm without changing the color. Once the first repeat is established, the fabric becomes a gentle sampler of ridges, clusters, and crossed details finished by one graceful scalloped edge.
Helpful questions
Who originally designed the Evelyn Blanket?
The technical reference and original Evelyn Blanket design come from That Crochet Life. This HookElla edition uses original wording and its own images while preserving the published materials, dimensions, stitch structure, texture cycle, and border.
What size is the finished blanket?
The baby-size blanket is approximately 30 × 30 inches or 76 × 76 cm after the border. Yarn, hook, tension, and blocking can change the final dimensions.
Why does the pattern begin with Chain 126?
Working into the second chain creates 125 body stitches. The two edge stitches leave 123 interior stitches, which divide evenly into the three-stitch cluster sequence. Chain 126 is also a multiple of six, which keeps the crossed-post row balanced.
How can I change the blanket width?
Use a starting chain that is a multiple of 6. This is equivalent to choosing an odd multiple of 3 and adding 3. Work the first row into the second chain and keep the resulting stitch total unchanged on every row.
Can I use a different yarn weight?
Yes, but the width, drape, yardage, and border spacing will change. Choose a hook suitable for the yarn, make a full eight-row swatch, and resize with a multiple-of-six foundation chain.
Do turning chains count as stitches?
No turning chains are used unless a border round specifically calls for one. Turn the work and place the first stitch directly into the first stitch of the previous row.
How do I stop the blanket edges from narrowing?
Mark the first and last stitch of every row and count 125 stitches regularly. The final stitch can hide against the side edge, especially after raised post and cluster rows.
Why is the final border spacing adjustable?
The shell round must fit four sides and four corners without ruffling. Small changes in side-edge pickup and personal gauge can alter the available stitch count, so one interval may need an extra skipped stitch or a four-stitch shell.