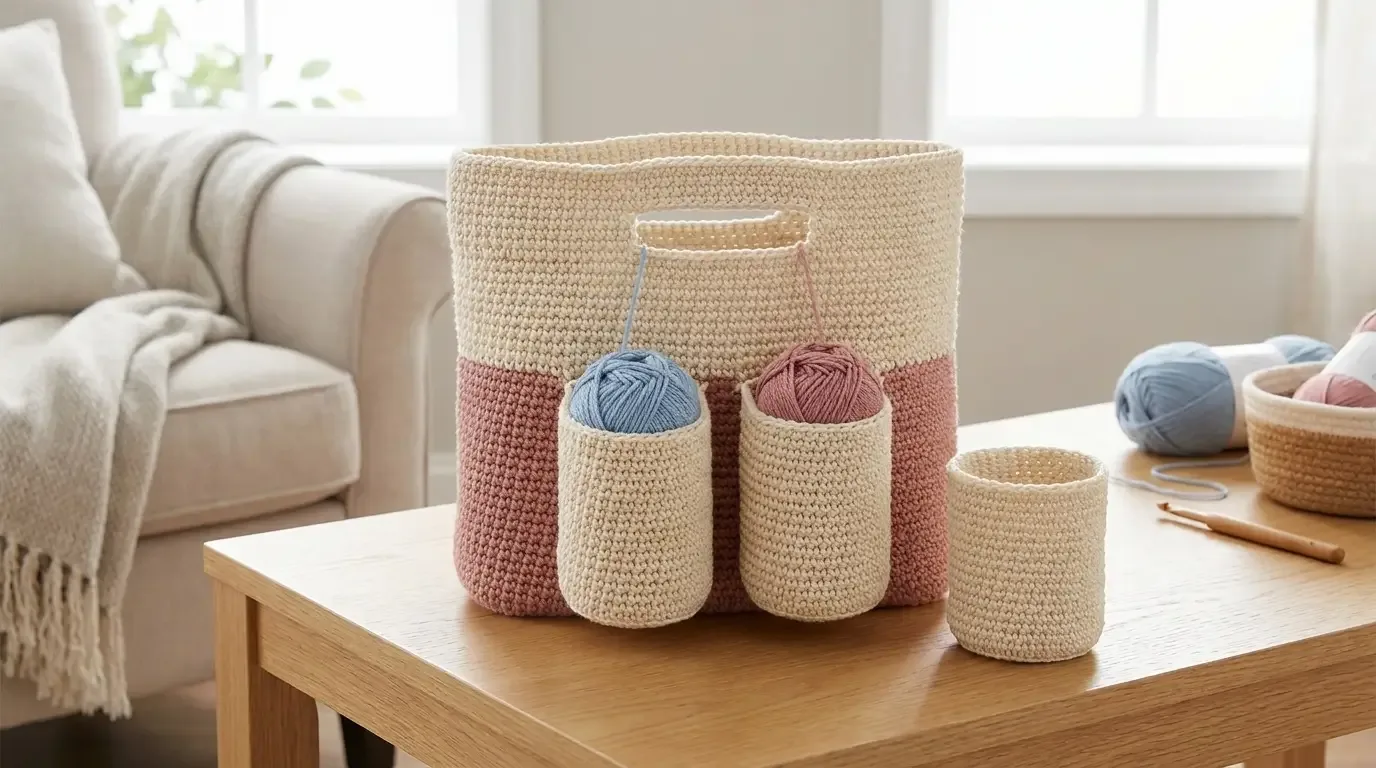
Keep three active yarn colours tidy with a sturdy crochet tote and detachable cups that travel with the project. This original HookElla design combines a blush lower body, cream upper walls, two built-in handles, and exactly three removable 4-inch yarn cups.
A project tote that keeps three colours moving
The Detachable Yarn-Cup Crochet Tote is made for a project that needs more than one ball at once. The main bag gives you a roomy 12-inch oval base and 9-inch walls. Two integrated handles make it easy to lift, while three small cups keep individual yarn balls from rolling across the floor.
Knitty Natty’s Float Tote listing is credited as the design inspiration for the detachable-cup idea. The pattern on this page is an original HookElla construction using the supplied three-skein specifications, stitch counts, dimensions, and magnetic-snap system.
Materials and gauge
- three skeins of worsted cotton, held double throughout;
- 6 mm crochet hook;
- yarn needle, scissors, stitch markers, and measuring tape;
- six pairs of sew-on magnetic snaps (one pair for each of three cups);
- small fabric or felt reinforcement patches for the snap backs;
- optional removable stitch markers to mark handle and cup positions.
Aim for roughly 11 single crochets per 4 inches with the doubled cotton. The fabric should feel dense and stand without collapsing. If your tote is floppy, go down a hook size; if the stitches are difficult to enter, loosen your tension before changing the hook.
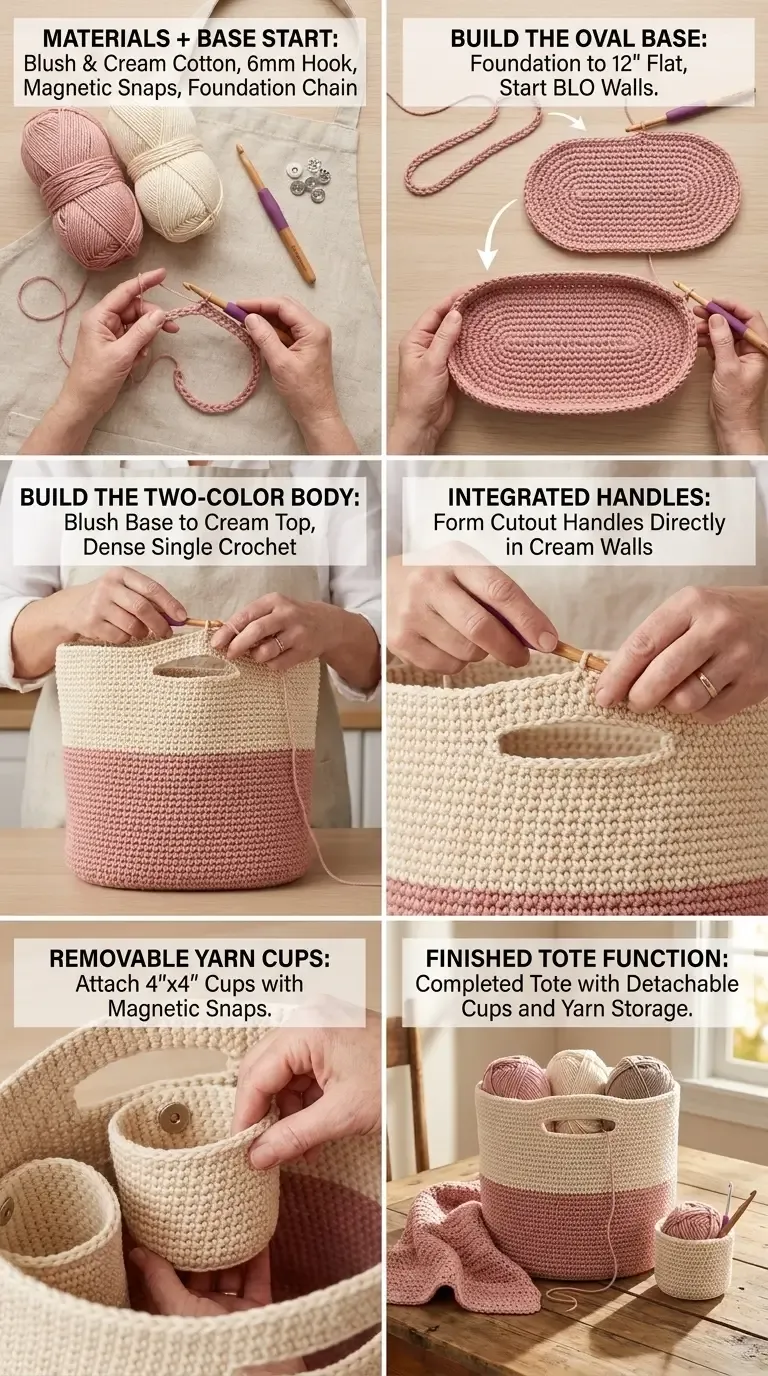
The HookElla construction image accompanies the pattern steps below.
Main tote
Work in US terms and join each round with a slip stitch unless noted. The base is an oval; count the centre stitches as you work so both ends expand evenly.
Oval base
- With blush yarn held double, chain 35. Sc in the second chain from the hook and across. Work 3 sc in the last chain, then turn the chain to work down the opposite side. Sc across the remaining loops and place 2 sc in the starting chain space. (72 sc)
- Work one sc in each stitch, placing 3 sc in each rounded end stitch group. (78 sc)
- Continue increasing only at the two ends: work sc along the straight sides and 2 sc in each of the three end stitches at both ends. (84 sc)
- Repeat the end-increase round until the oval measures approximately 12 inches long and 6½–7 inches wide. Keep the long sides straight; stop when the measurement is right rather than forcing a specific round count.
Blush lower body
Work 8 rounds of sc around with no increases. Keep the first stitch marked and check that the walls rise vertically. For a firmer turning edge, work the first wall round in BLO.
Cream upper body
Change to cream by completing the final yarn-over of the last blush stitch with the cream strand. Work 9 rounds of sc. Add one extra round if your tote is shorter than 9 inches from base to rim. Keep the colour join at the back centre.
Integrated handles
Mark two handle positions on the cream upper body, centred on the long sides. Leave at least 4 inches of stitches between the handle openings and the side curves.
- On the handle round, sc to the first marker, chain 15 for a handle opening, skip 15 stitches, and sc to the second marker. Repeat the same chain-and-skip sequence on the opposite long side.
- On the next round, work sc around, placing 17 sc over each chain space. Keep the stitches snug but not tight.
- Work two more rounds of sc. On each handle, place the new stitches into the tops of the chain-space stitches so the opening has a rounded, reinforced edge.
- Finish with one round of reverse sc or loose slip stitches around the rim. Fasten off and weave the tail down the inside wall.
The handles are part of the tote body rather than separate straps. Test them with the empty tote before adding yarn; if the opening stretches, work one extra reinforcement round around each handle.
Three removable yarn cups
Make exactly three cups in cream. Each cup is a small cylinder about 4 inches wide and 4 inches high.
- Make a magic ring and work 6 sc. Increase evenly to 12, 18, 24, 30, and 36 stitches over the next five rounds. Stop when the circle is approximately 4 inches across.
- Work one BLO sc round to create the base-to-wall ridge, then work 10 rounds of sc with no increases.
- Add one round of hdc for a soft but firm rim, followed by one round of sc. Fasten off and weave the tail inside.
- Repeat for cups two and three. Keep the cup height and opening identical so they can be swapped between positions.
Reinforced magnetic-snap attachment
Each cup needs two attachment points: one near the upper left side and one near the upper right side. Place the matching tote halves at the same height on the tote’s front wall.
- Cut six small felt or fabric reinforcement patches, each about 1 inch square. Position one behind every snap half.
- Sew the snap halves to the cups first, stitching through the cup fabric and reinforcement patch. Keep the metal parts centred and test that the cup still opens freely.
- Place the cups across the tote front with a small gap between them. Mark the corresponding tote positions, then sew the six matching snap halves through the tote wall and patches.
- Press each cup onto its pair of snaps and lift it off several times. If a snap pulls the crochet outward, add a second patch or stitch around the patch edge with a small rectangle.
The cups should hang straight and remain removable. Do not rely on glue alone for the snaps; the reinforcement stitching carries the repeated pull.
Sizing, use, and care
The three-skein version targets a 12-inch oval base and 9-inch height. To make a wider tote, add chains to the foundation in pairs and add matching end increases. To make it taller, add plain blush or cream rounds before the handle round. Keep the cup diameter at 4 inches unless you also move the snap spacing.
Use the tote for yarn, hooks, scissors with closed tips, and a current project. Keep the cups lightly filled so the snap points do not bear excessive weight. Spot-clean the cotton and dry flat; remove the cups and any metal snaps’ loose covers before washing. Inspect the snap stitching regularly and repair a loose attachment before carrying the tote.
Credit and variations
Knitty Natty’s Float Tote is credited as background inspiration for the detachable-cup concept. HookElla’s dimensions, colour sections, handle openings, cup pattern, and reinforced snap system are original to this page. Try a single neutral shade, a striped lower body, or contrasting cups while keeping the three-cup layout.
Helpful questions
How large is the tote?
The three-skein HookElla version measures approximately 12 inches along the oval base and 9 inches tall.
What yarn and hook are used?
Hold worsted cotton double and use a 6 mm hook for the tote and cups.
How many yarn cups are included?
Make exactly three removable cylindrical cups, each about 4 inches wide and 4 inches high.
How are the cups attached?
Each cup uses reinforced magnetic snaps so it can be removed from the tote and returned to the same position.
Can I make the tote one colour?
Yes. Keep the same round counts and use one shade, or change colour at the blush-to-cream transition for the two-tone version.