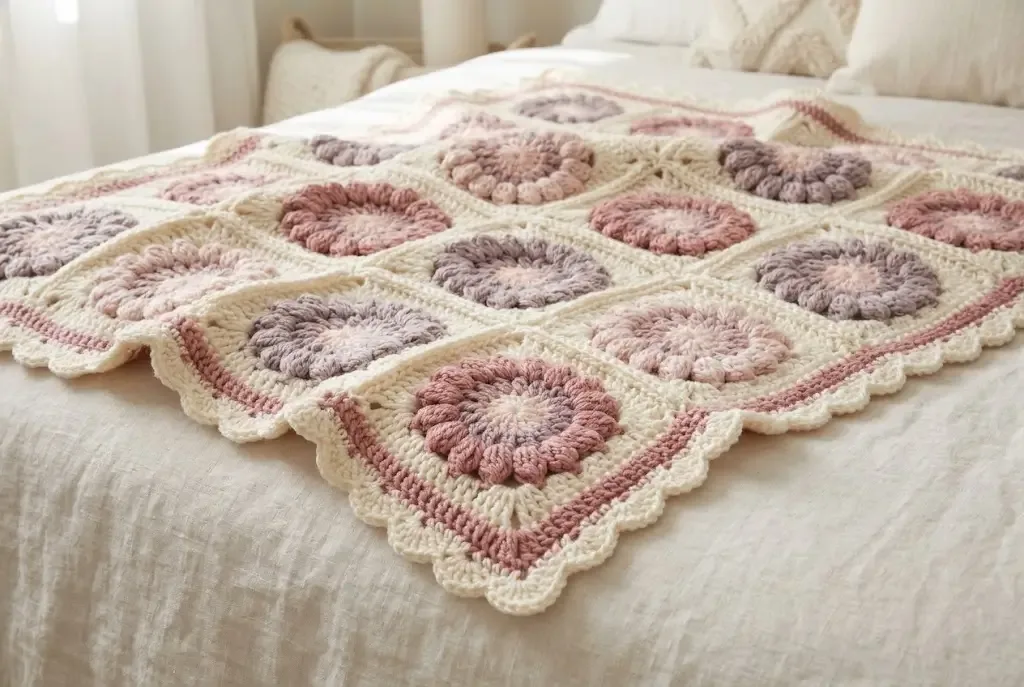
Soft flower centers, quiet vintage color, and a creamy scalloped frame give the Rosy Heirloom Motif Blanket the feeling of a treasured nursery piece. Each motif begins as a round puff-stitch bloom, becomes a neat square, and joins into a portable project that is as lovely to make as it is to give.
A flower blanket with heirloom character
The Rosy Heirloom Motif Blanket balances decorative crochet with an approachable repeat. Small projects travel easily, color changes happen in short rounds, and the cream outer rounds make even varied flower centers feel calm and connected. The finished blanket works beautifully as a nursery accent, stroller layer, lap blanket, or handmade shower gift.
The pattern uses US crochet terminology. It is rated easy to intermediate: the basic stitches are familiar, while puff stitches, round-to-square shaping, consistent blocking, and tidy assembly add just enough technique to keep the project interesting.
Finished measurements and gauge
The featured blanket uses 20 motifs arranged 4 motifs across × 5 motifs long and measures approximately 28 × 34 in (71 × 86 cm) after joining, bordering, and light blocking.
One finished and lightly blocked motif should measure approximately 6.5–7 in (16.5–18 cm) square. Exact gauge is less important than consistency. Make one complete motif first, block it, and use it as the size template for the remaining 19.
The 28 × 34 inch target assumes motifs near the smaller end of the range, a compact flat join, and a modest border. If every square finishes close to 7 inches, expect the completed blanket to be larger. Measure the assembled grid before working the border if the final size matters.
Materials
- MC — cream or soft ivory: approximately 850–950 yd (777–869 m) DK / category 3 yarn for framing, joining, and border
- Color A — dusty rose: approximately 120–150 yd (110–137 m)
- Color B — pale blush: approximately 120–150 yd (110–137 m)
- Color C — misty lavender or taupe-lilac: approximately 120–150 yd (110–137 m)
- 4.0 mm (G-6) crochet hook, or size needed to reach the motif measurement with a soft fabric
- Yarn needle
- Scissors
- Tape measure
- Optional stitch markers, blocking mats, and rustproof pins
Choose a smooth, soft yarn that can tolerate regular washing. DK yarn creates the featured scale and drape. Light worsted yarn can also work, but it will generally produce a larger motif and increase the finished dimensions and yarn requirement.
For the vintage look shown, keep the contrast gentle: creamy ivory, dusty rose, shell pink, muted mauve, and greyed lavender. Bright hot pink or saturated violet will create a livelier blanket, but they will change its quiet heirloom character.
US abbreviations
- ch — chain
- dc — double crochet
- hdc — half double crochet
- MC — main color
- MR — magic ring
- rep — repeat
- rnd — round
- sc — single crochet
- sl st — slip stitch
- sp — space
- st(s) — stitch(es)
- tr — treble crochet
Special stitch: puff
Yarn over, insert the hook in the indicated stitch, and pull up a loop. Repeat that sequence three more times in the same stitch. Yarn over and pull through all loops on the hook, then ch 1 to close the puff.
The closing chain belongs to the puff; do not count it as a separate stitch. Keep each drawn-up loop the same height so all petals have equal fullness.
Motif color plan
Make 20 motifs. The core color order is:
- Round 1: Color A, dusty rose
- Round 2: Color B, pale blush
- Round 3: Color C, misty lavender or taupe-lilac
- Rounds 4–5: MC, cream
For a more varied field, rotate A, B, and C through the first three rounds while preserving the cream frame. Make a written color list before starting and distribute repeated combinations across the 4 × 5 layout rather than clustering them in one area.
Floral round-to-square motif
Round 1: flower center
With Color A, make an MR.
Ch 3; this counts as the first dc. Work 15 dc into the ring. Pull the ring closed and join with a sl st to the top of the beginning ch-3 — 16 dc.
Fasten off.
Round 2: puff petals
Join Color B in any dc. Ch 1; this does not count as a stitch.
Work 1 puff in the same stitch and 1 puff in every remaining stitch around. Join with a sl st to the top of the first puff — 16 puffs.
Fasten off.
Round 3: soft flower ring
Join Color C in any space between two puffs. Ch 2; this counts as the first dc. Work 2 dc in the same space.
Work 3 dc in every remaining space between puffs. Join with a sl st to the top of the beginning ch-2 — 16 groups of 3 dc; 48 dc total.
Fasten off.
Round 4: turn the circle into a square
Join MC in any space between two 3-dc groups.
In the same space, work (3 tr, ch 2, 3 tr) for Corner 1. Work 3 dc in each of the next 3 spaces; work (3 tr, ch 2, 3 tr) in the next space for a corner. Repeat from * twice more, then work 3 dc in each of the final 3 spaces.
Join with a sl st to the top of the first tr. The square has 4 corner ch-2 spaces and 3 side groups between adjacent corner groups.
Fasten off.
Round 5: cream framing round
Join MC in any corner ch-2 space. Ch 1; this does not count as a stitch.
Work (2 sc, ch 2, 2 sc) in the same corner space. Sc in each of the next 15 stitches across the side. Work (2 sc, ch 2, 2 sc) in the next corner space, then sc in each of the next 15 stitches. Repeat from * twice more.
Join with a sl st to the first sc and fasten off. Each side has 19 sc between its two corner ch-2 spaces when the two sc at each end of that side are included.
That 19-stitch distribution is important: it gives every seam the same number of matching stitches and keeps the square frame balanced.
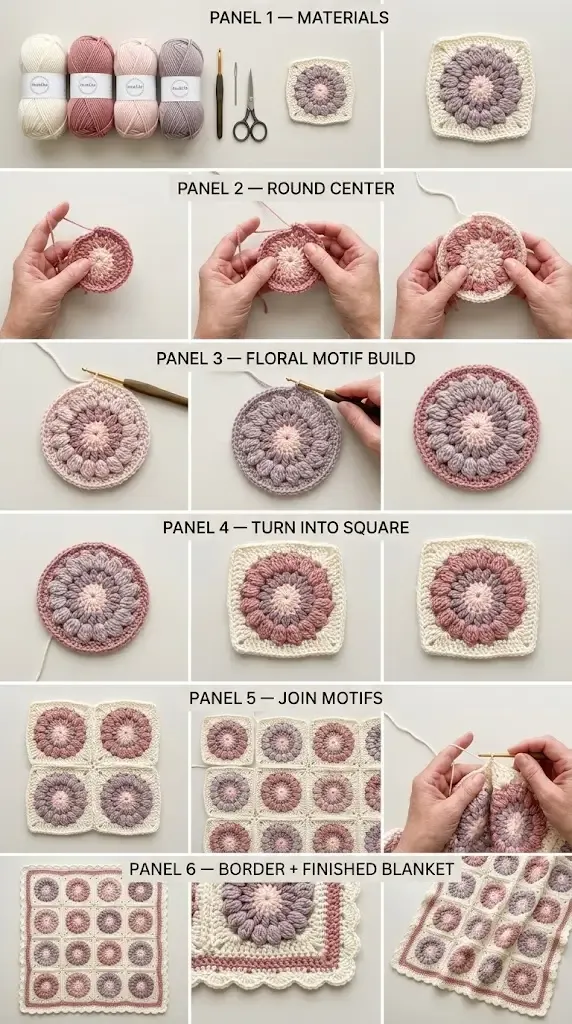
The HookElla construction image shows the order of the project. Use the written stitch counts above for the working pattern.
Block every motif before joining
Weave the center and color-change tails securely, leaving the final cream tail only if you plan to use it for seaming. Lightly dampen or steam each motif according to the yarn label. Pin the square to 6.5–7 inches, keeping all four sides equal and all corners at right angles.
Do not stretch a small motif aggressively to match a large one. If one square differs noticeably, remake it or adjust your hook and tension before producing more. Equal motif dimensions are what allow the seams and border to lie flat.
Arrange the 4 × 5 blanket
Place four motifs across and five down with all right sides facing up. Step back and check the balance of dusty rose, blush, and lavender centers. Photograph or number the arrangement before moving the pieces.
Align every Round 5 corner with the corresponding corner on its neighbor. All joins should run from one corner ch-2 space to the next and match the 19 edge stitches one for one. Never ease extra stitches into a seam; that introduces ripples.
Join the motifs
Use MC cream for either method. Joining with the same color as Round 5 preserves the pale framed-motif effect.
Option 1: easy whipstitch join
Place two motifs side by side with right sides facing up. Thread the needle with a comfortable length of MC. Starting in the paired corner spaces, whipstitch through the matching inner loops of the 19 sc along both edges, then secure the seam in the paired corner spaces at the other end.
Join four motifs into each horizontal row, then join the five rows together. Keep the sewing tension relaxed enough that the seam remains the same length as an unjoined motif edge.
Option 2: flat slip-stitch join
Hold two motifs with wrong sides together. With MC and the hook, slip stitch through matching outer loops along the aligned edges. Use one slip stitch for each pair of sc and work carefully at both corner spaces. This creates a slim decorative ridge on the right side.
Reinforce the four-motif intersections
Where four corners meet, pass the joining yarn through the adjacent corner spaces once, then secure it without pulling the junction closed. The center should meet neatly with no hole, but over-tightening will pucker the four surrounding squares.
Lay the completed grid flat before beginning the border. If a seam draws inward, reopen that section and loosen it; border rounds cannot correct a tight join.
Four-round blanket border
Work joined rounds with the right side facing. Because side-edge counts can vary slightly with joining method and tension, the foundation round is placed evenly rather than forced to an arbitrary fixed number. Mark each true blanket corner and check after every round that the fabric lies flat.
Border Round 1: cream foundation
Join MC in any outer blanket corner. Ch 1; this does not count as a stitch.
Work sc evenly around the entire blanket, placing 1 sc in each exposed Round 5 sc. At each motif junction along an outer edge, work cleanly across the meeting point without adding extra stitches into the seam. In each of the four true blanket corner ch-2 spaces, work (sc, ch 2, sc).
Join with a sl st to the first sc.
Pause and spread the blanket flat. If the edge waves, remove excess pickup stitches at motif junctions. If it pulls inward, add a stitch at evenly spaced junctions.
Border Round 2: rosy accent
Join Color A or Color C in any corner space. Ch 2; this does not count as a stitch.
Hdc in each stitch around. In every corner ch-2 space, work (2 hdc, ch 2, 2 hdc). Join with a sl st to the first hdc and fasten off.
Border Round 3: cream stabilizing round
Join MC in any corner space. Ch 1; this does not count as a stitch.
Sc in each stitch around. In every corner ch-2 space, work (sc, ch 2, sc). Join with a sl st to the first sc. Do not fasten off.
Border Round 4: cream scallops
Ch 1. Treat the corner ch-2 spaces as the centers of the four corner shells. Work 7 dc in the first corner space, skip the next 2 stitches, and sc in the following stitch. Across the side, repeat: skip 2 stitches, work 5 dc in the next stitch, skip 2 stitches, sc in the next stitch. Adjust the final gap if necessary so an sc anchor sits before the next corner; work 7 dc in that corner space, then continue in the same manner around the blanket.
The regular side repeat uses six stitches from one sc anchor to the next. An assembled edge may not contain a perfect multiple because the pickup count reflects your gauge and join. Near a corner, skip 1 or 3 stitches instead of 2 when needed to place the anchor and center the 7-dc shell in the corner space. Mirror visible adjustments on the opposite side. This is more reliable than forcing the repeat and letting the edge ruffle.
Join with a sl st to the first sc, fasten off, and weave in the tail.
Finishing and blocking
Weave every end through several stitches on the wrong side, reverse direction once, and trim only after the fabric is relaxed. Follow the yarn label to wash or dampen the blanket, then lay it flat.
Square the motif grid, straighten the seams, and gently shape every scallop. Do not pull the shells into sharp points; the intended edge is softly rounded. Allow the blanket to dry completely before measuring.
For a gift, add a simple care card with the fiber content and laundering instructions. The blanket pairs naturally with HookElla’s Teddy-Ear Crochet Baby Hat or Even Moss Baby Sweater for a coordinated handmade set.
Troubleshooting
- The flower center cups: Lengthen the loops in the puffs slightly, loosen Round 3, or move up one hook size for the motif.
- The flower center waves: Tighten the puffs or Round 3. Confirm that there are exactly 16 puffs and 16 three-dc groups.
- Round 4 does not form four equal sides: Each corner must occupy every fourth space, with exactly three 3-dc groups between corners.
- The cream frame is uneven: Count 15 stitches between corner spaces before working Round 5. Each finished edge should have 19 sc when its corner stitches are included.
- Joined motifs pucker: Loosen the seam and verify that all 19 sc are matched one for one.
- There is a hole where four motifs meet: Reinforce the corner spaces with one relaxed pass of MC. Do not cinch hard.
- The border waves: Remove pickup stitches from Border Round 1 or increase one scallop gap. Blocking will not permanently fix excess edge circumference.
- The border cups inward: Add foundation stitches at evenly spaced motif junctions or shorten an occasional scallop gap.
Resizing the blanket
Add complete motifs to change the size while keeping the same joining and border method:
- 4 × 5 motifs: 20 motifs, approximately 28 × 34 in baby/lap size
- 5 × 6 motifs: 30 motifs, larger stroller or toddler size
- 6 × 7 motifs: 42 motifs, throw size
For a reliable estimate, multiply your blocked motif width by the number of motifs across and your motif height by the number of motifs down, then add the measured width of the border on both sides.
Estimate yarn by area: multiply the featured yardage by new blanket area ÷ featured blanket area, then add at least 10% for color balance, joining, border adjustments, and swatching. Buy extra MC because every square frame, seam, and border uses cream.
For another delicate nursery texture, make the Evelyn Crochet Baby Blanket. If you enjoy joining individual shapes into a larger design, the 3D Crochet Cube Blanket offers a geometric alternative. Browse the Baby Crochet collection for more handmade gift projects.
The Rosy Heirloom Motif Blanket is built one small bloom at a time, but the cream frames and scalloped border bring every color into one graceful composition. Take care with motif size and seams, and the finished blanket will feel polished, soft, and worthy of being passed along.
Helpful questions
Is the Rosy Heirloom Motif Blanket an original HookElla pattern?
Yes. This is an original HookElla pattern developed from the supplied visual inspiration, with complete stitch counts, motif construction, joining guidance, and border instructions written for this project.
How large is the finished blanket?
Twenty motifs arranged four across by five down make an approximately 28 × 34 inch or 71 × 86 cm baby or lap blanket after joining and adding the border. Yarn, tension, blocking, and the exact motif size can change the result.
How many motifs do I need?
Make 20 motifs for the featured size. Use 30 motifs in a 5 × 6 layout for a larger stroller or toddler blanket, or 42 motifs in a 6 × 7 layout for a throw.
Can I use light worsted yarn instead of DK?
Yes. Keep one yarn weight consistent throughout, choose a hook that creates supple fabric, and block a complete motif before committing. Light worsted yarn will usually make a larger, heavier blanket and may require more yarn.
Do the puff-closing chains count as separate stitches?
No. The chain 1 closes each puff and is part of that puff stitch. Round 2 still contains 16 puffs, one in every double crochet from Round 1.
Why are all motifs blocked before joining?
Equal squares produce straight seams, matching corner points, and a flat blanket. Joining motifs of different sizes can make the grid pucker even when each individual motif looks acceptable.
What if the final scallops do not fit a side exactly?
Adjust one or two gaps near the corner by skipping one more or one fewer stitch. The shell rhythm should remain visually even, but keeping the border flat is more important than forcing an exact repeat into a side-edge count affected by gauge and joining.
Is this blanket suitable as a baby gift?
Yes. Choose washable baby-safe yarn, secure every end, avoid loose embellishments, and include the yarn-care instructions. The finished blanket should always be used with age-appropriate sleep-safety guidance.